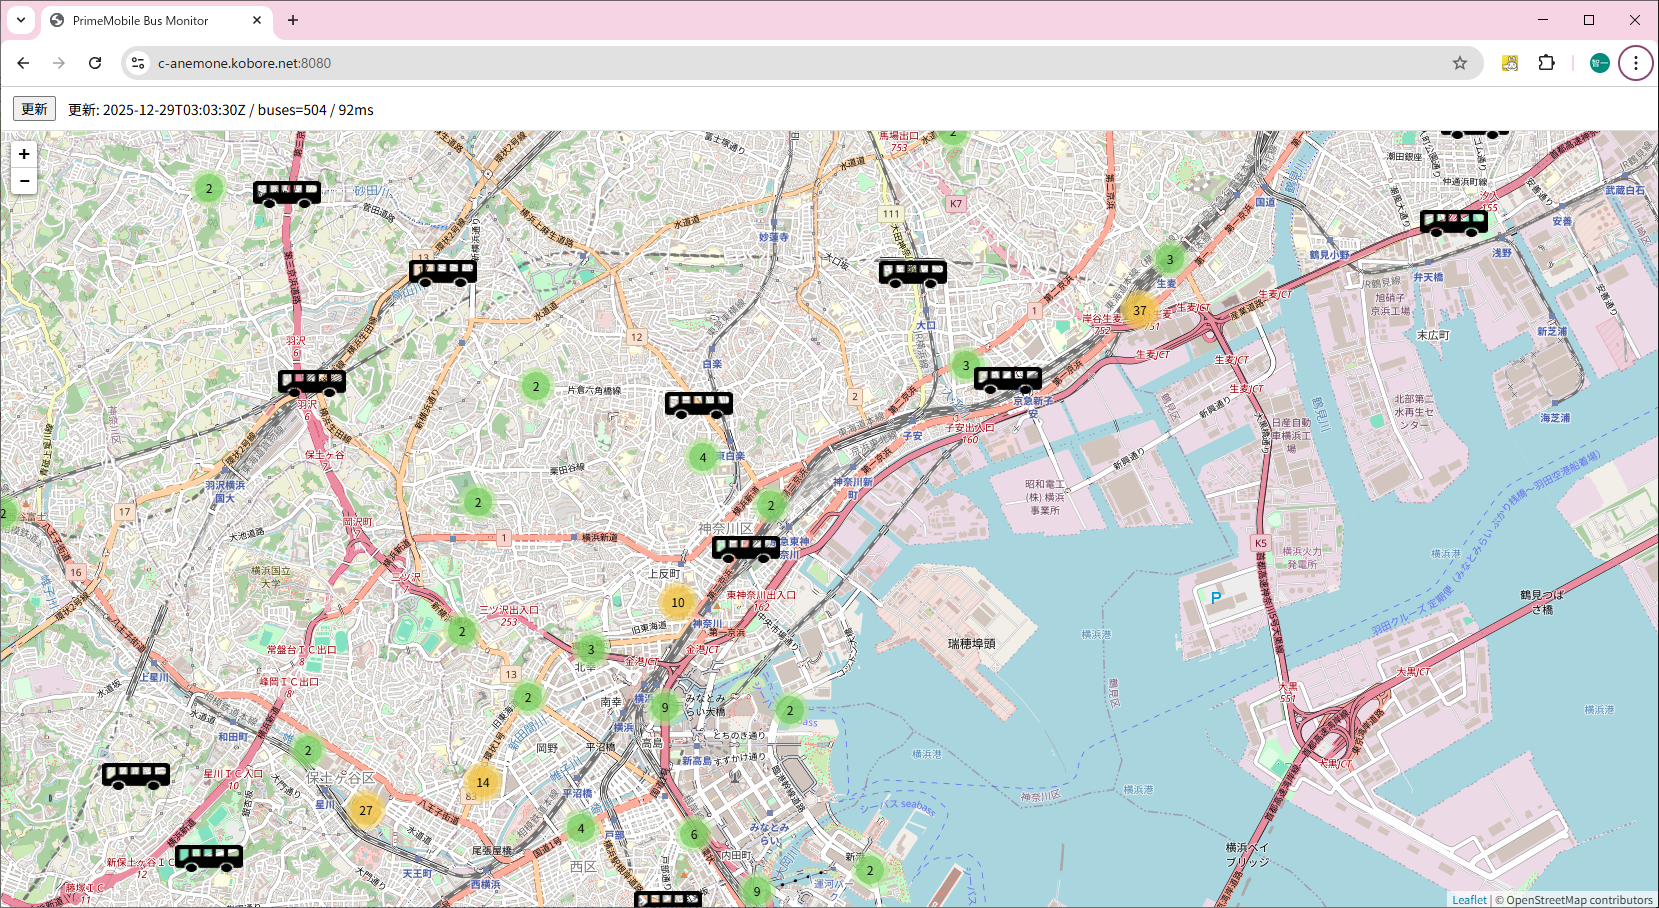
公共交通オープンデータセンタを通じて横浜市交通局が提供しているバスのリアルタイム情報を用いたバス位置把握システムについて、昨夜、全面的な改修を行いました。
これまで、本システムには「ユーザごとに表示内容が異なる」という問題がありました。そこで、バスのリアルタイム位置情報の収集処理をサーバ側に集約し、クライアント側は表示機能のみを担う構成へと変更しました。現在、この仕組みはサーバ化されています。
つきましては、過負荷テストを実施したく、皆様のご協力をお願いできればと思います。
ここ↓をクリックするだけです(お1人、1回で結構です)。
下記のような画面がでてきたら、拡大や縮小させて見て下さい。30秒毎に画面が自動更新されます。
(出てこない場合は、サーバが落ちたということになります。ご容赦下さい)。

「Protocol Buffersって何? 」から、「公共交通オープンデータ」を攻略する
横浜市交通局 バス停情報のJSONパーサー
横浜市交通局 バス路線情報の取得方法 golangによるJSONパーサー
[ubuntu:~/yoko_bus/PruneMobile$more index.html]
<!DOCTYPE html>
<html lang="ja">
<head>
  <meta charset="utf-8" />
  <title>PrimeMobile Bus Monitor</title>

  <link rel="stylesheet"
        href="https://cdnjs.cloudflare.com/ajax/libs/leaflet/1.0.0-beta.2.rc.2/leaflet.css" />
  <script src="https://cdnjs.cloudflare.com/ajax/libs/leaflet/1.0.0-beta.2.rc.2/leaflet.js"></script>

  <!-- ★クラスタリング(以前の方式) -->
  <script src="scripts/PruneCluster.js"></script>

  <link rel="stylesheet" href="styles/style.css" />

  <style>
    html, body { height: 100%; margin: 0; }
    #bar {
      height: 44px;
      display: flex;
      align-items: center;
      gap: 12px;
      padding: 0 12px;
      border-bottom: 1px solid #ddd;
      font-family: sans-serif;
      font-size: 14px;
      box-sizing: border-box;
    }
    #map { height: calc(100% - 44px); }
  </style>
</head>

<body>
  <div id="bar">
    <button id="reload" type="button">更新</button>
    <span id="status">起動中…</span>
  </div>

  <div id="map"></div>

  <script>
    const UPDATE_INTERVAL_MS = 30000;
    const API_BUSES = "/api/buses";

    const statusEl = document.getElementById("status");
    const reloadBtn = document.getElementById("reload");

    function setStatus(s) {
      statusEl.textContent = s;
    }

    // ★ ISO8601(UTC) → JST 表示
    function fmtTimeJST(iso) {
      if (!iso) return "";
      const d = new Date(iso);
      if (isNaN(d.getTime())) return String(iso);
      return d.toLocaleString("ja-JP", { timeZone: "Asia/Tokyo" });
    }

    // 地図
    const map = L.map("map", { zoomControl: true }).setView([35.45, 139.63], 12);
    L.tileLayer("https://{s}.tile.openstreetmap.org/{z}/{x}/{y}.png", {
      maxZoom: 19,
      attribution: "© OpenStreetMap contributors"
    }).addTo(map);

    // バスアイコン
    const busIcon = L.icon({
      iconUrl: "images/bus-icon.png",
      iconSize: [68, 27],
      iconAnchor: [34, 13]
    });

    // ★PruneCluster
    const leafletView = new PruneClusterForLeaflet(120, 20);
    map.addLayer(leafletView);

    leafletView.BuildLeafletMarker = function (marker, position) {
      const m = new L.Marker(position, { icon: busIcon });
      if (marker.data && marker.data.popup) {
        m.bindPopup(marker.data.popup);
      }
      return m;
    };

    // bus_id -> { marker, lastSeenUnix }
    const busMarkers = new Map();

    function fmtTime(iso) {
      if (!iso) return "";
      const d = new Date(iso);
      if (isNaN(d.getTime())) return String(iso);
      return d.toLocaleString("ja-JP", { timeZone: "Asia/Tokyo" });
    }

    function upsertBus(b) {
      const id = b.id;
      const lat = b.lat;
      const lng = b.lon;
      const lastSeenUnix = (typeof b.last_seen_unix === "number")
        ? b.last_seen_unix
        : Math.floor(Date.now() / 1000);

      let ent = busMarkers.get(id);

      const popup =
        "BUS " + id +
        (b.trip_id ? ("<br>trip: " + b.trip_id) : "") +
        (b.last_seen ? ("<br>last: " + fmtTime(b.last_seen)) : "");

      if (!ent) {
        const pm = new PruneCluster.Marker(lat, lng, { popup: popup });
        leafletView.RegisterMarker(pm);
        busMarkers.set(id, { marker: pm, lastSeenUnix: lastSeenUnix });
      } else {
        ent.marker.position.lat = lat;
        ent.marker.position.lng = lng;
        ent.marker.data.popup = popup;
        ent.lastSeenUnix = lastSeenUnix;
      }
    }

    // 古い車両を削除
    const STALE_SEC = 120;

    function gcStale() {
      const now = Math.floor(Date.now() / 1000);
      const removeList = [];
      for (const [id, ent] of busMarkers.entries()) {
        if (now - ent.lastSeenUnix > STALE_SEC) {
          removeList.push(ent.marker);
          busMarkers.delete(id);
        }
      }
      if (removeList.length > 0) {
        leafletView.RemoveMarkers(removeList);
      }
    }

    async function fetchBuses() {
      const t0 = Date.now();
      try {
        const r = await fetch(API_BUSES + "?ts=" + t0, { cache: "no-store" });
        if (!r.ok) throw new Error("HTTP " + r.status);

        const j = await r.json();
        if (!j || !Array.isArray(j.buses)) throw new Error("invalid json");

        for (const b of j.buses) {
          if (typeof b.id !== "number") continue;
          if (typeof b.lat !== "number") continue;
          if (typeof b.lon !== "number") continue;
          upsertBus(b);
        }

        gcStale();

        const dt = Date.now() - t0;
        setStatus(
          "更新: " + fmtTimeJST(j.ts) +
          " / buses=" + j.buses.length +
          " / " + dt + "ms"
        );
      } catch (e) {
        setStatus("更新失敗: " + e);
      }
    }

    reloadBtn.addEventListener("click", fetchBuses);

    fetchBuses();
    setInterval(fetchBuses, UPDATE_INTERVAL_MS);

    setInterval(function () {
      leafletView.ProcessView();
    }, 1000);
  </script>
</body>
</html>
[ubuntu:~/yoko_bus/PruneMobile$more server.py]
/*
再現シミュレーション用のサーバプログラム

// server.go
*/
package main

import (
	"flag"
	"fmt"
	"log"
	"m/routing"
	"math"
	"net/http"
	"net/http/httputil"
	"net/url"
	"os"
	"sync"
	"time"

	"github.com/gorilla/websocket"
)

var clients = make(map[*websocket.Conn]bool) // 接続されるクライアント

type key struct {
	*websocket.Conn
	id  int
	att string
}

// 配列宣言
var m1 = make(map[key]int) // このm1は、mmapと異なるクライアント(Webブラウザ単位のMap)

// Ebata: m1保護用のミューテックス
var m1Mutex sync.RWMutex

// ChartData
type ChartData struct {
	UserCnt int `json:"user_cnt"`
	JoinCnt int `json:"join_cnt"`
}

var addr = flag.String("addr", ":8080", "http service address") // テスト

var upgrader = websocket.Upgrader{
	CheckOrigin: func(r *http.Request) bool { return true },
} // use default options

var chan2_1 = make(chan routing.LocMessage)
var chan2_2 = make(chan routing.LocMessage)

// chan2_1用のミューテックス
var mutex sync.Mutex

// Enata: map保護用のミューテックス
var mmapMutex sync.RWMutex

//// Ebata: json read write用のmutex
var rwMutex sync.Mutex

// 2次元配列: 変数名は暫定。元々はmmと呼称。
var mmap = map[int]routing.LocMessage{}

// ----------------------
// 追加:gtfs_hub の /api/buses をプロキシ
// ----------------------
func apiBusesProxy() http.Handler {
	hubURLStr := os.Getenv("GTFS_HUB_URL")
	if hubURLStr == "" {
		hubURLStr = "http://127.0.0.1:18081"
	}
	target, err := url.Parse(hubURLStr)
	if err != nil {
		log.Fatalf("bad GTFS_HUB_URL: %v", err)
	}

	proxy := httputil.NewSingleHostReverseProxy(target)
	origDirector := proxy.Director
	proxy.Director = func(r *http.Request) {
		origDirector(r)
		r.URL.Path = "/api/buses"
		// クエリは維持(ts=... など)
	}
	proxy.ModifyResponse = func(resp *http.Response) error {
		resp.Header.Set("Cache-Control", "no-store")
		return nil
	}
	proxy.ErrorHandler = func(w http.ResponseWriter, r *http.Request, e error) {
		http.Error(w, "proxy error: "+e.Error(), http.StatusBadGateway)
	}
	return proxy
}

func echo2(w http.ResponseWriter, r *http.Request) { // 下からの受けつけ(e.g. Simulator/Hub)
	webConn, err := upgrader.Upgrade(w, r, nil) // cはサーバのコネクション
	if err != nil {
		log.Print("upgrade:", err)
		return
	}
	defer webConn.Close()

	for {
		locMsg := new(routing.LocMessage)

		err := webConn.ReadJSON(&locMsg) // クライアントからのメッセージの受信
		if err != nil {
			log.Println("74: read:", err)
			return // Readロック解除の為、goroutineの強制終了
		}

		mutex.Lock()         // chan2_1を守るミューテックス
		chan2_1 <- *locMsg   // here -> pub
		locMsg2 := <-chan2_1 // pub -> here
		mutex.Unlock()

		err = webConn.WriteJSON(locMsg2) // here -> bike, person
		if err != nil {
			log.Println("write:", err)
			return // Writeロック解除の為、goroutineの強制終了
		}

	}
}

func pub() {

	serialId := 1 // 表示マーカー区別用の通番の初期値

	for { // 番号の対応付け直しを行っている

		locMsg := <-chan2_1 // echo2(下) -> here
		if locMsg.ID == -1 {
			locMsg.ID = serialId
			serialId += 1 // 表示マーカー区別用の通番のインクリメント
		}

		mmapMutex.Lock() // map mmap のロック

		/// グローバルマップの作成(ここから)
		_, isThere := mmap[locMsg.ID]

		if isThere && (math.Abs(locMsg.Lat) > 90.0 || math.Abs(locMsg.Lng) > 180.0) { // レコードが存在して、ありえない座標が投入されたら
			delete(mmap, locMsg.ID) // レコードを削除して終了する

		} else if !isThere { // もしレコードが存在しなければ(新しいIDであれば)
			mmap[locMsg.ID] = locMsg // レコードを追加する

		} else { //レコードが存在すれば、要素を書き換える
			mmap[locMsg.ID] = locMsg // レコードの内容を変更する
		}
		/// グローバルマップの作成(ここまで)

		mmapMutex.Unlock() // map mmap のアンロック

		chan2_1 <- locMsg // here -> echo2(下)
		chan2_2 <- locMsg // here -> echo(上)
	}
}

// UI側(上)とのやり取り
func echo(w http.ResponseWriter, r *http.Request) { // JavaScriptとの通信
	webConn, err := upgrader.Upgrade(w, r, nil)
	if err != nil {
		log.Println("websocket connection err:", err)
		return
	}
	defer webConn.Close()

	// クライアントを新しく登録(だけ)
	m1Mutex.Lock()
	clients[webConn] = true
	m1Mutex.Unlock()

	for {
		fmt.Print(time.Now())
		fmt.Print(" 223 ")
		fmt.Println(clients)

		locMsg := new(routing.LocMessage)
		locMsg2 := new(routing.LocMessage)

		*locMsg = <-chan2_2

		var delete_client *websocket.Conn

		for client := range clients { // 全部のクライアントのサーチ

			delete_client = nil

			fmt.Println("231 ")
			// 変数を使って、キーの存在を確認する
			m1Mutex.Lock()
			value, ok := m1[key{client, locMsg.ID, locMsg.TYPE}]
			m1Mutex.Unlock()
			fmt.Println("236")

			if ok && (math.Abs(locMsg.Lat) > 90.0 || math.Abs(locMsg.Lng) > 180.0) { // レコードが存在して、ありえない座標が投入されたら
				fmt.Println("enter 1")
				fmt.Println("240")
				tmpId := locMsg.ID
				locMsg.ID = value

				fmt.Println("1:locMsg:", locMsg)

				rwMutex.Lock()

				err = client.WriteJSON(&locMsg)
				if err != nil {
					delete_client = client
				}
				err = client.ReadJSON(&locMsg2)
				if err != nil {
					delete_client = client
				}

				rwMutex.Unlock()

				m1Mutex.Lock()
				delete(m1, key{delete_client, tmpId, locMsg.TYPE})
				m1Mutex.Unlock()

				fmt.Println("1:locMsg2:", locMsg2)

			} else if !ok { // もしレコードが存在しなければ(新しいIDであれば)
				fmt.Println("enter 2")

				tmpId := locMsg.ID
				locMsg.ID = -1 // 空番号

				fmt.Println("2:locMsg:", locMsg)

				rwMutex.Lock()

				err = client.WriteJSON(&locMsg)
				if err != nil {
					delete_client = client
				}
				err = client.ReadJSON(&locMsg2)
				if err != nil {
					delete_client = client
				}

				rwMutex.Unlock()

				fmt.Println("2:locMsg2:", locMsg2)

				pm_id := locMsg2.ID
				_ = pm_id

				time.Sleep(time.Millisecond * 10)

				m1Mutex.Lock()
				m1[key{client, tmpId, locMsg.TYPE}] = locMsg2.ID
				m1Mutex.Unlock()

			} else { //レコードが存在すれば、その値を使ってアイコンを動かす

				locMsg.ID = value

				rwMutex.Lock()
				err = client.WriteJSON(&locMsg)
				if err != nil {
					delete_client = client
				}
				client.ReadJSON(&locMsg2)
				if err != nil {
					delete_client = client
				}
				rwMutex.Unlock()
			}

		}

		if delete_client != nil {
			fmt.Println("delete_client")
			delete_client.Close()
			delete(clients, delete_client)
		}
	}
}

func echo3(w http.ResponseWriter, r *http.Request) {

	fmt.Println("             Echo3() is starting..........")

	upgrader.CheckOrigin = func(r *http.Request) bool { return true }

	conn2, err := upgrader.Upgrade(w, r, nil) //conn2でwebsocketを作成
	if err != nil {
		log.Println("websocket connection err:", err)
		return
	}
	defer conn2.Close()

	for {

		chart := new(ChartData)
		joinCnt := 0

		mmapMutex.Lock()

		chart.UserCnt = len(mmap)

		for _, v := range mmap {
			dis, _ := routing.DistanceKm(v.Lng, v.Lat, 139.69978753816494, 35.664114318726675) // 北谷公園
			fmt.Println("dis:", dis)
			if dis < 0.10 { //100メートルに入ったらカウント
				joinCnt += 1
			}
		}

		mmapMutex.Unlock()

		chart.JoinCnt = joinCnt

		err := conn2.WriteJSON(&chart)
		if err != nil {
			log.Println("WriteJSON:", err)
			break
		}
		fmt.Println("echo3:", chart)
		time.Sleep(time.Second * 1)
	}
}

func main() {

	flag.Parse()
	log.SetFlags(0)

	log.Println(routing.LiPoint)
	go pub()

	// 追加:/api/buses を先に登録("/"より前)
	http.Handle("/api/buses", apiBusesProxy())

	// アクセスされたURLから /static 部分を取り除いてハンドリングする
	http.Handle("/", http.FileServer(http.Dir(".")))

	http.HandleFunc("/echo3", echo3)
	http.HandleFunc("/echo2", echo2)
	http.HandleFunc("/echo", echo)

	log.Fatal(http.ListenAndServeTLS(*addr, "./fullchain.pem", "./privkey.pem", nil))
}
[ubuntu:~/yoko_bus/gtfs$ more gtfs_hub.go]
// https://gtfs.org/realtime/language-bindings/golang/

package main

import (
	"encoding/json"
	"flag"
	"log"
	"net/http"
	"strconv"
	"sync"
	"time"

	"github.com/MobilityData/gtfs-realtime-bindings/golang/gtfs"
	proto "github.com/golang/protobuf/proto"
)

var (
	// GTFS-RT取得周期(現状踏襲:30秒)
	pollInterval = 30 * time.Second

	// HTTPサーバ(server.go から http://127.0.0.1:18081/api/buses へプロキシする)
	httpAddr = flag.String("http", "127.0.0.1:18081", "http listen addr for /api/buses")

	// ODPT(現行コードのURLを踏襲)
	gtfsURL = flag.String("url",
		"https://api.odpt.org/api/v4/gtfs/realtime/YokohamaMunicipalBus_vehicle?acl:consumerKey=f4954c3814b207512d8fe4bf10f79f0dc44050f1654f5781dc94c4991a574bf3",
		"gtfs realtime url",
	)
)

// ---- 返却JSON ----
type Bus struct {
	ID           int     `json:"id"`
	Lat          float64 `json:"lat"`
	Lon          float64 `json:"lon"`
	TripID       string  `json:"trip_id,omitempty"`
	Bearing      float32 `json:"bearing,omitempty"`
	Speed        float32 `json:"speed,omitempty"`
	LastSeen     string  `json:"last_seen"`
	LastSeenUnix int64   `json:"last_seen_unix"`
}

type BusesResponse struct {
	TS   string `json:"ts"`
	Buses []Bus `json:"buses"`
}

// ---- 内部保持 ----
type hubState struct {
	mu    sync.RWMutex
	ts    time.Time
	buses map[int]Bus
}

var st = hubState{
	ts:    time.Time{},
	buses: map[int]Bus{},
}

func main() {
	flag.Parse()
	log.SetFlags(0)

	// HTTP
	http.HandleFunc("/api/buses", handleAPIBuses)
	go func() {
		log.Printf("gtfs_hub http listening on %s", *httpAddr)
		log.Fatal(http.ListenAndServe(*httpAddr, nil))
	}()

	// Poll
	for {
		pollOnce()
		time.Sleep(pollInterval)
	}
}

func handleAPIBuses(w http.ResponseWriter, r *http.Request) {
	w.Header().Set("Content-Type", "application/json; charset=utf-8")
	w.Header().Set("Cache-Control", "no-store")

	st.mu.RLock()
	defer st.mu.RUnlock()

	out := BusesResponse{
		TS:   st.ts.Format(time.RFC3339),
		Buses: make([]Bus, 0, len(st.buses)),
	}
	for _, b := range st.buses {
		out.Buses = append(out.Buses, b)
	}

	enc := json.NewEncoder(w)
	enc.SetEscapeHTML(false)
	_ = enc.Encode(out)
}

func pollOnce() {
	client := &http.Client{Timeout: 15 * time.Second}
	req, err := http.NewRequest("GET", *gtfsURL, nil)
	if err != nil {
		log.Println("new request:", err)
		return
	}

	// ODPT(横浜市営バス)では不要とのことなので、ダミーを踏襲
	req.SetBasicAuth("xx@gmail.com", "xx")

	resp, err := client.Do(req)
	if err != nil {
		log.Println("http do:", err)
		return
	}
	defer resp.Body.Close()

	if resp.StatusCode/100 != 2 {
		log.Println("bad status:", resp.Status)
		return
	}

	feed := gtfs.FeedMessage{}
	body, err := readAll(resp)
	if err != nil {
		log.Println("read:", err)
		return
	}
	if err := proto.Unmarshal(body, &feed); err != nil {
		log.Println("proto unmarshal:", err)
		return
	}

	now := time.Now()

	next := map[int]Bus{}

	for _, entity := range feed.Entity {
		if entity == nil || entity.Vehicle == nil || entity.Vehicle.Vehicle == nil || entity.Vehicle.Position == nil {
			continue
		}

		// vehicle.id
		vidStr := entity.Vehicle.Vehicle.Id
		if vidStr == nil {
			continue
		}
		vid, err := strconv.Atoi(*vidStr)
		if err != nil {
			continue
		}

		latp := entity.Vehicle.Position.Latitude
		lonp := entity.Vehicle.Position.Longitude
		if latp == nil || lonp == nil {
			continue
		}

		b := Bus{
			ID:           vid,
			Lat:          float64(*latp),
			Lon:          float64(*lonp),
			LastSeen:     now.Format(time.RFC3339),
			LastSeenUnix: now.Unix(),
		}

		// trip_id
		if entity.Vehicle.Trip != nil && entity.Vehicle.Trip.TripId != nil {
			b.TripID = *entity.Vehicle.Trip.TripId
		}

		// bearing / speed(入っていれば)
		if entity.Vehicle.Position.Bearing != nil {
			b.Bearing = *entity.Vehicle.Position.Bearing
		}
		if entity.Vehicle.Position.Speed != nil {
			b.Speed = *entity.Vehicle.Position.Speed
		}

		next[vid] = b
	}

	st.mu.Lock()
	st.ts = now
	st.buses = next
	st.mu.Unlock()

	log.Printf("polled: buses=%d at %s", len(next), now.Format(time.RFC3339))
}

func readAll(resp *http.Response) ([]byte, error) {
	// Go1.17+ なら io.ReadAll でよいが、環境差を避けるため手書きしないで最小にする
	// (標準の io.ReadAll が使えるならそちらに置換してもよい)
	type reader interface{ Read([]byte) (int, error) }
	b := make([]byte, 0, 1<<20)
	tmp := make([]byte, 32*1024)
	for {
		n, err := resp.Body.Read(tmp)
		if n > 0 {
			b = append(b, tmp[:n]...)
		}
		if err != nil {
			if err.Error() == "EOF" {
				return b, nil
			}
			return b, err
		}
	}
}
[実行方法]
cd PrumeMobile
go run server.go

cd ..
cd gtfs
go run gtfs_hub.go

