http://mstc.or.jp/faop/committee/11b4d681d4059ef7fed08409b8b34e1f2c1c4029.PDF
nxdlink_lua
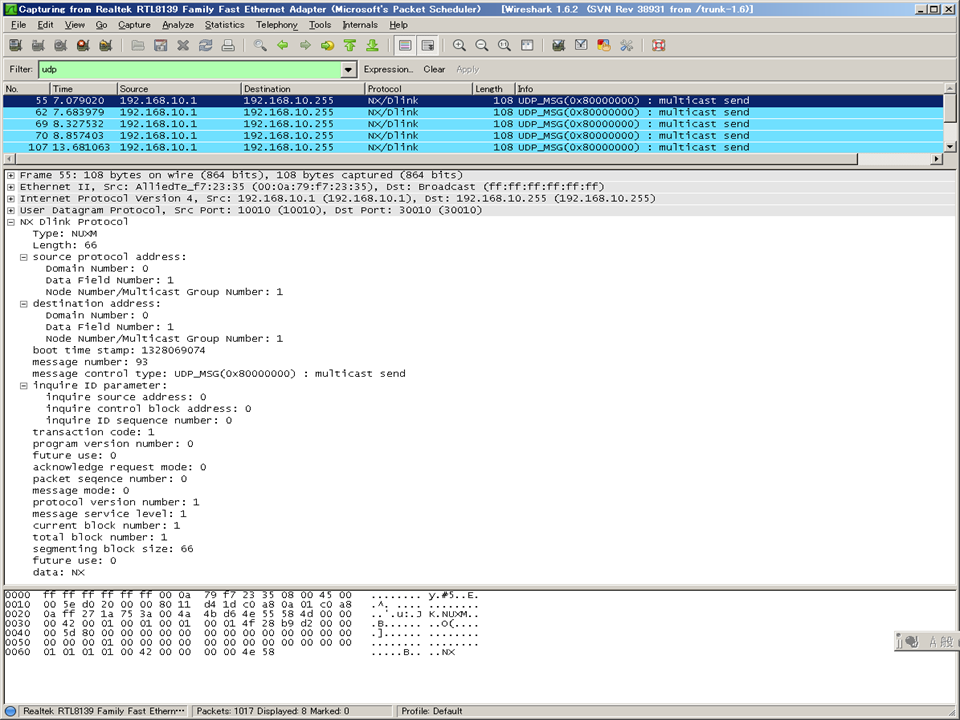
--[[ Wireshark用 NX/Dlinkプロトコル解析プログラム
 	       			      	ver0.03	  2012年2月16日
 	       			      	ver0.02	  2012年2月10日
 	       			      	ver0.01	  2012年2月1日

						  江端智一
使用条件
 	    絶対的な意味において無保証

History
   Ver 0.03	重複登録を一応回避

   Ver 0.02	TCP/UDPデータに"NUXM"があったら、送信ポート番号を調べて
       		動的にDissectorをWiresharkに登録するようにした

   Ver 0.01	とりあえず動作確認のみ
		udpポート番号が特定の値に固定されている
		フィールドの位置がズレている可能性あり

使い方
 (Step.1)	c:/Program Files/Wireshark/init.lua の一部を書き換え

	(a)	disable_lua = true; do return end;
 			     ↓
		-- disable_lua = true; do return end;

	(b)	run_user_scripts_when_superuser = false
  			     ↓
		run_user_scripts_when_superuser = true

	(c)	最終行に 以下の一行を追加
		"init.lua"と同じディレクトリに置く
		dofile("nxdlink.lua")

 (Step.2)	このファイルを c:/Program Files/Wireshark/ に
 		"nxdlink.lua"という名前で保存
]]

do
    nxdlink_proto = Proto("NXDlink", "nxdlink protocol dissector")


    nxdlink_proto.dissector = function(buffer, pinfo, tree)

       -- nexus header type : "NUXM"
       local    hd_h_type_range = buffer(0,4)
       local    hd_h_type = hd_h_type_range:string()

       -- message length ( 16K + 64 )
       local 	hd_ml_range = buffer(4,4)
       local    hd_ml = hd_ml_range:uint()

       -- source protocol address
       local	hd_sa_range = buffer(8,4)
       local	hd_sa = hd_sa_range:uint()

       -- destination address
       local 	hd_da_range = buffer(12,4)
       local 	hd_da = hd_da_range:uint()

       -- boot time stamp
       local 	hd_v_seq_range = buffer(16,4)
       local 	hd_v_seq = hd_v_seq_range:uint()

       -- message number
       local    hd_seq_range = buffer(20,4)
       local    hd_seq = hd_seq_range:uint()

       --[[ /* message control type		*/
         			/* UDP_MSG : multicast send	*/
				/* UDP_INQ : multicast inquire	*/
				/* UDP_NIQ : multicast Ninquire	*/
				/* TCP_MSG : peer send		*/
				/* TCP_INQ : peer inquire	*/
				/* TCP_RPL : peer reply		*/]]

       local	hd_m_ctl_range = buffer(24,4)
       local	hd_m_ctl = hd_m_ctl_range:uint()

       local    control_type  = {
            [0x80000000] = "UDP_MSG(0x80000000) : multicast send",
            [0xa0000000] = "UDP_INQ(0xa0000000) : multicast inquire",
	    [0x88000000] = "UDP_NIQ(0x88000000) : multicast Ninquire",
	    [0x40000000] = "TCP_MSG(0x40000000) : peer send",
	    [0x60000000] = "TCP_INQ(0x60000000) : peer inquire",
	    [0x50000000] = "TCP_RPL(0x50000000) : peer reply",
       }

       -- /* inquire ID parameter		*/

	-- /* inquire source address	 */
       local	inq_id_range = buffer(28,12)

	-- /* transaction code		*/
       local 	hd_tcd_range = buffer(40,2)
       local 	hd_tcd = hd_tcd_range:uint()

       -- /* program version number	*/
       local    hd_ver_range = buffer(42,2)
       local    hd_ver = hd_ver_range:uint()

       -- /* future use			*/
       local 	hd_fu0_range = buffer(44,3)
       local 	hd_fu0 = hd_fu0_range:uint()

       -- /* acknowledge request mode	*/
		--		/* PT_REQ : request message	*/
		--		/* PT_ACK : response message	*/
       local    hd_pkind_range = buffer(47,1)
       local    hd_pkind = hd_pkind_range:uint()

       -- /* packet seqence number	*/
       local    hd_pseq_range = buffer(48,4)
       local    hd_pseq = hd_pseq_range:uint()

       -- /* message mode			*/
		--		/* HEAD_ONLINE : online mode	*/
		--		/* HEAD_TEST   : test   mode	*/
       local 	hd_mode_range = buffer(52,2)
       local 	hd_mode = hd_mode_range:uint()

       -- /* protocol version number	*/
	-- /* NEXUS_DLINK : NeXUS/Dlink	*/
	-- /* NEXUS_T     : NeXUS/T	*/
       local    hd_pver_range = buffer(54,1)
       local    hd_pver = hd_pver_range:uint()

       -- /* message service level	*/
       local    hd_pri_range = buffer(55,1)
       local    hd_pri = hd_pri_range:uint()

       -- /* current block number		*/
       local    hd_cbn_range = buffer(56,1)
       local    hd_cbn = hd_cbn_range:uint()

       -- /* total block number		*/
       local    hd_tbn_range = buffer(57,1)
       local    hd_tbn = hd_tbn_range:uint()

       -- /* segmenting block size	*/
       local    hd_bsize_range = buffer(58,2)
       local    hd_bsize = hd_bsize_range:uint()

       -- /* future use			*/
       local 	hd_fu1_range = buffer(60,4)
       local    hd_fu1 = hd_fu1_range:uint()

       -- data
       local	data_range = buffer(64)
       local	data = data_range:string()

       local subtree = tree:add("NX Dlink Protocol")


       -- nexus header type : "NUXM"
       subtree:add(hd_h_type_range, "Type:",hd_h_type)

       -- message length ( 16K + 64 )
       subtree:add(hd_ml_range, "Length:",hd_ml)

       -- source protocol address
       dispatch_addr("source protocol address:",hd_sa_range, pinfo, subtree)

       -- /* destination address		*/
       dispatch_addr("destination address:",hd_da_range, pinfo, subtree)

       -- /* boot time stamp		*/
       subtree:add(hd_v_seq_range, "boot time stamp:",hd_v_seq)

       -- /* message number		*/
       subtree:add(hd_seq_range,"message number:",hd_seq)

       -- /* message control type		*/

       dispatch_cnttype(string.format("message control type: %s",control_type[hd_m_ctl]), hd_m_ctl_range, pinfo, subtree)

	-- /* inquire ID parameter */
       dispatch_inq("inquire ID parameter:",inq_id_range, pinfo, subtree)

	-- /* transaction code		*/
       subtree:add(hd_tcd_range, "transaction code:",hd_tcd)

       -- /* program version number	*/
       subtree:add(hd_ver_range, "program version number:",hd_ver)

       -- /* future use			*/
       subtree:add(hd_fu0_range, "future use:",hd_fu0)

       -- /* acknowledge request mode	*/
       subtree:add(hd_pkind_range, "acknowledge request mode:",hd_pkind)

       -- /* packet seqence number	*/
       subtree:add(hd_pseq_range, "packet seqence number:",hd_pseq)

       -- /* message mode			*/
       subtree:add(hd_mode_range, "message mode(1:online 0:test) :",hd_mode)

       -- /* protocol version number	*/
       subtree:add(hd_pver_range, "NX protocol version number:",hd_pver)

       -- /* message service level	*/
       subtree:add(hd_pri_range, "message service level:",hd_pri)

       -- /* current block number		*/
       subtree:add(hd_cbn_range, "current block number:",hd_cbn)

       -- /* total block number		*/
       subtree:add(hd_tbn_range, "total block number:",hd_tbn)

       -- /* segmenting block size	*/
       subtree:add(hd_bsize_range, "segmenting block size:",hd_bsize)

       -- /* future use			*/
       subtree:add(hd_fu1_range, "future use:",hd_fu1)

       -- data
       subtree:add(data_range, "data:",data)
--       dispatch_inq("Data:",data_range, pinfo, subtree)

        pinfo.cols.protocol = "NX/Dlink"
        pinfo.cols.info = control_type[hd_m_ctl]
    end

   -- リスナーを定義
   function init_listener()

       u = {}
       t = {}

       u_cnt = 1;
       t_cnt = 1;

       u_bool = true
       t_bool = true

       -- UDP/TCPデータの中に"NUXM"があったらフックする
       tap = Listener.new("frame", "udp contains NUXM or tcp contains NUXM")


        function tap.reset()
            print("passed tap.reset")
            u_cnt = 0;
            t_cnt = 0;
        end

       -- Dissector を Wireshark に追加登録
       -- 重複登録問題を(不細工だけけど)以下で対応
       function tap.packet(pinfo,tvb,ip)
       	   -- UDPの場合
           if ( pinfo.ipproto == 17 ) then

 	       u_flag = 1

	       for i=0, u_cnt do
	           if u[i] == pinfo.dst_port then
	               u_flag = 0
  	           end
	       end

	       if u_flag == 1 then
  	           u_cnt = u_cnt + 1
	           u[u_cnt] = pinfo.dst_port
	           udp_table = DissectorTable.get("udp.port")
	           udp_table:add(pinfo.dst_port, nxdlink_proto)
               end

	   -- TCPの場合  (まだ実験前)
	   elseif ( pinfo.ipproto == 6 ) then

 	       t_flag = 1

	       for i=0, t_cnt do
	           if u[i] == pinfo.dst_port then
	               c_flag = 0
  	           end
	       end

	       if t_flag == 1 then
  	           t_cnt = t_cnt + 1
	           t[t_cnt] = pinfo.dst_port
  	           tcp_table = DissectorTable.get("tcp.port")
	           tcp_table:add(pinfo.dst_port, nxdlink_proto)
               end
           end
       end
   end

   init_listener()

end

function dispatch_cnttype(string, buffer, pinfo, subtree)
   local subsubtree = subtree:add(buffer(0), string, buffer(0):tvb())

    subsubtree:add(buffer(0,1),string.format("%d... .... .... .... .... .... .... .... = multicast flag",buffer(0,1):bitfield(0)))
    subsubtree:add(buffer(0,1),string.format(".%d.. .... .... .... .... .... .... .... = unicast flag",buffer(0,1):bitfield(1)))
    subsubtree:add(buffer(0,1),string.format("..%d. .... .... .... .... .... .... .... = inquire flag",buffer(0,1):bitfield(2)))
    subsubtree:add(buffer(0,1),string.format("...%d .... .... .... .... .... .... .... = reply flag",buffer(0,1):bitfield(3)))
    subsubtree:add(buffer(3,1),string.format(".... .... .... .... .... .... .... .%d.. = ack flag(future use)",buffer(3,1):bitfield(5)))
    subsubtree:add(buffer(3,1),string.format(".... .... .... .... .... .... .... ...%d = ack flag(future use)",buffer(3,1):bitfield(7)))

end


function dispatch_udp_port(string, buffer, pinfo, subtree)
    local subsubtree = subtree:add(buffer(0), string, buffer(0):tvb())

    subsubtree:add(buffer(0,2),"source port:", buffer(0,2):uint())
    subsubtree:add(buffer(2,2),"destination port:", buffer(2,2):uint())
end

function dispatch_addr(string, buffer, pinfo, subtree)
    local subsubtree = subtree:add(buffer(0), string, buffer(0):tvb())

    subsubtree:add(buffer(0,1),"Domain Number:", buffer(0,1):uint())
    subsubtree:add(buffer(1,1),"Data Field Number:", buffer(1,1):uint())
    subsubtree:add(buffer(2,2),"Node Number/Multicast Group Number:", buffer(2,2):uint())
end

function dispatch_inq(string, buffer, pinfo, subtree)
    local subsubtree = subtree:add(buffer(0), string, buffer(0):tvb())

    subsubtree:add(buffer(0,2), "inquire source address:",buffer(0,2):uint())
    subsubtree:add(buffer(2,2), "inquire control block address:",buffer(2,2):uint())
    subsubtree:add(buffer(4,2), "inquire ID sequence number:",buffer(4,2):uint())
end

