「Open Street Map: マップ上にマーカー表示と経度・緯度の取得するには」のコードを使わせて頂いて、OpenStreetMap API 等の勉強をさせて頂いています。
「Open Street Map: マップ上にマーカー表示と経度・緯度の取得するには」のコードを使わせて頂いて、OpenStreetMap API 等の勉強をさせて頂いています。
今日は、マウスクリックで、始点と終点の位置情報を取れる方法を試してみました。
<!DOCTYPE html>
<html lang="ja">
<head>
  <meta charset="utf-8">
  <title>Open Street Map Test</title>
  <style type="text/css">
    html,body{ margin: 0px; }
  </style>
  <!--
  <script src="https://ajax.googleapis.com/ajax/libs/jquery/1.12.4/jquery.min.js"></script>
  -->

  <script type="text/javascript" src="http://code.jquery.com/jquery-2.2.1.min.js"></script>
  <script type="text/javascript" src="http://www.openlayers.org/api/OpenLayers.js"></script>

  <script type="text/javascript">
    // グーローバル変数の定義
    var od;
    var des_lonlat;
    var arr_lonlat;
  </script>

  <script>
    function MapInit(){

      map = new OpenLayers.Map("MapCanvas");

      var mapnik = new OpenLayers.Layer.OSM();
      map.addLayer(mapnik);

      //var lonLat = new OpenLayers.LonLat(139.47552, 35.59857)
      var lonLat = new OpenLayers.LonLat(139.796182, 35.654285)
        .transform(
          new OpenLayers.Projection("EPSG:4326"),
          new OpenLayers.Projection("EPSG:900913")
        );
      map.setCenter(lonLat, 17);

      OpenLayers.Control.Click = OpenLayers.Class(OpenLayers.Control, {
        initialize: function(options) {
          this.handler = new OpenLayers.Handler.Click(
            this, {
              'click': this.onClick
            }, this.handlerOptions
          );
        },

        onClick: function(e) {
          var lonlat = map.getLonLatFromPixel(e.xy);
          lonlat.transform(
            new OpenLayers.Projection("EPSG:900913"),
            new OpenLayers.Projection("EPSG:4326")
          );

          var markers = new OpenLayers.Layer.Markers("Markers");
          map.addLayer(markers);
          var marker = new OpenLayers.Marker(
            new OpenLayers.LonLat(lonlat.lon, lonlat.lat)
            .transform(
              new OpenLayers.Projection("EPSG:4326"),
              new OpenLayers.Projection("EPSG:900913")
            )
          );
          markers.addMarker(marker);
          $("#LonLat").html("lon:" +lonlat.lon+ "  lat:" +lonlat.lat);

          if (od == "arrival"){
            arr_lonlat = lonlat;
            alert("arr_lonlatが設定されました" +  arr_lonlat.lon +" " + arr_lonlat.lat);
          } else if (od == "destination"){
            des_lonlat = lonlat;
            alert("des_lonlatが設定されました" +  des_lonlat.lon +" " + des_lonlat.lat);
          }
        }
      });

      var click = new OpenLayers.Control.Click();
      map.addControl(click);
      click.activate();
    }
  </script>

<script type="text/javascript">
    $(document).ready(function () {
    $("#button01").on('click', function () {
      od = "destination";
      alert(od + "  ボタン1がクリックされました。");
    });
    $("#button02").on('click', function () {
      od = "arrival";
      alert(od + "  ボタン2がクリックされました。");
    });
    $("#button03").on('click', function () {
      od = "confirmed"
      alert(od + "  ボタン3がクリックされました。");
      //
    });

  })
</script>


</head>

<body>
  <div id="MapCanvas" style="width:700px;height:700px;"></div>
  <div id="LonLat"></div>
  <input id="button01" type="button" value="Button1"/>
  <input id="button02" type="button" value="Button2" />
  <input id="button03" type="button" value="Button3" />

  <script type="text/javascript">MapInit();</script>


</body>

</html>
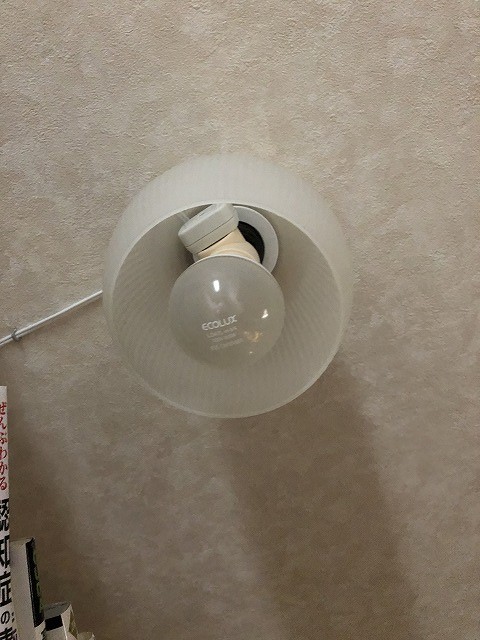
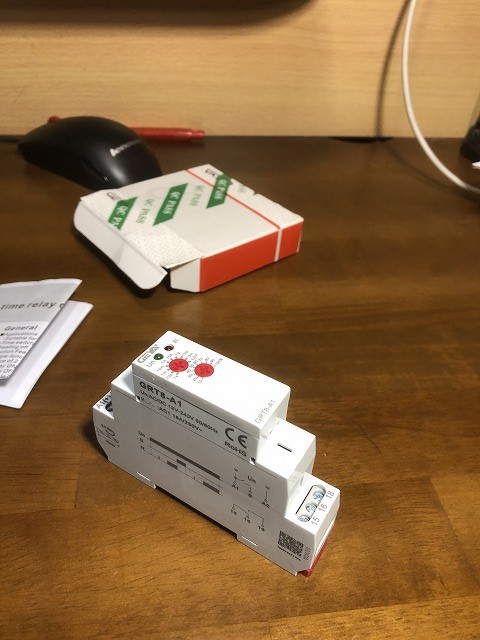
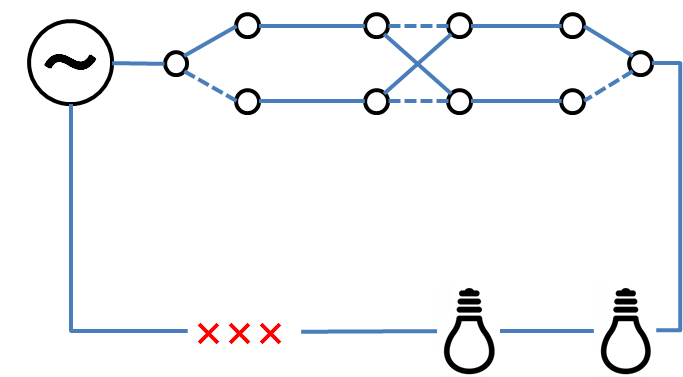
階段の電気をつけっぱなしにすると、3分後にブザーが鳴るシステムを作ってみた
最近、江端家では、戸締りや門扉の開けっぱばしが多くなってきたので、LINEで写真で送って注意喚起をするようにしました。
で、その反動で、「電灯のつけっぱなし」を注意されるようになりました。
特に、階段の電灯のつけっぱなしが多いので、3分間の電灯がつけっぱなしになると、警告音(ブザー)が鳴るシステム、を作ってみました。
ポイントは、「半田付けや、555などのICを使った回路を作るのはゴメン」という一点です。なので機材を配線するだけで実現することにしました。
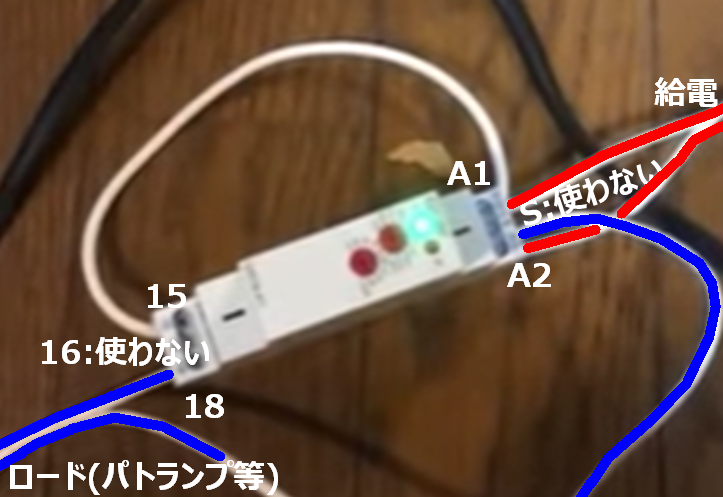
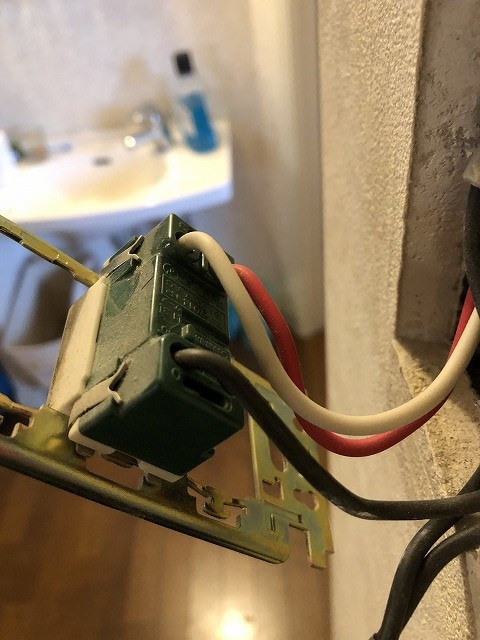
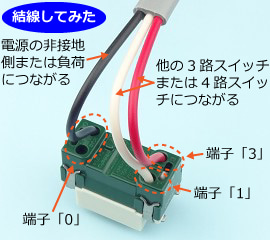
前提となる装置は、GRT-A1という遅延リレーです。
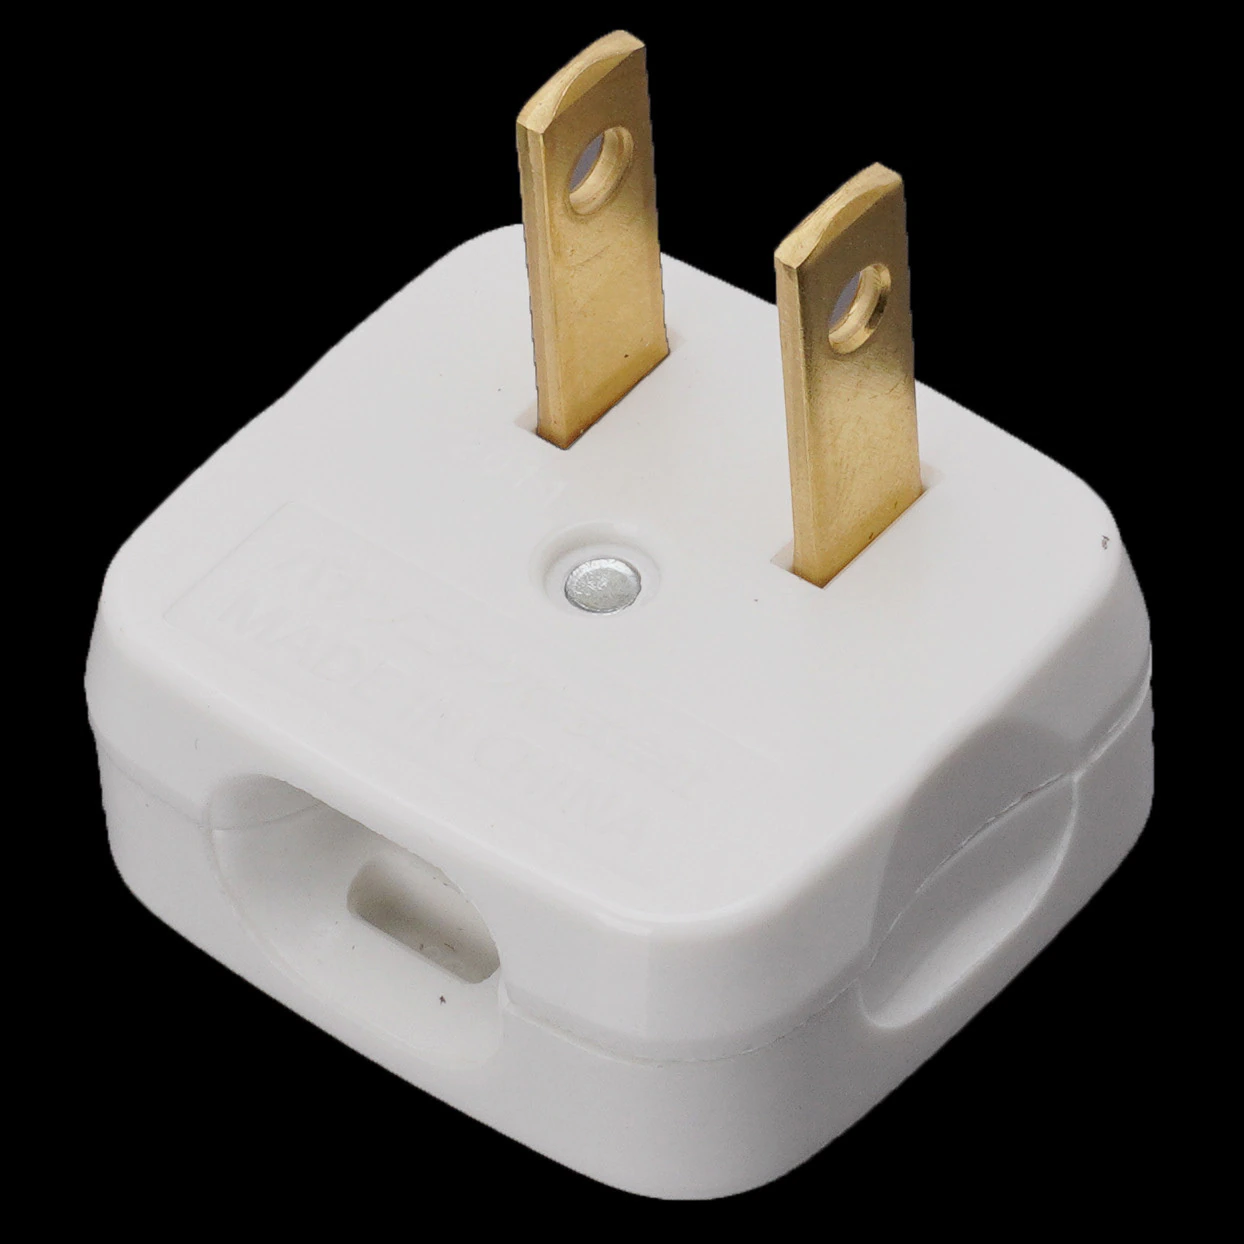
問題は、電球の点灯時に100Vが通電される方法でしたが、それは、このソケットを購入することで解決しました。
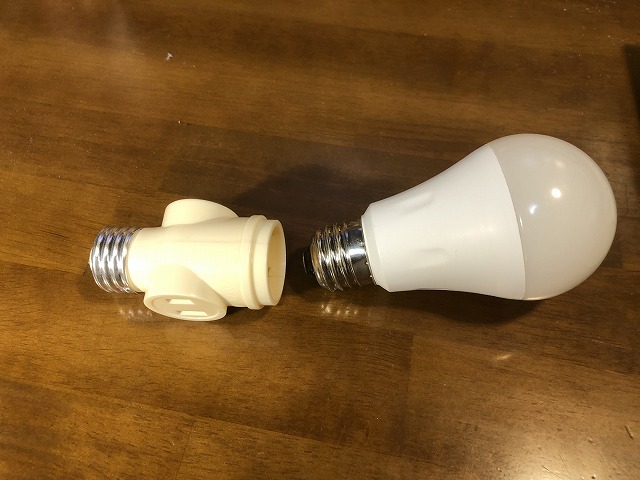
コーナーキャップのプラグを買って、100Vを引き出すことにしました。
https://www.monotaro.com/p/3518/3233/?t.q=%83X%83i%83b%83v%83L%83%83%83b%83v
で、電灯から、こんな感じで100Vを取り出すことにしました。
次に、GRT-A1を設定するには、DINレールというものが必要なのですが、近くのDIYショップに行ってみたのですが、入手できませんでした。
発想を転換して、DINレールの変りに、プラスチックカードを35mmに切断したもので代用してみました。
後は、プラスチックカードごと、ネジで固定することにしました。
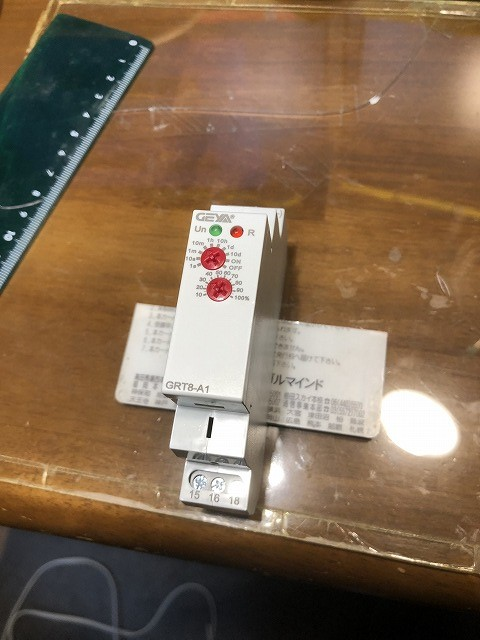
で、以下のような、装置を設営しました。わざわざコンセントを入れたのは、いずれ家族から「うるさい! ブザーを切れ!」と言われる時に備えた為です。

システムの稼動状況です。
以上
トイレのランプを、人感センサライトに交換してみました
人感センサライトを買って、トイレに設置してみました。
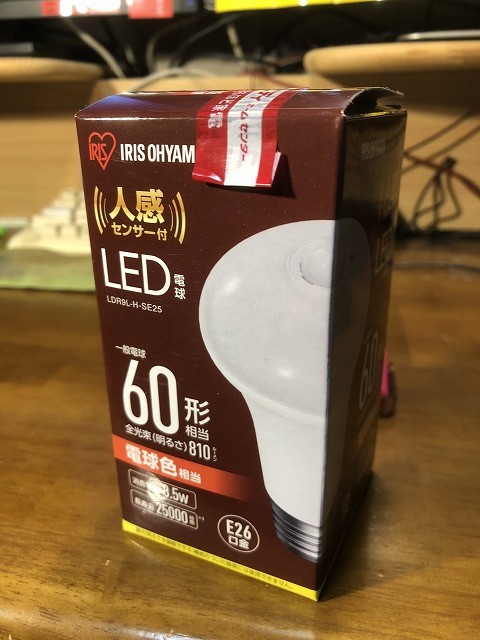
トイレの中で、電気が切れたら、ジタバタしなければならない ―― と嫁さんに文句を言われましたが、まあ、それって、いわゆる「トレードオフ」ですよね。
IEEE PDF xEpress (PDFeXPRESS)で投稿用PDFを作るときの注意
学会に(カンファレンス)ペーパーを投稿する時に、IEEE PDF xEpress (PDFeXPRESS) でPDFファイルを作らないと、学会が受理してくれません(少なくとも現時点では)。
で、この投稿WordでもPDFでも受理してくれるのですが・・・
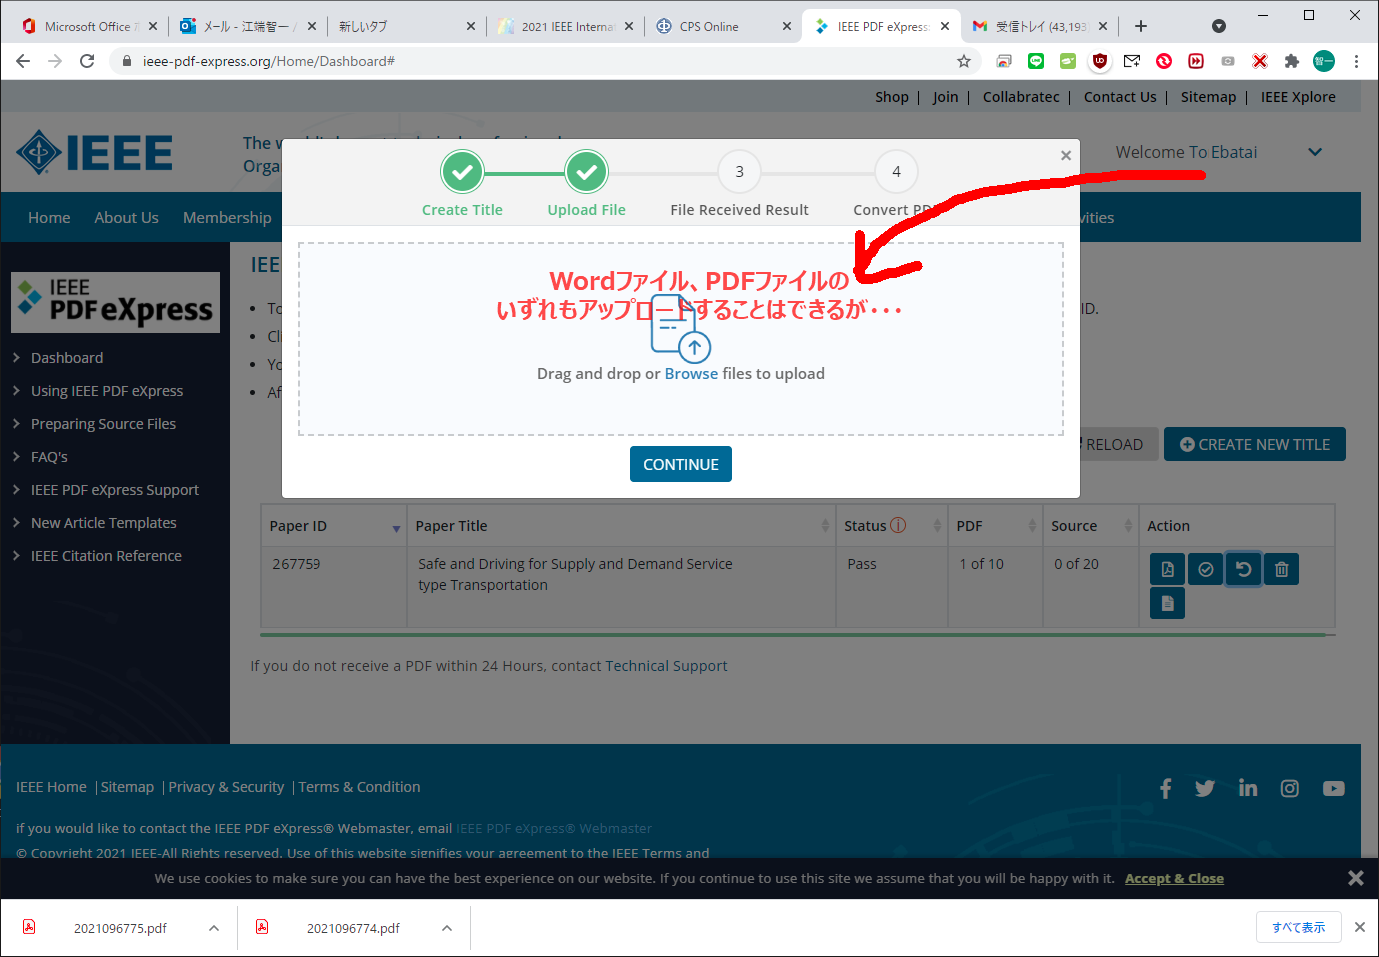
Wordでアップロードすると、図面のフォントがボロボロになったPDFが作成されます。

しかし、Wordで作ったPDFを投稿すると、 PDF xEpress が受けつけてくれません(弾きます(これ、どうも有名な問題らしい))。
そこで、Wordで作ったPDFファイル(例 "1.pdf")を、さらに「印刷」を使ってPDFファイル(例 "2.pdf")として作り直すと、PDF xEpressから弾かれなくなり、学会で受けつけて貰えるファイルを作って貰えます(例 "3.pdf")。
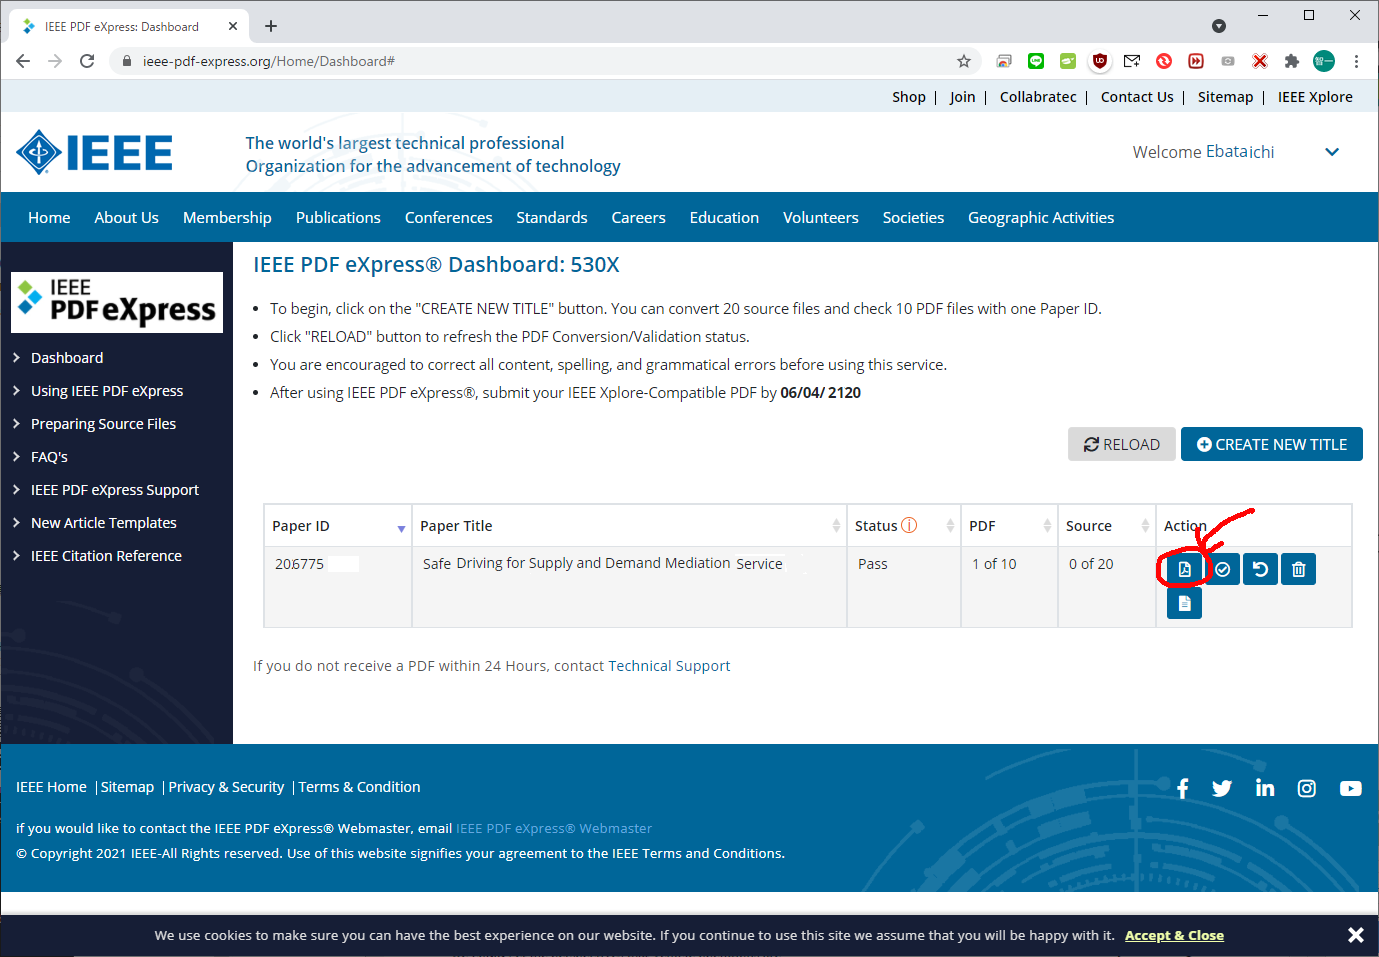
PDF xEpressで作ってもらったものはこちら

毎回、PDF xEpress を使う度に同じトラブル対応しているみたいでしたので、私の為に、メモを残しておきます。
以上
江端版 Ubuntu Desktop 18.04でClamAVによるウィルスチェックを実行する
をベースに実施しました。

$ sudo apt-get isntall
$ sudo apt-get update
$ sudo apt-get upgrade
$ sudo apt-get dist-upgrade
$ sudo reboot

として、

$ sudo apt install clamav clamav-daemon
をして、再度、
$ sudo reboot
を実施。

さて、ここで、
$ sudo cat /var/log/clamav/freshclam.log
を実施すると、
Mon May 24 08:48:11 2021 -> WARNING: Can't download daily.cvd from https://database.clamav.net/daily.cvd
Mon May 24 08:48:11 2021 -> Trying again in 5 secs...
Mon May 24 08:48:16 2021 -> daily database available for download (remote version: 26179)
Mon May 24 08:48:46 2021 -> ERROR: Download failed (28)
Mon May 24 08:48:46 2021 -> ERROR: Message: Timeout was reached
Mon May 24 08:48:46 2021 -> ERROR: Can't download daily.cvd from https://database.clamav.net/daily.cvd
Mon May 24 08:48:46 2021 -> Giving up on https://database.clamav.net...
Mon May 24 08:48:46 2021 -> ERROR: Update failed for database: daily
Mon May 24 08:48:46 2021 -> ERROR: Database update process failed: Connection failed
Mon May 24 08:48:46 2021 -> ERROR: Update failed.
Mon May 24 08:48:46 2021 -> --------------------------------------

てな感じで、明らかに上手くいっていない感じです。
で、このエラー内容でググってみたら、以下のようなページが出てきました。

https://ujimasayuruyuru.blogspot.com/2019/06/clamav.html
で、このページに記載されている、
$ wget http://database.clamav.net/main.cvd
$ wget http://database.clamav.net/daily.cvd
$ wget http://database.clamav.net/bytecode.cvd


を実施しようとしたのですが、wgetが上手く動かなかったので、Webブラウザを使って
http://database.clamav.net/main.cvd,
http://database.clamav.net/daily.cvd,
http://database.clamav.net/bytecode.cvd を手動でダウンロードしました。
その上で、teraterm から「ファイル」→「SSH SFC」を使って、main.cvd, daily.cvd, bytecode.cvd をEC2に放り込みます。
$ sudo mv main.cvd /var/lib/clamav/
$ sudo mv daily.cvd /var/lib/clamav/
$ sudo mv bytecode.cvd /var/lib/clamav/
$ sudo chown -R clamav:clamav /var/lib/clamav/

を実施して、
$ sudo reboot
をした後、以下のコマンドで、手動で/home/以下のスキャンを実施しました。

で、ログを確認したところ
$ sudo cat /var/log/clamav/freshclam.log
on May 24 11:51:18 2021 -> The database server doesn't have the latest patch for the daily database (version 26180). The server will likely have updated if you check again in a few hours.
Mon May 24 11:51:18 2021 -> main.cvd database is up-to-date (version: 59, sigs: 4564902, f-level: 60, builder: sigmgr)
Mon May 24 11:51:18 2021 -> bytecode.cvd database is up-to-date (version: 333, sigs: 92, f-level: 63, builder: awillia2)
Mon May 24 11:51:18 2021 -> --------------------------------------

という感じで動いているようです。
ここで手動スキャンを実施してみました、

$ sudo clamscan --infected --remove --recursive /home/
(ホームディレクトリ配下の全ファイル、ディレクトリのウイルスチェックを行う。
感染が疑われるファイルがあった場合は画面に表示(-infect)して削除(-remove)する)

----------- SCAN SUMMARY -----------
Known viruses: 8531859
Engine version: 0.103.2
Scanned directories: 117
Scanned files: 1802
Infected files: 0
Data scanned: 195.30 MB
Data read: 169.32 MB (ratio 1.15:1)
Time: 36.215 sec (0 m 36 s)
Start Date: 2021:05:24 12:04:31
End Date: 2021:05:24 12:05:08

と、こんな感じで、ウイルスチェックが完了しました。


Ubuntu Desktop 18.04でClamAVによるウィルスチェックを実行する!
Ubuntu Desktop 18.04でClamAVによるウィルスチェックを実行する!
を参考にして、ClamAVを、Amazon Lightsailにインストールしたら、(それが原因かどうかは、今一つはっきりしないんだけど)以下のような問題が発生した。
Amazon lightsailにsshログインできなくなった件 (ClamAV のアンインストールと AWS inspectorのアンインストール)
けど、お勧めされたので、AWS EC2(Ubuntu Desktop 18.04)の方には、週明けにインストールする予定。
(T.B.D.)
Amazon lightsailにsshログインできなくなった件 (ClamAV のアンインストールと AWS inspectorのアンインストール)
私は小心者なので、サーバにログインできなくなるだけで、青ざめてしまいます。
今日も、Amazon lightsailにsshログインできなくなって、パニックになっていました。
原因は、ウイルスチェックツールのClamAVのインストールと、AWS inspectorのインストール(Amazon lightsailでは動かない)が原因と考えられました。
『こういう場合、あわてて動くとロクなことがない』は経験則ですので、まずは、Amazonlightsailの内部情報をコンソールから見る方法をググってみました。
から「メトリクス」を選ぶと

CPUが100%のまま動いているグラフが出てきます。
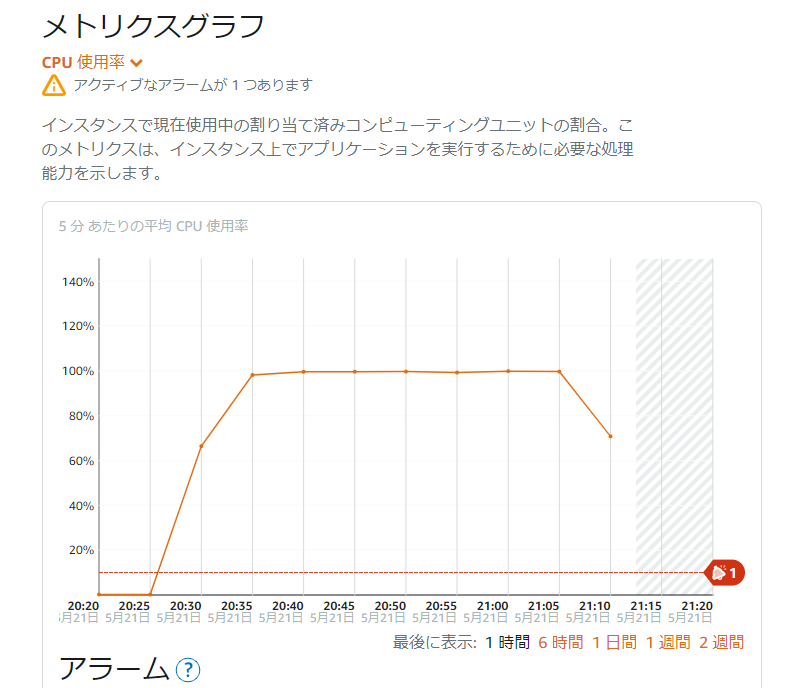
間違いなく、ウイルススキャンがCPUを喰い捲っている、と思いましたので、いつかは下がるはず、と1時間くらい待ってみたところ、落ちてきました(ケースによっては、3時間、6時間コースもあるようなので、しばらく放っておく勇気が大切です)。
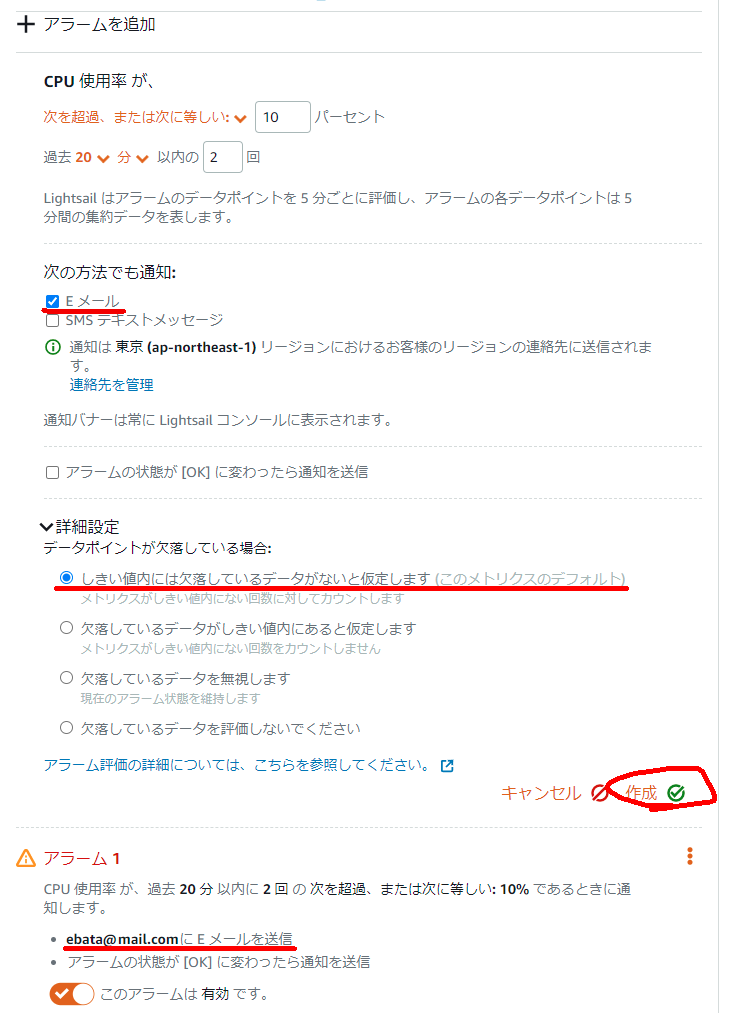
で、この間に、「使用率」と記載されているところをクリックして、「+アラームの追加」をクリックして、こういう状態になったらアラートが飛んでくるように設定しておきました。私の場合、以下のように設定しておきました。」
で、CPUも落ちついてきて、sshログインができるようになったので、早速パッケージのアンインストールを実施しました。
ubuntu@ip-123-45-67-89:~$ sudo apt-get remove --purge clamav clamav-daemon
Reading package lists... Done
Building dependency tree
Reading state information... Done
The following packages were automatically installed and are no longer required:
clamav-base clamav-freshclam clamdscan libclamav9 libtfm1
Use 'sudo apt autoremove' to remove them.
The following packages will be REMOVED:
clamav* clamav-daemon*
0 upgraded, 0 newly installed, 2 to remove and 0 not upgraded.
After this operation, 1881 kB disk space will be freed.
Do you want to continue? [Y/n] y
(Reading database ... 196083 files and directories currently installed.)
Removing clamav (0.103.2+dfsg-0ubuntu0.20.04.2) ...
Removing clamav-daemon (0.103.2+dfsg-0ubuntu0.20.04.2) ...
Processing triggers for man-db (2.9.1-1) ...
(Reading database ... 196045 files and directories currently installed.)
Purging configuration files for clamav-daemon (0.103.2+dfsg-0ubuntu0.20.04.2) . ..
Processing triggers for systemd (245.4-4ubuntu3.6) ...
で、サービス状態を確認したら、まだ生き残っていたので、これも力付くで停止
ubuntu@ip-123-45-67-89:~$ systemctl list-unit-files | grep clamav
clamav-freshclam.service enabled enabled
ubuntu@ip-123-45-67-89:~$ sudo systemctl stop clamav-freshclam
さらに、AWS inspectorも強制アンインストールを実施
ubuntu@ip-172-26-7-19:~$ systemctl list-unit-files | grep aws
awsagent.service generated enabled
ubuntu@ip-172-26-7-19:~$ sudo apt-get remove --purge awsagent
Reading package lists... Done
Building dependency tree
Reading state information... Done
The following packages were automatically installed and are no longer required:
clamav-base clamav-freshclam clamdscan libclamav9 libtfm1
Use 'sudo apt autoremove' to remove them.
The following packages will be REMOVED:
awsagent*
0 upgraded, 0 newly installed, 1 to remove and 0 not upgraded.
After this operation, 0 B of additional disk space will be used.
Do you want to continue? [Y/n] y
(Reading database ... 196040 files and directories currently installed.)
Removing awsagent (1.1.1677.0-102677) ...
Stopping awsagent-agent service:
Stopping awsagent (via systemctl): awsagent.service.
Removing awsagent-agent service:
Killing existing AwsAgent Updater Cron Jobs:
Found existing awsagent updater cron job PID: 1462
Processing triggers for systemd (245.4-4ubuntu3.6) ...
(Reading database ... 196024 files and directories currently installed.)
Purging configuration files for awsagent (1.1.1677.0-102677) ...
dpkg: warning: while removing awsagent, directory '/opt/aws/awsagent/etc' not empty so not removed
最期に、sudo reboot をして、起動を確認しました。
教訓: メモリ1G程度の Amazon lightsailに、あまり凝った仕組みを組込むな