2021/03,江端さんの技術メモ

GO 1.5 と C++ を SWIG でブリッジさせる方法

を試してみたのですが、私は上手く動かすことができませんでした。

で、こんな風にしてみたら動いたので、記録を残しておきます。

ebata@DESKTOP-P6KREM0 MINGW64 ~/kese/swig
$ tree
.
├── main1.go
└── sc1
    ├── nop.go
    ├── sc1.h
    └── sc1.swigcxx

1 directory, 4 files
// main1.go

package main

import (
	"fmt"

	"./sc1"
)

func Dump(p interface{}) {
	fmt.Printf("%v:%T\n", p, p)
}

func main() {
	Dump(sc1.EchoIntN(8))
	Dump(sc1.EchoDoubleN(9))
}

でもって、nop.go

package sc1

sc1.h

#pragma once 

inline  int
EchoIntN( int p ) {
    return p;
}

inline  double
EchoDoubleN( double p ) {
    return p;
}

sc1.swigcxx

%module sc1
%{
#include    "sc1.h"
%}

%include    "sc1.h"

ちなみに、sc1.hのインラインをやめて、sc1.hとsc1.cに分けて実施したら、こうなった

$ go build main1.go
# _/C_/Users/ebata/kese/swig2/sc1
C:/msys64/mingw64/bin/../lib/gcc/x86_64-w64-mingw32/10.2.0/../../../../x86_64-w6
4-mingw32/bin/ld.exe: $WORK\b002\_x004.o:/tmp/go-build/sc1_wrap.cxx:279: undefin
ed reference to `EchoIntN(int)'
C:/msys64/mingw64/bin/../lib/gcc/x86_64-w64-mingw32/10.2.0/../../../../x86_64-w6
4-mingw32/bin/ld.exe: $WORK\b002\_x004.o:/tmp/go-build/sc1_wrap.cxx:292: undefin
ed reference to `EchoDoubleN(double)'
collect2.exe: error: ld returned 1 exit status

ずいぶん悩んだが、もしかしたらと思い、sc1.c → sc1.cpp   にリネームしたら、あっさり通った

sc1.hは以下の通り

#pragma once 

int EchoIntN(int);

double EchoDoubleN(double);

sc1.cppは以下の通り

//#pragma once
#include "sc1.h"

int EchoIntN( int p ) {
    return p;
}

double EchoDoubleN( double p ) {
    return p;
}

以上


2021/03,江端さんの技術メモ

C 言語から GO 言語の関数を呼ぶ方法

を参考にさせて頂いて、実験中です。

大変申し訳ありませんが、ほぼ丸パクりさせて下さい。これから、頻繁に見る必要があり、万一ページがexpiredされたら青冷めますので。

hoge.goというファイル名のPrintHoge関数を C 言語から呼べるようにします。

  1. Cをインポートする
  2. C 言語から呼びたい関数に//export XXXXを書く (普通、//とするとコメントなんだけどなぁ)
  3. コンパイルする
package main

import (
    "C"
    "fmt"
)

//export PrintHoge
func PrintHoge() {
    fmt.Println("hoge")
}

func main() {}

main関数がないとエラーになるので、空で良いので書いておきます。

-buildmode=c-archiveオプションをつけてgo buildします。

$ go build -buildmode=c-archive hoge.go

すると、hoge.aアーカイブとhoge.hヘッダが生成されます。

生成されたヘッダをインクルードして、Go 言語の関数を呼びます。

#include <stdio.h>
#include "hoge.h"

int main() {
    PrintHoge();
    return 0;    
}

生成されたアーカイブと一緒にコンパイルします。

$ gcc -o hoge hoge.a main.c

ところが、

$ gcc -o hoge hoge.a main.c
C:/msys64/mingw64/bin/../lib/gcc/x86_64-w64-mingw32/10.2.0/../../../../x86_64-w6
4-mingw32/bin/ld.exe: C:\Users\ebata\AppData\Local\Temp\cc1F3Mbe.o:main.c:(.text
+0xe): undefined reference to `PrintHoge'
collect2.exe: error: ld returned 1 exit status

が出てきて、「変だなー」と思いつつ、色々調べてみたのですが、hoge.aを一番最後にしたら、動きました。

$ gcc -o hoge main.c hoge.a
$ ./hoge
hoge
以上

2021/03,江端さんの技術メモ

Go言語をVSCodeを使ってデバッグをしようとするとすると以下のメッセージが出てきて、困っていました。

"Failed to continue: Check the debug console for details."

が消えなくて、困っていたのですが、

// +build ignore
package main

の "// +build ignore"を消したら、消えました。


2021/03,江端さんの技術メモ

go run xxxx.go で起動すると、「このアプリの機能のいくつかがwindows defenderファイアウォールでブロックされています」が出てきます
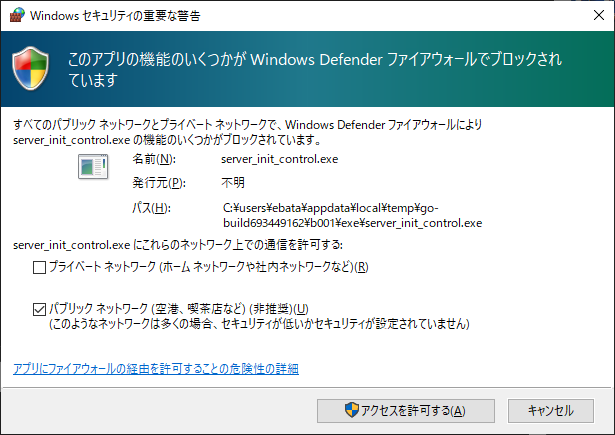
素直に、go build xxxxx.go として、exeファイルを作って、実施すれば、出てこなくなります。

2021/03,江端さんの技術メモ

swigを使ってgoとc++をブリッジをやっているのですが、そうなると、コンパイルオプションの

gcc xxxx xxxxx  -I c:\users\ebata\json\include

というような、力づくが使えないです。

まあ、色々やり方はありますが、一番簡単なのは、Windows10のコントロールパネルから、"CPATH" を作って、 ダイレクトに"c:\users\ebata\json\include"を書き込むのが簡単です。
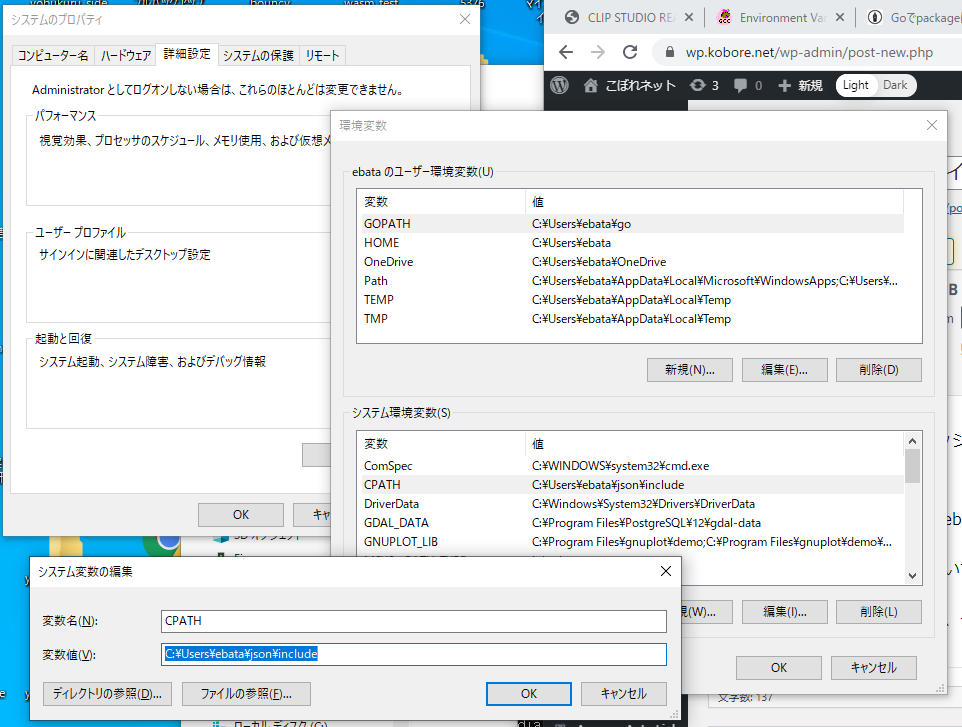
スマートとか、かっこいいとか、汎用性とか、そういうことは、考えないのが良いです。

2021/03,江端さんの技術メモ

まず、何も考えないで以下のプログラムを実行

// go run main2.go

package main

import (
	"fmt"
)

func subPerson(i int) {
	fmt.Printf("Now... sub_person(%v)\n", i)
}

func person(i int) {
	fmt.Printf("Now... person(%v)\n", i)

	go subPerson(i)
}

func main() {

	for i := 0; i < 5; i++ {
		go person(i)
	}

}

当然、何も表示されれない。go routineが起動する前に、main()が終了してしまうから

なので、最後のスレッドが完了するまでは待機するようにする

// go run main2.go

package main

import (
	"fmt"
	"sync"
)

func subPerson(i int) {
	fmt.Printf("Now... sub_person(%v)\n", i)
}

func person(i int, wg *sync.WaitGroup) {
	defer wg.Done() // WaitGroupを最後に完了しないといけない。
	fmt.Printf("Now... person(%v)\n", i)

	go subPerson(i)
}

func main() {

	var wg sync.WaitGroup
	for i := 0; i < 5; i++ {
		wg.Add(1) // goルーチンを実行する関数分だけAddする
		go person(i, &wg)
	}
	wg.Wait()
}

$ go run main2.go
Now... person(0)
Now... sub_person(0)
Now... person(4)
Now... sub_person(4)
Now... person(2)
Now... person(3)
Now... sub_person(3)
Now... person(1)

ただ、これの場合、subPerson()が実行されないまま終了することがある。例えば、、上記の場合、sub_person(1)が実施されずに終了してしまっている。

なので、subPerson()の終了を持って、main()の終了とするようにすると、こうなる。

// go run main2.go

package main

import (
	"fmt"
	"sync"
)

func subPerson(i int, wg *sync.WaitGroup) {
	defer wg.Done() // WaitGroupを最後に完了しないといけない。
	fmt.Printf("Now... sub_person(%v)\n", i)
}

func person(i int, wg *sync.WaitGroup) {
	subWG := wg
	//defer wg.Done() // WaitGroupを最後に完了しないといけない。
	fmt.Printf("Now... person(%v)\n", i)

	go subPerson(i, subWG)
}

func main() {

	var wg sync.WaitGroup
	for i := 0; i < 5; i++ {
		wg.Add(1) // goルーチンを実行する関数分だけAddする
		go person(i, &wg)
	}
	wg.Wait()
}

結果は、以下の通りとなり、問題なし。


$ go run main2.go
Now... person(0)
Now... person(1)
Now... sub_person(1)
Now... person(4)
Now... sub_person(4)
Now... sub_person(0)
Now... person(2)
Now... sub_person(2)
Now... person(3)
Now... sub_person(3)


2021/03,江端さんの技術メモ

「ドメイン "sea-anemone.tech "のLet's Encrypt証明書期限切れのお知らせ」というのがメールで届きました。
一通りメールを読んだのだけど、詰るところ「作り直せ」ということかな、理解して、以前書いたメモ通りを実施して、関係のあるディレクトリに片っぱしからバラまくことにました 。
に記載されたことを、唯唯諾諾と実施しました。
―― 自動化シェルスクリプトなどというシャレたものを"作らない"ことが寛容だ、ということを、私は知っています。
Let's Encrypt certificate expiration notice for domain "sea-anemone.tech"


ドメイン "sea-anemone.tech "のLet's Encrypt証明書期限切れのお知らせ。


Hello,


こんにちは。


Your certificate (or certificates) for the names listed below will expire in 19 days (on 29 Mar 21 23:38 +0000). Please make sure to renew your certificate before then, or visitors to your web site will encounter errors.


以下の名前に対するあなたの証明書(または複数の証明書)は、19日後(29 Mar 21 23:38 +0000)に期限切れとなります。それまでに証明書を更新しないと、あなたのウェブサイトにアクセスした際にエラーが発生します。


We recommend renewing certificates automatically when they have a third of their total lifetime left. For Let's Encrypt's current 90-day certificates, that means renewing 30 days before expiration. See https://letsencrypt.org/docs/integration-guide/ for details.


私たちは、証明書の有効期間の3分の1が経過した時点で、証明書を自動的に更新することをお勧めします。現在のLet's Encryptの90日証明書の場合、期限切れの30日前に更新することになります。詳細は https://letsencrypt.org/docs/integration-guide/ をご覧ください。


sea-anemone.tech


For any questions or support, please visit: https://community.letsencrypt.org/ Unfortunately, we can't provide support by email.


ご質問やサポートについては、次のサイトをご覧ください: https://community.letsencrypt.org/ 残念ながら、電子メールによるサポートは行っておりません。


For details about when we send these emails, please visit: https://letsencrypt.org/docs/expiration-emails/ In particular, note that this reminder email is still sent if you've obtained a slightly different certificate by adding or removing names. If you've replaced this certificate with a newer one that covers more or fewer names than the list above, you may be able to ignore this message.


特に、名前を追加または削除してわずかに異なる証明書を取得した場合にも、このリマインダーメールが送信されますのでご注意ください。この証明書を、上記のリストよりも名前の数が多かったり少なかったりする新しい証明書に差し替えた場合は、このメッセージを無視することができるかもしれません。


If you are receiving this email in error, unsubscribe at:


誤ってこのメールを受信している場合は、以下の方法で配信を停止してください。


  http://delivery.letsencrypt.org/track/unsub.php?u=30850198&id=f76fe707fe6142509a23d40dde02c153.3i5yYrnKlNWIWqOs%2Fn8YMBMPOVU%3D&r=https%3A%2F%2Fmandrillapp.com%2Funsub%3Fmd_email%3Dt%252A%252A%252A%252A%2540g%252A%252A%252A%252A.%252A%252A%252A


Please note that this would also unsubscribe you from other Let's Encrypt service notices, including expiration reminders for any other certificates.


これにより、他の証明書の期限切れのお知らせなど、Let's Encryptの他のサービスのお知らせも配信停止となりますので、ご注意ください。


Regards,
The Let's Encrypt Team


Let's Encryptチーム

2021/03,江端さんの技術メモ

C++でJSONを扱わなければならなくなりました。

blog.livedoor.jp/tek_nishi/archives/10216517.html

に、

JSON for Modern C++ を紹介するよ!
ブログに書いた書いたと思い込んでてまったく触れてなかった...
このJSON読み書きライブラリは他のライブラリに依存しておらず、json.hppをインクルードするだけというお手軽さながら、JSONオブジェクトをめっちゃ気楽に扱えるようにしてくれます。

なん・・だと・・。インクルードするだけ・・ 採用決定!!

となりました。

で、早速、

$ git clone https://github.com/nlohmann/json.git

をして、

// g++ test_json.cpp -o test_json -I json/include/

#include <stdio.h>
#include <string.h>
#include <nlohmann/json.hpp>  
#include <iostream>

int main(int argc, char **argv){

  using json = nlohmann::json;

  json j;

  j["pi"] = 3.141;
  j["happy"] = true;
  j["name"] = "Niels";
  j["nothing"] = nullptr;
  j["answer"]["everything"] = 42;

  j["list"] = { 1, 0, 2 };         // [1,0,2]
  j["object"] = { {"currency", "USD"}, {"value", 42.99} };  // {"currentcy": "USD", "value": 42.99} 

  std::cout << j << std::endl;  // cout

  return 0;
}

をした後、

>g++ test_json.cpp -o test_json -I c:/Users/Ebata/json/include  (git cloneが展開された場所にjson/includeというディレクトリができているので、そこをダイレクトに指示する)

を行い、./test_json を実施したら、

さくっと動きました。

では、次にこのJSONをUDP通信で飛ばしてみます。

ゲストOSがLinuxのDockerコンテナの中から、ホストOSにデータを放り出す為に使ったUDPプログラム

この↑のプログラムを前提とします

■C++送信プログラム (キモは、std::string jj = j.dump(); です)

// g++ test_send_json.cpp -o test_send_json -I C:/Users/Ebata/json/include/ -lwsock32 -lws2_32 (Windows版)

#include <stdio.h>
#include <string.h>
#include <nlohmann/json.hpp>  
#include <iostream>
#include "simple_udp_win.h" // https://wp.kobore.net/江端さんの技術メモ/post-1959/
//#include "simple_udp.h"

//simple_udp udp0("0.0.0.0",12345); // これはWindowでは動かない
//simple_udp udp0("192.168.0.8",12345); // これは使わない方がいい
simple_udp udp0("127.0.0.1",12345); // ホストOSのUDPの受信側

int main(int argc, char **argv){

  using json = nlohmann::json;

  json j;

  j["pi"] = 3.141;
  j["happy"] = true;
  j["name"] = "Niels";
  j["nothing"] = nullptr;
  j["answer"]["everything"] = 42;

  j["list"] = { 1, 0, 2 };         // [1,0,2]
  j["object"] = { {"currency", "USD"}, {"value", 42.99} };  // {"currentcy": "USD", "value": 42.99} 

  std::cout << j << std::endl;  // cout

  std::string jj = j.dump(); // これが重要(これを見つけるのに時間がかかった)

  udp0.udp_send(jj);

  return 0;
}

■C++受信プログラム (キモは、json j = json::parse(rdata); です)

// g++ test_recv_json.cpp -o test_recv_json -I C:/Users/Ebata/json/include/ -lwsock32 -lws2_32

#include <stdio.h>
#include <string.h>
#include <nlohmann/json.hpp>  
#include <iostream>
#include "simple_udp_win.h" // https://wp.kobore.net/江端さんの技術メモ/post-1959/
//#include "simple_udp.h"

//simple_udp udp0("0.0.0.0",12345);  // これはWindowsでは動かない
//simple_udp udp0("192.168.0.8",12345); // これは使わない方がいい
simple_udp udp0("127.0.0.1",12345); // これを使うのが無難


int main(int argc, char **argv){
  
  using json = nlohmann::json;

  json j;
  
  udp0.udp_bind();
  while (1){
    std::string rdata=udp0.udp_recv();

    j = json::parse(rdata); // これが重要(これを見つけるのに時間がかかった)
    // j = json::parse(rdata.c_str()); これでも動くようだが

    std::cout << j << std::endl;  // cout
   
  }
  return 0;
}

さて、そろそろ詰めに入ろうか。

■GOのJSONのUDP受信プログラム(上記の「C++送信プログラム」と対向で動くもの)

// test_recv_json.go
// go run test_recv_json.go
// golangによるjsonのudp受信"だけ"するプログラム

package main

import (
	"encoding/json"
	"fmt"
	"net"
)

type Message struct {  // とりあえず3つ
	Pi    float64 `json:"pi"`
	Happy bool    `json:"happy"`
	Name  string  `json:"name"`
}

func main() {
	addr, _ := net.ResolveUDPAddr("udp", "127.0.0.1:12345")
	sock, _ := net.ListenUDP("udp", addr)

	var j Message

	i := 0
	for {
		i++
		buf := make([]byte, 1024)
		rlen, _, err := sock.ReadFromUDP(buf)
		if err != nil {
			fmt.Println(err)
		}
		str := string(buf[0:rlen])
		fmt.Println(str)

		// 受信したメッセージをJSON形式に格納する
		json.Unmarshal(buf[0:rlen], &j)

		// JSONに格納したデータを見る
		fmt.Println(j)

		fmt.Println(j.Pi)
		fmt.Println(j.Happy)
		fmt.Println(j.Name)

	}
}

■GOのJSONのUDP送信プログラム(上記の「C++受信プログラム」と対向で動くもの)

// test_send_json.go
// go run test_send_json.go
// golangによるjsonのudp送信"だけ"するプログラム

package main

import (
	"encoding/json"
	"fmt"
	"log"
	"net"
)

type Message struct { // とりあえず3つ
	Pi    float64 `json:"pi"`
	Happy bool    `json:"happy"`
	Name  string  `json:"name"`
}

func main() {

	addr, err := net.ResolveUDPAddr("udp", "127.0.0.1:12345")
	if err != nil {
		log.Fatal(err)
	}

	conn, _ := net.DialUDP("udp", nil, addr)

	if err != nil {
		log.Fatal(err)
	}

	var j Message
	j.Pi = 3.1415
	j.Happy = false
	j.Name = "Ebata"

	s, _ := json.Marshal(j)

	n, err := conn.Write(s) // WriteToUDPを使ってはならない
	fmt.Printf("dial send: bytes=%d to=%s\n", n, addr.String())

}


以上