>sudo emacs
で立ち上げて、
/sudo::/root/.emacs
で、sudo emacs専用の.emacsの編集ができる(はず)
江端智一のホームページ
>sudo emacs
で立ち上げて、
/sudo::/root/.emacs
で、sudo emacs専用の.emacsの編集ができる(はず)
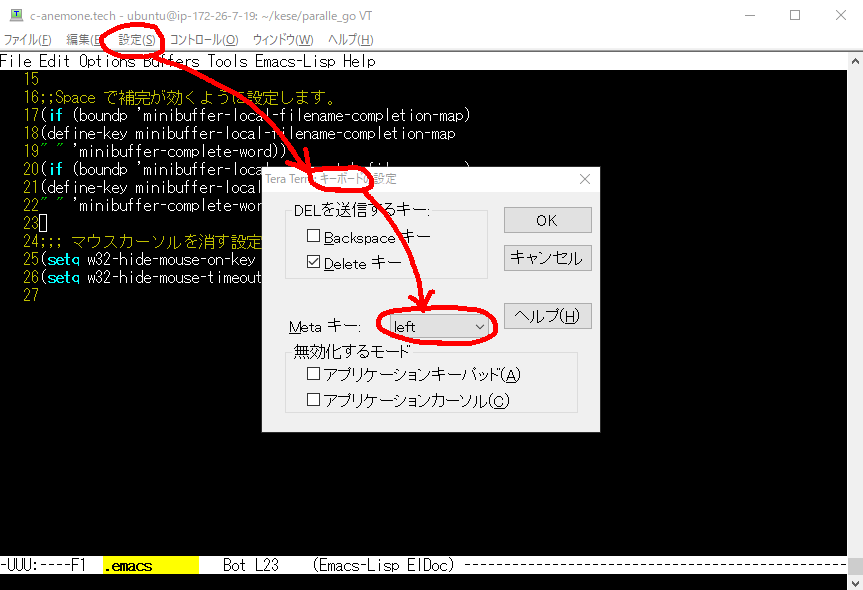
teratermから入って、emacsでプログラム編集していると、"M-x" を "Alt-x" として使えませんでした。
".emacs"の設定でも変えられなかったので、もしかしたらteratermの設定の問題かもしれない思い、ちょっと調べたみたら。
設定→キーボード→Metaキーで変更できました。
自宅の塗装工事後に、以下のような現象が現われてきました。チョークで書かれたような白いものが壁に浮き出てきます。

白華現象(エフロ)と言われるものらしく、壁の内部から出てくる水分によって引き起こされる現象とのことです。
そこで、本日、この対応を実地で教えて貰いましたので、記録しておきます。
(Step.1)対象箇所を、水(水道水)で塗らす。

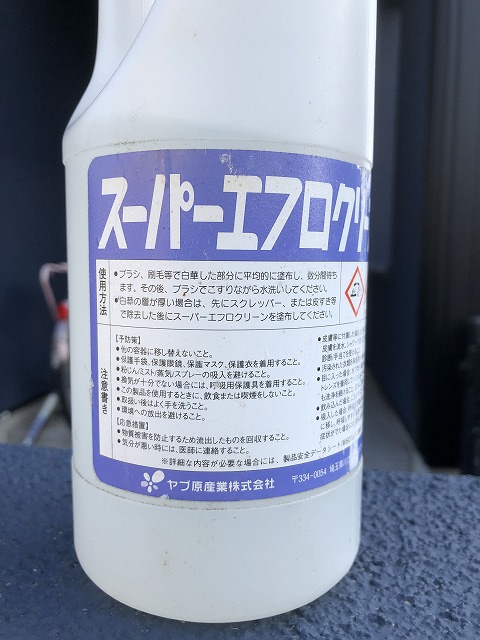
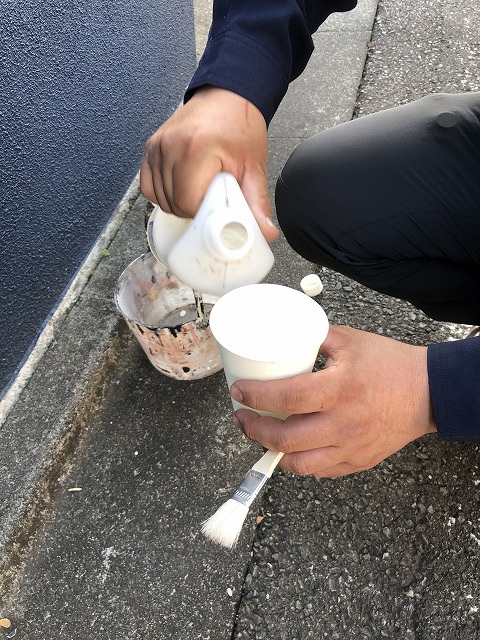
(Step.2) 市販の溶液を準備する
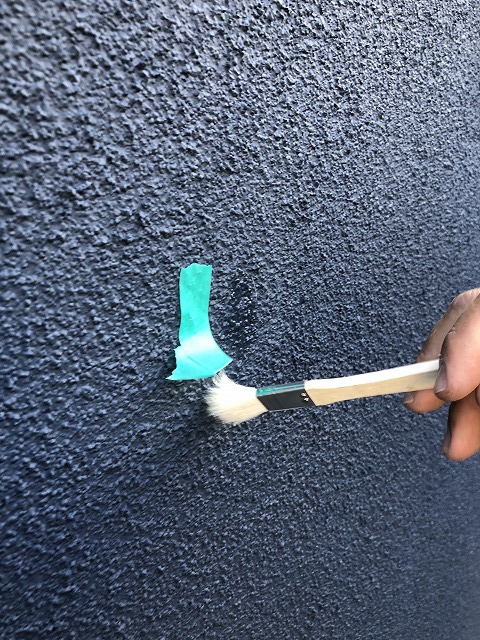
(Step.3)溶液を塗布する
(Step.4)3分ほど待ってから、水で洗い流す
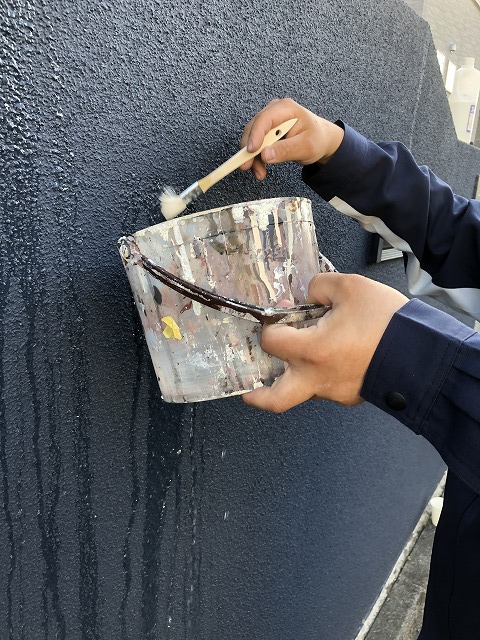
以上
https://www.meti.go.jp/meti_lib/report/H30FY/000677.pdf
マイクロトランジッド
Chariot (サンフランシスコ周辺など)
• フォードが買収した通勤者向けの乗合バスサービス
• 利用者数に基づく柔軟なルート設定に特徴
• 14人乗りのシャトルバスを利用し、1日当たり100を超える路線
でサービス提供
出所: Tech Crunch, Chariot
Via (ニューヨーク、ワシントン、シカゴ 等)
• 乗客と車両の座席とをリアルタイムに関連づけ、同一ルートで
移動できる乗客をグループ化して配車する乗合バスサービス
• 車両の最適なルートに合わせて、利用者の乗降車スポットを
自動的に指定する仕組み
• テキサス州アーリントン市と提携。市の補助で運賃3ドルで運行
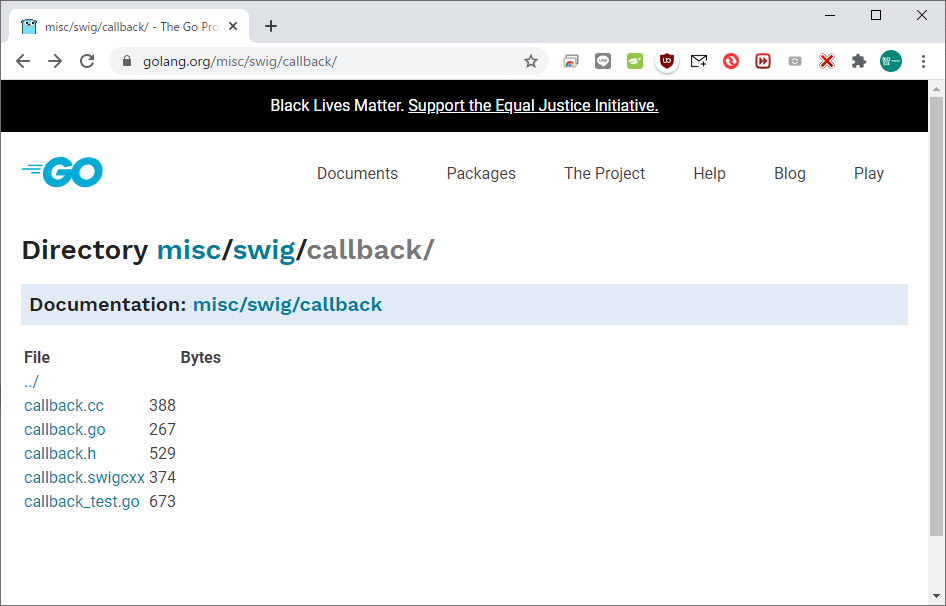
http://www.swig.org/Doc2.0/Go.html
GO 1.5 と C++ を SWIG でブリッジさせる方法
を試してみたのですが、私は上手く動かすことができませんでした。
で、こんな風にしてみたら動いたので、記録を残しておきます。
ebata@DESKTOP-P6KREM0 MINGW64 ~/kese/swig
$ tree
.
├── main1.go
└── sc1
    ├── nop.go
    ├── sc1.h
    └── sc1.swigcxx

1 directory, 4 files
// main1.go
package main
import (
"fmt"
"./sc1"
)
func Dump(p interface{}) {
fmt.Printf("%v:%T\n", p, p)
}
func main() {
Dump(sc1.EchoIntN(8))
Dump(sc1.EchoDoubleN(9))
}でもって、nop.go
package sc1sc1.h
#pragma once

inline  int
EchoIntN( int p ) {
    return p;
}

inline  double
EchoDoubleN( double p ) {
    return p;
}
sc1.swigcxx
%module sc1
%{
#include    "sc1.h"
%}

%include    "sc1.h"
ちなみに、sc1.hのインラインをやめて、sc1.hとsc1.cに分けて実施したら、こうなった
$ go build main1.go
# _/C_/Users/ebata/kese/swig2/sc1
C:/msys64/mingw64/bin/../lib/gcc/x86_64-w64-mingw32/10.2.0/../../../../x86_64-w6
4-mingw32/bin/ld.exe: $WORK\b002\_x004.o:/tmp/go-build/sc1_wrap.cxx:279: undefin
ed reference to `EchoIntN(int)'
C:/msys64/mingw64/bin/../lib/gcc/x86_64-w64-mingw32/10.2.0/../../../../x86_64-w6
4-mingw32/bin/ld.exe: $WORK\b002\_x004.o:/tmp/go-build/sc1_wrap.cxx:292: undefin
ed reference to `EchoDoubleN(double)'
collect2.exe: error: ld returned 1 exit status
ずいぶん悩んだが、もしかしたらと思い、sc1.c → sc1.cpp にリネームしたら、あっさり通った
sc1.hは以下の通り
#pragma once

int EchoIntN(int);

double EchoDoubleN(double);
sc1.cppは以下の通り
//#pragma once
#include "sc1.h"

int EchoIntN( int p ) {
    return p;
}

double EchoDoubleN( double p ) {
    return p;
}
以上
を参考にさせて頂いて、実験中です。
大変申し訳ありませんが、ほぼ丸パクりさせて下さい。これから、頻繁に見る必要があり、万一ページがexpiredされたら青冷めますので。
hoge.goというファイル名のPrintHoge関数を C 言語から呼べるようにします。
Cをインポートする//export XXXXを書く (普通、//とするとコメントなんだけどなぁ)package main
import (
"C"
"fmt"
)
//export PrintHoge
func PrintHoge() {
fmt.Println("hoge")
}
func main() {}main関数がないとエラーになるので、空で良いので書いておきます。
-buildmode=c-archiveオプションをつけてgo buildします。
$ go build -buildmode=c-archive hoge.go
すると、hoge.aアーカイブとhoge.hヘッダが生成されます。
生成されたヘッダをインクルードして、Go 言語の関数を呼びます。
生成されたアーカイブと一緒にコンパイルします。
$ gcc -o hoge hoge.a main.c

ところが、
$ gcc -o hoge hoge.a main.c
C:/msys64/mingw64/bin/../lib/gcc/x86_64-w64-mingw32/10.2.0/../../../../x86_64-w6
4-mingw32/bin/ld.exe: C:\Users\ebata\AppData\Local\Temp\cc1F3Mbe.o:main.c:(.text
+0xe): undefined reference to `PrintHoge'
collect2.exe: error: ld returned 1 exit status
が出てきて、「変だなー」と思いつつ、色々調べてみたのですが、hoge.aを一番最後にしたら、動きました。
$ gcc -o hoge main.c hoge.a$ ./hogehoge
https://github.com/HazeyamaLab/setup/issues/14
Go言語をVSCodeを使ってデバッグをしようとするとすると以下のメッセージが出てきて、困っていました。
"Failed to continue: Check the debug console for details."
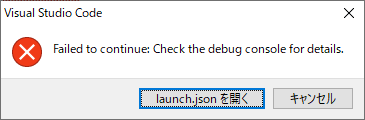
が消えなくて、困っていたのですが、
// +build ignorepackage main
の "// +build ignore"を消したら、消えました。