映像テストの実験用に使っているのですが、Mozcの日本語-直接入力がサクサクできず、ちょっとした検索もできず、困っておりました。
手当たり次第、探した結果、(私の場合は)このキーに割り当たっていたようでした。

ちゃんと設定すべきところ、それすら面倒くさくて ―― 私は、これで十分です。
ましてや、SKKを入れる気力は、絶無です。
江端智一のホームページ
映像テストの実験用に使っているのですが、Mozcの日本語-直接入力がサクサクできず、ちょっとした検索もできず、困っておりました。
手当たり次第、探した結果、(私の場合は)このキーに割り当たっていたようでした。
ちゃんと設定すべきところ、それすら面倒くさくて ―― 私は、これで十分です。
ましてや、SKKを入れる気力は、絶無です。
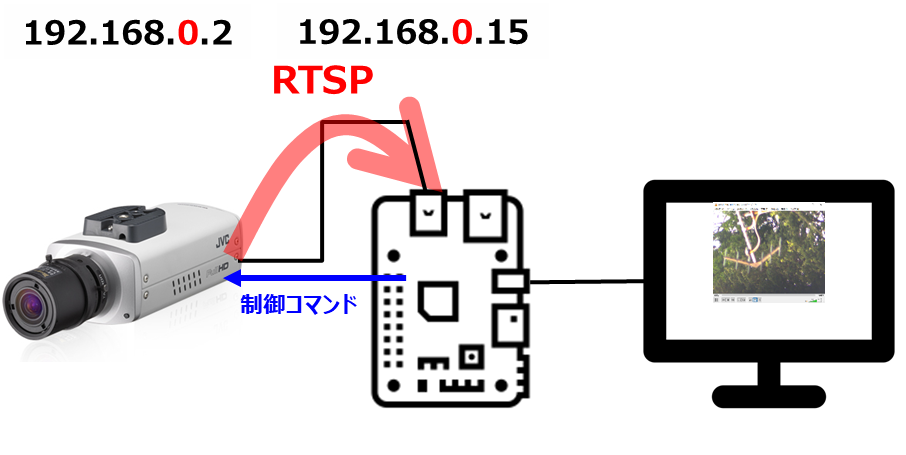
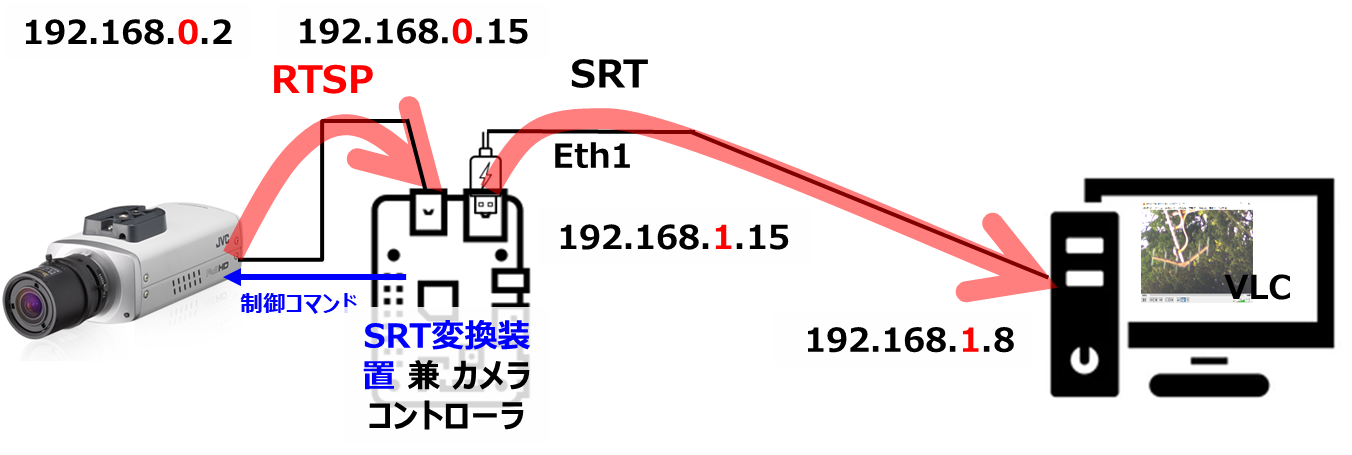
今度のターゲットはVN-H68(カメラ)です。


で、取り敢えず、RTSPを取得できるかの確認作業に入りました。
VN-H68の初期設定IPアドレスは、192.168.0.2/24 になっており、私の自宅ネットワークのIPアドレスと見事にバッティングしていましたので、カメラのMACアドレスを使って、ルータに固定DHCPアドレスとして設定しなおして、ルータを再起動させました(ルータの再起動は、いつでもドキドキします)。
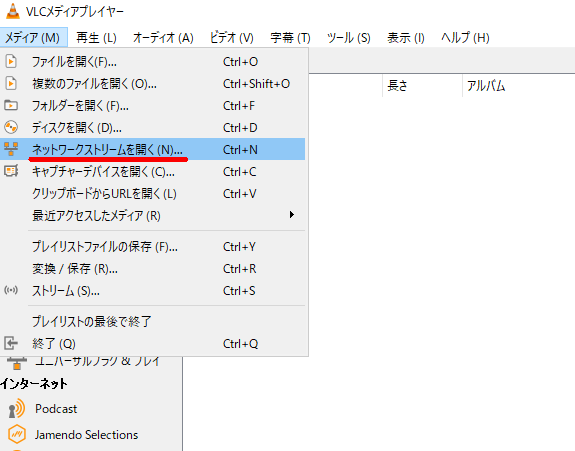
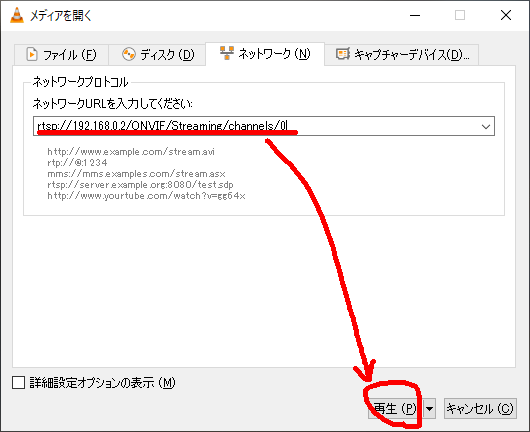
問題は、RTSPで転送したデータをどうやって表示するかですが、いつも通りVLCを使おうと思ったのですが、以下が失敗例です。
rtsp://192.168.0.2
rtsp://192.168.0.2:554
rtsp://192.168.0.2:544/XXXXX(適当なファイル名)
で、結局、製品の箱に入っていたCDファイルの中の
E:\VN-H68_VN-U78\VN-H68_VN-U78_ネットワークカメラAPIガイドV1.02.pdf
の中にあった以下の記載から、
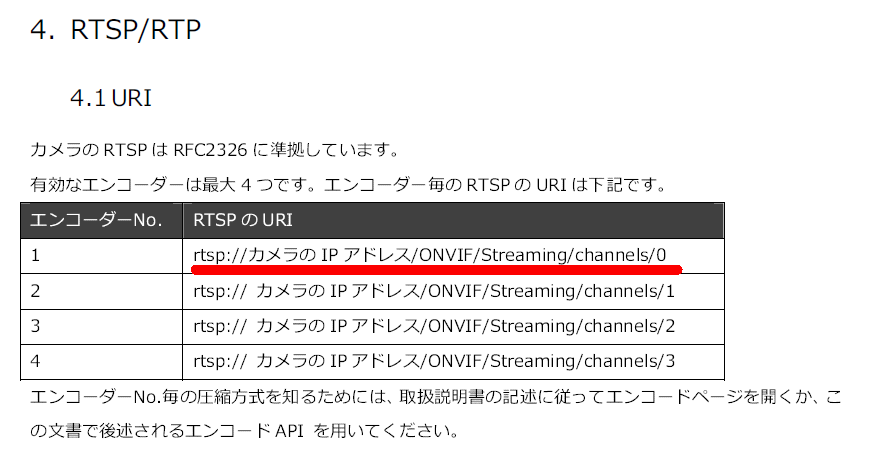
rtsp://192.168.0.2/ONVIF/Streaming/channels/0

なんか、レンズの配置を間違えたのか、逆さに写っているようですが、先ずは成功です。
次は、VLCを使わずに、Gstreamerを使って、直接RTSPを受信しました。
(結構すったもんだしましたが)結果として、以下のコマンドでラズパイで表示させることができました。
$ gst-launch-1.0 rtspsrc location=rtsp://192.168.0.2/
gst-launch-1.0: GStreamerのコマンドラインユーティリティの実行ファイル名です。1.0はGStreamerのバージョン番号で、バージョン1.0を使用していることを示します。rtspsrc location=rtsp://192.168.0.2/ONVIF/Streaming/channels/0: RTSPソースを指定しています。locationパラメータには、ストリーミング元のURL(この場合はRTSPストリームのURL)を指定します。rtsp://192.168.0.2/ONVIF/Streaming/channels/0は、カメラなどのデバイスが提供するRTSPストリームのアドレスを表します。! rtph264depay: RTP(Real-time Transport Protocol)パケットからH.264ビデオデータを取り出すデパケット化(デマルチプレクサ)エレメントです。! h264parse: H.264ビデオストリームを解析して必要なメタデータを抽出するエレメントです。! avdec_h264: H.264形式のビデオをデコードするためのエレメントです。avdec_h264は、GStreamer内部で使用されるデコーダの一つです。! queue: デコードされたビデオデータを一時的にキューイング(バッファリング)するエレメントです。これにより、デコードと表示の間でのタイミングのずれを最小限に抑えることができます。! autovideosink: 自動的に適切なビデオ出力を選択し、デコードされたビデオを表示するエレメントです。環境によっては、X Window System上で動作するxvimagesinkなどのビデオ出力プラグインが選択されることがあります。ちなみに
$ gst-launch-1.0 rtspsrc location=rtsp://192.168.0.2/
gst-launch-1.0: GStreamerのコマンドラインユーティリティの実行ファイル名です。rtspsrc location=rtsp://192.168.0.2/ONVIF/Streaming/channels/0: RTSPソースを指定しています。locationパラメータには、ストリーミング元のURL(この場合はRTSPストリームのURL)を指定します。rtsp://192.168.0.2/ONVIF/Streaming/channels/0は、カメラなどのデバイスが提供するRTSPストリームのアドレスを表します。! rtph264depay: RTP(Real-time Transport Protocol)パケットからH.264ビデオデータを取り出すデパケット化(デマルチプレクサ)エレメントです。! h264parse: H.264ビデオストリームを解析して必要なメタデータを抽出するエレメントです。! avdec_h264: H.264形式のビデオをデコードするためのエレメントです。avdec_h264は、GStreamer内部で使用されるデコーダの一つです。! videoconvert: ビデオのピクセルフォーマットを変換するためのエレメントです。必要な場合にビデオストリームのフォーマットを変換します。! x264enc tune=zerolatency key-int-max=30: H.264形式のビデオをエンコードするエレメントです。x264encは、x264エンコーダを使用してビデオをエンコードします。tune=zerolatencyは、低遅延を設定してストリーミングに適したエンコード設定を指定しています。key-int-max=30は、キーフレームの最大間隔を設定して、頻繁にキーフレームを生成し、エラーの影響を最小限に抑えます。! mpegtsmux: エンコードされたビデオをMPEG-TSコンテナにパケット化するエレメントです。! srtserversink uri="srt://:12345" latency=500: SRTストリームを送信するためのエレメントです。uri="srt://:12345"でポート番号が12345のSRTストリームを待ち受ける設定になっています。latency=500は、500ミリ秒のバッファリングを指定しています。つまり、送信時にストリームに500ミリ秒の遅延がかかります。


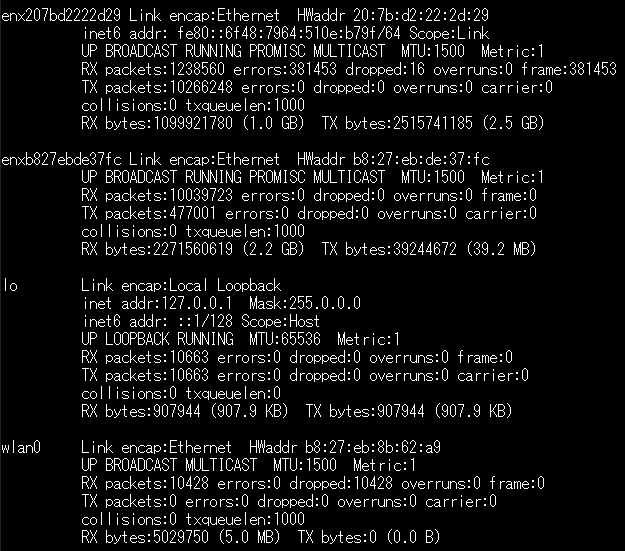
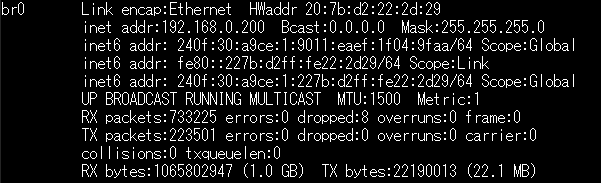
enx207bd2222d29 とか、enxb827ebde37fc とか、なんじゃらほい? と思われるかもしれませんが、これ、eth0 とかeth1と同じものと思って頂ければ結構です(正直、これで、ちょっとごたごたしましたが、今回、"そういうものだ"と思って貰えればO.K.です) 。https://wp.kobore.net/%e6%b1%9f%e7%ab%af%e3%81%95%e3%82%93%e3%81%ae%e6%8a%80%e8%a1%93%e3%83%a1%e3%83%a2/post-10990/

package main

import (
	"fmt"
	"math"
)

func main() {
	// 行列のデータ
	matrix := [][]float64{
		{2.5, 3.7, 4.8, 1.2},
		{1.0, 2.0, 3.0, 4.0},
		{0.5, 1.5, 2.5, 3.5},
	}

	numRows := len(matrix)
	numCols := len(matrix[0])

	// 各列の平均を計算
	averages := make([]float64, numCols)
	for j := 0; j < numCols; j++ {
		sum := 0.0
		for i := 0; i < numRows; i++ {
			sum += matrix[i][j]
		}
		averages[j] = sum / float64(numRows)
	}

	// 各列の各データと平均の差の二乗和を計算
	sumOfSquaredDiffs := make([]float64, numCols)
	for j := 0; j < numCols; j++ {
		for i := 0; i < numRows; i++ {
			diff := matrix[i][j] - averages[j]
			sumOfSquaredDiffs[j] += diff * diff
		}
	}

	// 各列の分散を計算
	variances := make([]float64, numCols)
	for j := 0; j < numCols; j++ {
		variances[j] = sumOfSquaredDiffs[j] / float64(numRows)
	}

	// 各列の標準偏差を計算
	stdDevs := make([]float64, numCols)
	for j := 0; j < numCols; j++ {
		stdDevs[j] = math.Sqrt(variances[j])
	}

	// 行列の各要素を標準偏差で正規化
	normalizedMatrix := make([][]float64, numRows)
	for i := 0; i < numRows; i++ {
		normalizedMatrix[i] = make([]float64, numCols)
		for j := 0; j < numCols; j++ {
			normalizedMatrix[i][j] = (matrix[i][j] - averages[j]) / stdDevs[j]
		}
	}

	// 正規化された行列を表示
	fmt.Println("正規化された行列:")
	for i := 0; i < numRows; i++ {
		fmt.Println(normalizedMatrix[i])
	}
}
ラズパイ4は、(○arm64 ×amd64)を採用しており、色々とトラブルとなっています。これも、その一つかどうか不明ですが、Chromeのインストールに失敗しています。
で、まあ、以下のことをごちゃごちゃしているうちに動きましたので、メモを残しておきます。
$ sudo snap refresh
$sudo snap install chromium
( $ sudo apt install -y chromium-browser は、失敗しました)
で、起動は、
$ chromium (× $ chromium-browser)
でした。
以上
Pythonを使った因子分析のコード を そのまま使わせて頂いています。
【Pythonで行う】因子分析
# ebata@DESKTOP-P6KREM0:/mnt/c/Users/ebata/go-efa$ python3 main3.py

# ライブラリのインポート
import numpy as np
import pandas as pd
import matplotlib.pyplot as plt
import japanize_matplotlib
from factor_analyzer import FactorAnalyzer

# データの読み込み
df_workers = pd.read_csv("sample_factor.csv")
print(df_workers)

# 変数の標準化
df_workers_std = df_workers.apply(lambda x: (x-x.mean())/x.std(), axis=0)

# 固有値を求める
ei = np.linalg.eigvals(df_workers.corr())
print("固有値", ei)

# 因子分析の実行
fa = FactorAnalyzer(n_factors=2, rotation="promax")
fa.fit(df_workers_std)

# 因子負荷量,共通性
loadings_df = pd.DataFrame(fa.loadings_, columns=["第1因子", "第2因子"])
loadings_df.index = df_workers.columns
loadings_df["共通性"] = fa.get_communalities()
print(loadings_df)

# 因子負荷量の二乗和,寄与率,累積寄与率
var = fa.get_factor_variance()
df_var = pd.DataFrame(list(zip(var[0], var[1], var[2])),
                      index=["第1因子", "第2因子"],
                      columns=["因子負荷量の二乗和", "寄与率", "累積寄与率"])
print(df_var.T)

# バイプロットの作図
score = fa.transform(df_workers_std)
coeff = fa.loadings_.T
fa1 = 0
fa2 = 1
labels = df_workers.columns
annotations = df_workers.index
xs = score[:, fa1]
ys = score[:, fa2]
n = score.shape[1]
scalex = 1.0 / (xs.max() - xs.min())
scaley = 1.0 / (ys.max() - ys.min())
X = xs * scalex
Y = ys * scaley
for i, label in enumerate(annotations):
    plt.annotate(label, (X[i], Y[i]))
for j in range(coeff.shape[1]):
    plt.arrow(0, 0, coeff[fa1, j], coeff[fa2, j], color='r', alpha=0.5,
              head_width=0.03, head_length=0.015)
    plt.text(coeff[fa1, j] * 1.15, coeff[fa2, j] * 1.15, labels[j], color='r',
             ha='center', va='center')
plt.xlim(-1, 1)
plt.ylim(-1, 1)
plt.xlabel("第1因子")
plt.ylabel("第2因子")
plt.grid()
plt.show()
Pythonを使ったGAのコード を そのまま使わせて頂いています。
【python】遺伝的アルゴリズム(Genetic Algorithm)を実装してみる
遺伝配列を0/1を、便宜的に0~4にして動くよう、一部改造させて頂いております。
# ebata@DESKTOP-P6KREM0:/mnt/c/Users/ebata/go-efa$ python3 ga.py
import numpy as np
import matplotlib.pyplot as plt
class Individual:
'''各個体のクラス
args: 個体の持つ遺伝子情報(np.array)'''
def __init__(self, genom):
self.genom = genom
self.fitness = 0 # 個体の適応度(set_fitness関数で設定)
self.set_fitness()
def set_fitness(self):
'''個体に対する目的関数(OneMax)の値をself.fitnessに代入'''
self.fitness = self.genom.sum()
def get_fitness(self):
'''self.fitnessを出力'''
return self.fitness
def mutate(self):
'''遺伝子の突然変異'''
tmp = self.genom.copy()
i = np.random.randint(0, len(self.genom) - 1)
# tmp[i] = float(not self.genom[i])
tmp[i] = np.random.randint(0, 5) # 江端修正
self.genom = tmp
self.set_fitness()
def select_roulette(generation):
'''選択の関数(ルーレット方式)'''
selected = []
weights = [ind.get_fitness() for ind in generation]
norm_weights = [ind.get_fitness() / sum(weights) for ind in generation]
selected = np.random.choice(generation, size=len(generation), p=norm_weights)
return selected
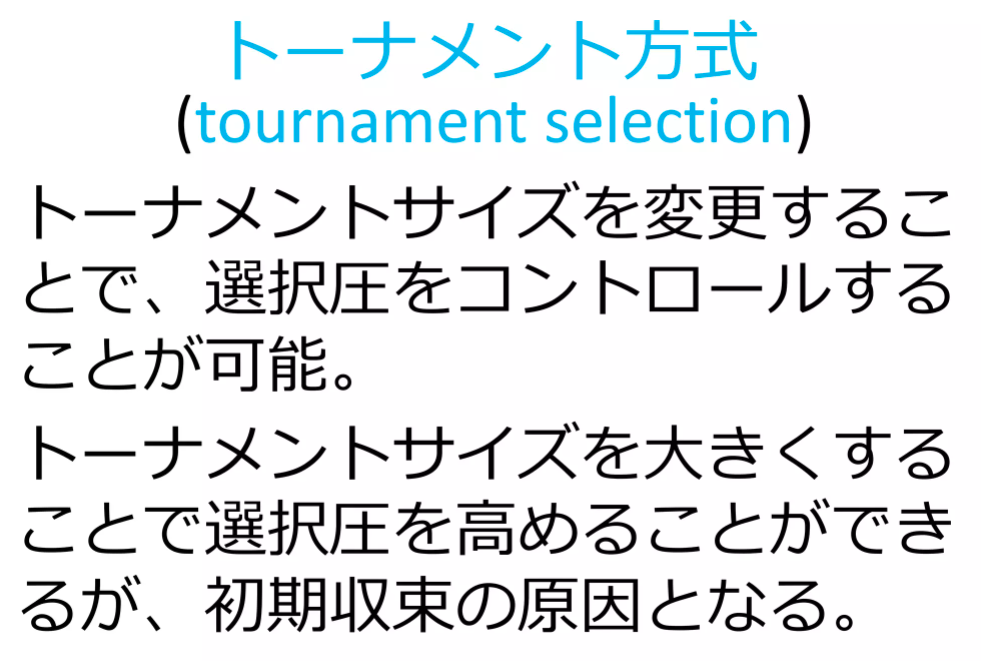
def select_tournament(generation):
'''選択の関数(トーナメント方式)'''
selected = []
for i in range(len(generation)):
tournament = np.random.choice(generation, 3, replace=False)
max_genom = max(tournament, key=Individual.get_fitness).genom.copy()
selected.append(Individual(max_genom))
return selected
def crossover(selected):
'''交叉の関数'''
children = []
if POPURATIONS % 2:
selected.append(selected[0])
for child1, child2 in zip(selected[::2], selected[1::2]):
if np.random.rand() < CROSSOVER_PB:
child1, child2 = cross_two_point_copy(child1, child2)
children.append(child1)
children.append(child2)
children = children[:POPURATIONS]
return children
def cross_two_point_copy(child1, child2):
'''二点交叉'''
size = len(child1.genom)
tmp1 = child1.genom.copy()
tmp2 = child2.genom.copy()
cxpoint1 = np.random.randint(1, size)
cxpoint2 = np.random.randint(1, size - 1)
if cxpoint2 >= cxpoint1:
cxpoint2 += 1
else:
cxpoint1, cxpoint2 = cxpoint2, cxpoint1
tmp1[cxpoint1:cxpoint2], tmp2[cxpoint1:cxpoint2] = tmp2[cxpoint1:cxpoint2].copy(), tmp1[cxpoint1:cxpoint2].copy()
new_child1 = Individual(tmp1)
new_child2 = Individual(tmp2)
return new_child1, new_child2
def mutate(children):
for child in children:
if np.random.rand() < MUTATION_PB:
child.mutate()
return children
def create_generation(POPURATIONS, GENOMS):
'''初期世代の作成
return: 個体クラスのリスト'''
generation = []
for i in range(POPURATIONS):
# individual = Individual(np.random.randint(0, 2, GENOMS))
individual = Individual(np.random.randint(0, 5, GENOMS))
generation.append(individual)
return generation
def ga_solve(generation):
'''遺伝的アルゴリズムのソルバー
return: 最終世代の最高適応値の個体、最低適応値の個体'''
best = []
worst = []
# --- Generation loop
print('Generation loop start.')
for i in range(GENERATIONS):
# --- Step1. Print fitness in the generation
best_ind = max(generation, key=Individual.get_fitness)
best.append(best_ind.fitness)
worst_ind = min(generation, key=Individual.get_fitness)
worst.append(worst_ind.fitness)
print("Generation: " + str(i) \
+ ": Best fitness: " + str(best_ind.fitness) \
+ ". Worst fitness: " + str(worst_ind.fitness))
# --- Step2. Selection (Roulette)
# selected = select_roulette(generation)
selected = select_tournament(generation)
# --- Step3. Crossover (two_point_copy)
children = crossover(selected)
# --- Step4. Mutation
generation = mutate(children)
print("Generation loop ended. The best individual: ")
print(best_ind.genom)
return best, worst
np.random.seed(seed=65)
# param
POPURATIONS = 100
# GENOMS = 50 # 江端修正
GENOMS = 160
GENERATIONS = 1000
CROSSOVER_PB = 0.8
MUTATION_PB = 0.1
# create first genetarion
generation = create_generation(POPURATIONS, GENOMS)
# solve
best, worst = ga_solve(generation)
# plot
fig, ax = plt.subplots()
ax.plot(best, label='max')
ax.plot(worst, label='min')
ax.axhline(y=GENOMS, color='black', linestyle=':', label='true')
ax.set_xlim([0, GENERATIONS - 1])
#ax.set_ylim([0, GENOMS * 1.1])
ax.set_ylim([0, GENOMS * 2.2])
ax.legend(loc='best')
ax.set_xlabel('Generations')
ax.set_ylabel('Fitness')
ax.set_title('Tournament Select')
plt.show()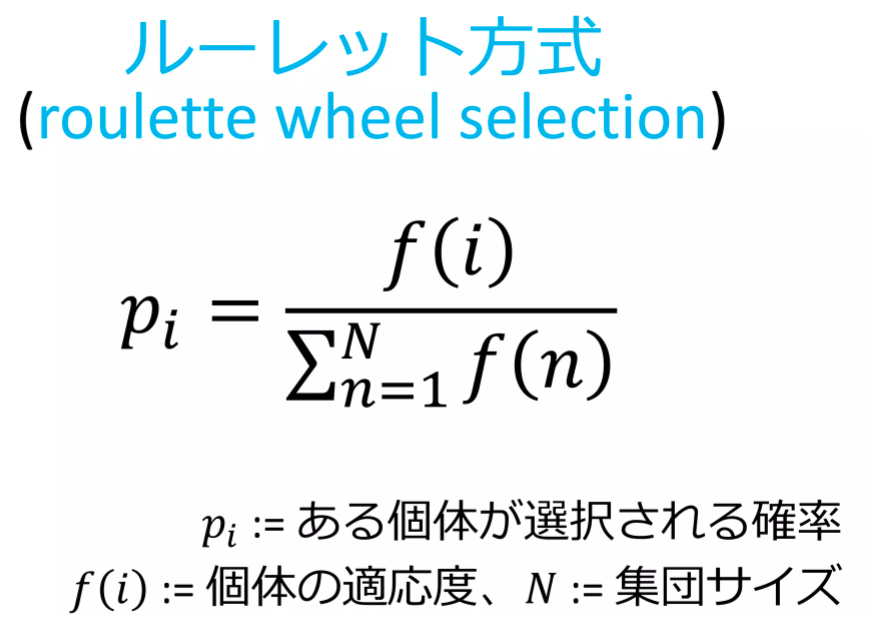

明日は、この2つをマージして、目的のプログラムを完成させます。
以下のプログラムは、20個のデータを使って因子分析を行い、その分析因子分析を同じ結果を生み出す200個のダミーデータを作成します。
アルゴリズムの説明は省略します(が、私は分かっています)。
まず、データ(sample_factory.csv)
x1,x2,x3,x4,x5,x6,x7,x8
2,4,4,1,3,2,2,1
5,2,1,3,1,4,2,1
2,3,4,3,4,2,4,5
2,2,2,2,3,2,2,2
5,4,3,4,4,5,4,3
1,4,4,2,4,3,2,3
3,1,1,1,1,2,1,1
5,5,3,5,4,5,3,5
1,3,4,1,3,1,3,1
4,4,3,1,4,4,2,1
3,3,3,2,4,4,4,2
1,2,1,3,1,1,1,1
5,2,3,5,2,5,1,3
4,1,1,3,1,2,2,1
1,1,1,1,2,1,2,1
3,1,2,1,1,3,2,1
1,2,3,5,2,2,2,2
3,1,1,3,2,4,2,1
3,2,3,2,2,2,2,5
1,4,3,1,4,3,5,3
以下、GAのコード
# ebata@DESKTOP-P6KREM0:/mnt/c/Users/ebata/go-efa$ python3 ga-factory2.py

# ライブラリのインポート
import numpy as np
import pandas as pd
import matplotlib.pyplot as plt
# import japanize_matplotlibe
from factor_analyzer import FactorAnalyzer
import matplotlib.pyplot as plt

class Individual:
    '''各個体のクラス
        args: 個体の持つ遺伝子情報(np.array)'''
    def __init__(self, genom):
        self.genom = genom
        self.fitness = 0  # 個体の適応度(set_fitness関数で設定)
        self.set_fitness()

    def set_fitness(self):
        '''個体に対する目的関数(OneMax)の値をself.fitnessに代入'''
        # まずgenomを行列にデータに変換する
        # self.fitness = self.genom.sum()

        # 遺伝子列を行列に変換
        arr2d = self.genom.reshape((-1, 8)) # 列が分からない場合は、-1にするとよい

        # 各列の平均と標準偏差を計算
        mean = np.mean(arr2d, axis=0)
        std = np.std(arr2d, axis=0)

        # 標準偏差値に変換
        standardized_arr2d = (arr2d - mean) / std

        # 因子分析の実行
        fa_arr2d = FactorAnalyzer(n_factors=2, rotation="promax")
        fa_arr2d.fit(standardized_arr2d)

        # 因子分析行列の算出
        loadings_arr2d = fa_arr2d.loadings_

        # 因子分析行列の差分算出
        distance2 = euclidean_distance(fa.loadings_, loadings_arr2d)
        # print(distance2)

        # とりあえず評価関数をこの辺から始めてみる
        self.fitness = 1 / distance2

    def get_fitness(self):
        '''self.fitnessを出力'''
        return self.fitness

    def mutate(self):
        '''遺伝子の突然変異'''
        tmp = self.genom.copy()
        i = np.random.randint(0, len(self.genom) - 1)
        # tmp[i] = float(not self.genom[i])
        tmp[i] = np.random.randint(1, 6) #  江端修正
        self.genom = tmp
        self.set_fitness()


def euclidean_distance(matrix_a, matrix_b):
    # 行列Aと行列Bの要素ごとの差を計算します
    diff = matrix_a - matrix_b

    # 差の二乗を計算します
    squared_diff = np.square(diff)

    # 差の二乗の和を計算します
    sum_squared_diff = np.sum(squared_diff)

    # 和の平方根を計算します
    distance = np.sqrt(sum_squared_diff)

    return distance


def select_roulette(generation):
    '''選択の関数(ルーレット方式)'''
    selected = []
    weights = [ind.get_fitness() for ind in generation]
    norm_weights = [ind.get_fitness() / sum(weights) for ind in generation]
    selected = np.random.choice(generation, size=len(generation), p=norm_weights)
    return selected


def select_tournament(generation):
    '''選択の関数(トーナメント方式)'''
    selected = []
    for i in range(len(generation)):
        tournament = np.random.choice(generation, 3, replace=False)
        max_genom = max(tournament, key=Individual.get_fitness).genom.copy()
        selected.append(Individual(max_genom))
    return selected


def crossover(selected):
    '''交叉の関数'''
    children = []
    if POPURATIONS % 2:
        selected.append(selected[0])
    for child1, child2 in zip(selected[::2], selected[1::2]):
        if np.random.rand() < CROSSOVER_PB:
            child1, child2 = cross_two_point_copy(child1, child2)
        children.append(child1)
        children.append(child2)
    children = children[:POPURATIONS]
    return children


def cross_two_point_copy(child1, child2):
    '''二点交叉'''
    size = len(child1.genom)
    tmp1 = child1.genom.copy()
    tmp2 = child2.genom.copy()
    cxpoint1 = np.random.randint(1, size)
    cxpoint2 = np.random.randint(1, size - 1)
    if cxpoint2 >= cxpoint1:
        cxpoint2 += 1
    else:
        cxpoint1, cxpoint2 = cxpoint2, cxpoint1
    tmp1[cxpoint1:cxpoint2], tmp2[cxpoint1:cxpoint2] = tmp2[cxpoint1:cxpoint2].copy(), tmp1[cxpoint1:cxpoint2].copy()
    new_child1 = Individual(tmp1)
    new_child2 = Individual(tmp2)
    return new_child1, new_child2


def mutate(children):
    for child in children:
        if np.random.rand() < MUTATION_PB:
            child.mutate()
    return children


def create_generation(POPURATIONS, GENOMS):
    '''初期世代の作成
        return: 個体クラスのリスト'''
    generation = []
    for i in range(POPURATIONS):  # POPURATIONS = 100
        # individual = Individual(np.random.randint(0, 2, GENOMS))
        individual = Individual(np.random.randint(1, 6, GENOMS))
        generation.append(individual)
    return generation


def ga_solve(generation):
    '''遺伝的アルゴリズムのソルバー
        return: 最終世代の最高適応値の個体、最低適応値の個体'''
    best = []
    worst = []
    # --- Generation loop
    print('Generation loop start.')
    for i in range(GENERATIONS):
        # --- Step1. Print fitness in the generation
        best_ind = max(generation, key=Individual.get_fitness)
        best.append(best_ind.fitness)
        worst_ind = min(generation, key=Individual.get_fitness)
        worst.append(worst_ind.fitness)
        print("Generation: " + str(i) \
                + ": Best fitness: " + str(best_ind.fitness) \
                + ". Worst fitness: " + str(worst_ind.fitness))

        # --- Step2. Selection (Roulette)
        # selected = select_roulette(generation)
        selected = select_tournament(generation)

        # --- Step3. Crossover (two_point_copy)
        children = crossover(selected)

        # --- Step4. Mutation
        generation = mutate(children)

    print("Generation loop ended. The best individual: ")
    print(best_ind.genom)
    return best, worst


np.random.seed(seed=65)

# param
POPURATIONS = 100  # 個体数
# GENOMS = 50 # 江端修正

# GENOMS = 160 # GENの長さ
GENOMS = 1600 # GENの長さ 1つのデータが8個の整数からなるので、合計200個のデ0タとなる

GENERATIONS = 1000
CROSSOVER_PB = 0.8

# MUTATION_PB = 0.1
MUTATION_PB = 0.3 # ミューテーションは大きい方が良いように思える

# ファイルからデータの読み込み
df_workers = pd.read_csv("sample_factor.csv")
print(df_workers)

# 変数の標準化
df_workers_std = df_workers.apply(lambda x: (x-x.mean())/x.std(), axis=0)
print(df_workers_std)


# 固有値を求める(不要と思うけど、残しておく)
ei = np.linalg.eigvals(df_workers.corr())
print(ei)

print("因子分析の実行") # 絶対必要
fa = FactorAnalyzer(n_factors=2, rotation="promax")
fa.fit(df_workers_std)

# print(fa.loadings_) # これが因子分析の行列


# 因子負荷量,共通性(不要と思うけど、残しておく)
loadings_df = pd.DataFrame(fa.loadings_, columns=["第1因子", "第2因子"])
loadings_df.index = df_workers.columns
loadings_df["共通性"] = fa.get_communalities()

# 因子負荷量の二乗和,寄与率,累積寄与率(不要と思うけど、残しておく)
var = fa.get_factor_variance()
df_var = pd.DataFrame(list(zip(var[0], var[1], var[2])),
                      index=["第1因子", "第2因子"],
                      columns=["因子負荷量の二乗和", "寄与率", "累積寄与率"])
print(df_var.T)


# create first genetarion
generation = create_generation(POPURATIONS, GENOMS)

# solve
best, worst = ga_solve(generation)

# plot

#fig, ax = plt.subplots()
#ax.plot(best, label='max')
#ax.plot(worst, label='min')
#ax.axhline(y=GENOMS, color='black', linestyle=':', label='true')
#ax.set_xlim([0, GENERATIONS - 1])
#ax.set_ylim([0, GENOMS * 1.1])
#ax.legend(loc='best')
#ax.set_xlabel('Generations')
#ax.set_ylabel('Fitness')
#ax.set_title('Tournament Select')
#plt.show()
ga-factory2.py :200固体 主成分行列からの距離は、distance2(これが一致度) 評価関数は、この逆数を使っているだけ
ga-factory3.py :2000固体
以上
で、勉強させて頂いております。
私、今、超スケーラブルな高速の遺伝的アルゴリズムをGo言語で実装しようとしているのですが、計算ライブラリの充実度はPythonが圧倒しているからです。
# 私が、Go言語で計算ライブラリを自作する、というのは、却下です(面倒くさい)
まあ、これは、元を辿ると"ChatGPTの責任"とも言えるのですが(押しつけ)
取り敢えず、参照させて頂いたページのコードを、自分の環境に合わせて(といっても、結構苦労した"Python3.h"の場所が分からなかった)、ここまで動きました。
/*
   環境
   wsl -d Ubuntu-20.04

   実行結果
   ebata@DESKTOP-P6KREM0:/mnt/c/Users/ebata/go-efa$ go run main1.go
   Hello, World! and Ebata is great
*/

package main

// #cgo CFLAGS: -I/usr/include/python3.9
// #cgo LDFLAGS: -L/usr/lib/pytho3.9 -lpython3.9
// #include
import "C"
// import "C"のうえに改行いれるとエラーになる(信じられないが)

func main() {
    //  最後にPythonインタプリタ終了
    defer C.Py_Finalize()
    // Pythonインタプリタの初期化
    C.Py_Initialize()
    // GoのstringをCのcharに型変換(変換しないとPyRun_SimpleStringに型合ってないよって怒られる)
    // cannot use "print(\"Hello, World!\")" (type string) as type *_Ctype_char in argument to _Cfunc_PyRun_SimpleString
    pyCodeStr := `print("Hello, World! and Ebata is great!")`
    pyCodeChar := C.CString(pyCodeStr)
    // Pythonコードを文字列として受け取ってインタプリタ上で実行
    C.PyRun_SimpleString(pyCodeChar)

}
ようするに、このプログラムは、Go言語を使って、Pythonのインタプリタに一行づつコマンドを打ち込むプログラムのようです。
pythonのライブラリを使えるという訳でないようです。
GoとPythonをマージする方法は、どうも調子がよくないようです。
GoとPythonとGrumpyの速度ベンチマーク ~Googleのトランスパイラはどれくらい速い?~
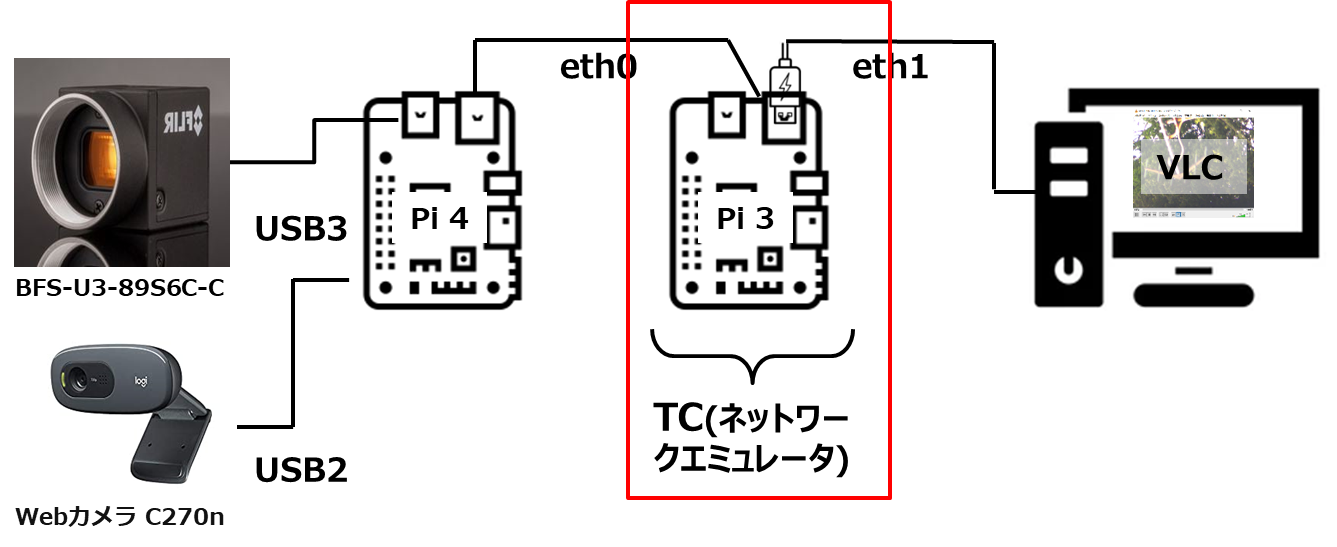
These steps describe using an Ubuntu desktop environment to install Ubuntu and the Spinnaker Python interface on a Raspberry Pi 3 B+. Commands to be run on the desktop are prefaced with (desktop)$, and commands to be run on the Raspberry Pi are prefaced with (pi)$
この手順では、Ubuntuデスクトップ環境を使用して、Raspberry Pi 3 B+にUbuntuとSpinnaker Pythonインターフェースをインストールする方法を説明します。デスクトップ上で実行するコマンドの前には(desktop)$を、Raspberry Pi上で実行するコマンドの前には(pi)$を付けます。
Flash the latest Ubuntu image (at the time of writing: 18.04) to an SD card and perform first-time setup by following these instructions. You will need an HDMI cable, a monitor, and a keyboard. The Raspberry Pi must also be connected to your local network via Ethernet.
最新のUbuntuイメージ(執筆時点では18.04)をSDカードに書き込み、以下の手順に従って初回セットアップを行う。HDMIケーブル、モニター、キーボードが必要です。また、Raspberry Piはイーサネット経由でローカルネットワークに接続されている必要があります。
(pi)$ sudo apt update && sudo apt upgrade
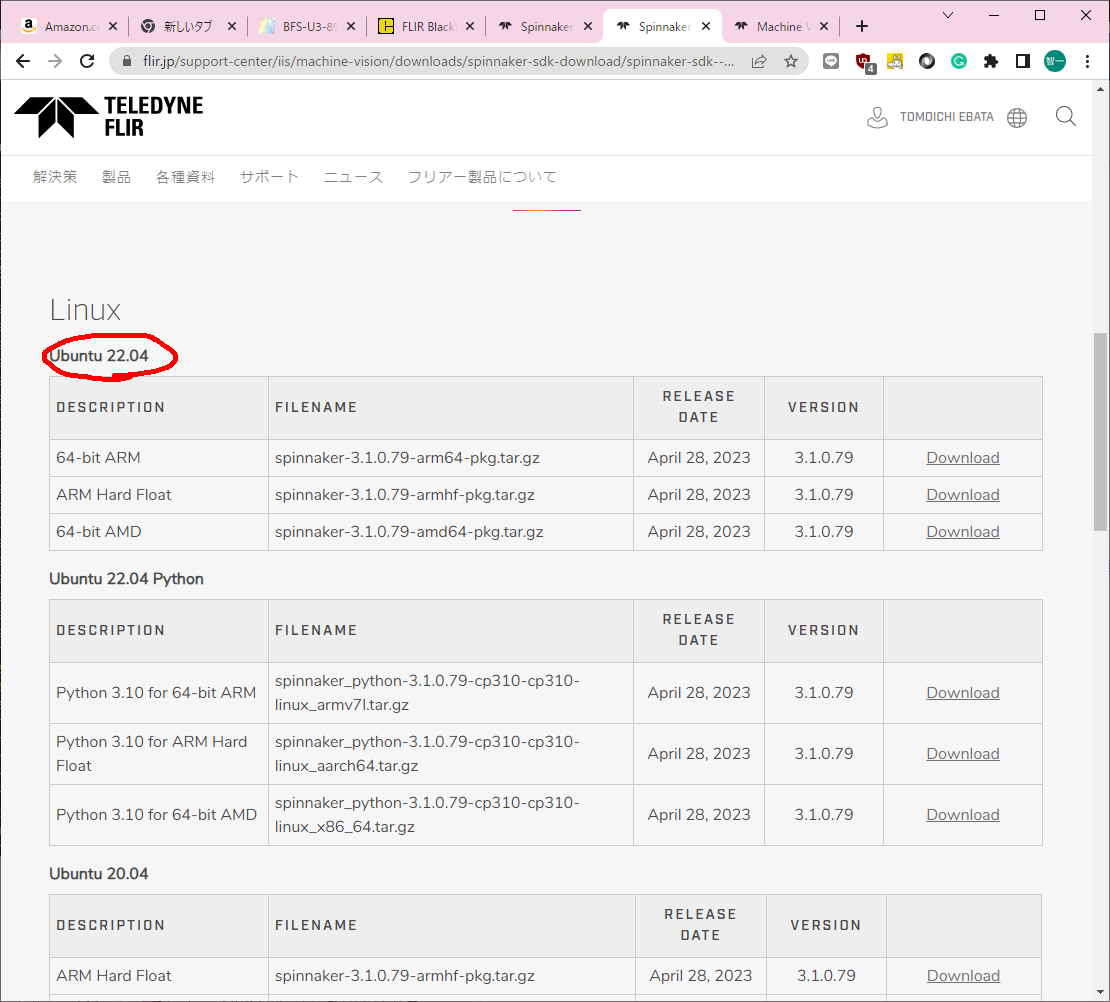
Go to the FLIR File Download website for your camera. The software downloads will require a free FLIR account.
お使いのカメラのフリアーファイルダウンロードサイトにアクセスします。ソフトウェアのダウンロードにはフリアーシステムズの無料アカウントが必要です。
On the FLIR website, find the latest Linux Ubuntu ARM Operating System packages.
フリアーシステムズのウェブサイトで、最新のLinux Ubuntu ARMオペレーティングシステムパッケージをご覧ください。
(pi)$ ip a # check pi's ip address
(desktop)$ scp spinnaker-*-pkg.tar.gz spinnaker_python-*.tar \
ubuntu@<pi's ip address>:~(pi)$ sudo sh install_spinnaker_arm.sh(pi)$ sudo apt install <name-of-missing-package>(pi)$ tar -xf spinnaker_python-1.*.tar
(pi)$ tar -xf spinnaker_python-1.*cp36*.tar.gz (pi)$ sudo apt install dphys-swapfile # (optional)
# follow the rest of the increasing swap size tutorial (optional)
(pi)$ sudo apt install python3-pip
(pi)$ python3 -m pip install numpy
(pi)$ sudo python3 -m pip install spinnaker_python-1.*.whl(pi)$ python3 -c 'import PySpin' # should take a few seconds, then exit silentlyYou will probably run into more dependency issues here. When you try to import PySpin with a missing dependency, you'll get an error along the lines of No Such File: <name-of-missing-package>.so. See step 8 for help resolving these issues.
おそらくここで依存関係の問題にもっとぶつかるでしょう。依存関係が見つからないPySpinをインポートしようとすると、No Such File: <名前-of-missing-package>.soというエラーが表示されます。このような問題の解決についてはステップ8を参照してください。
(pi)$ sudo sh -c 'echo 256 > /sys/module/usbcore/parameters/usbfs_memory_mb'Connect your USB 3.1 FLIR camera to the Raspberry Pi via USB.
USB3.1フリアーシステムズのカメラをUSB経由でRaspberry Piに接続します。
(pi)$ cd Examples/Python3
(pi)$ sudo python3 Acquisition.py
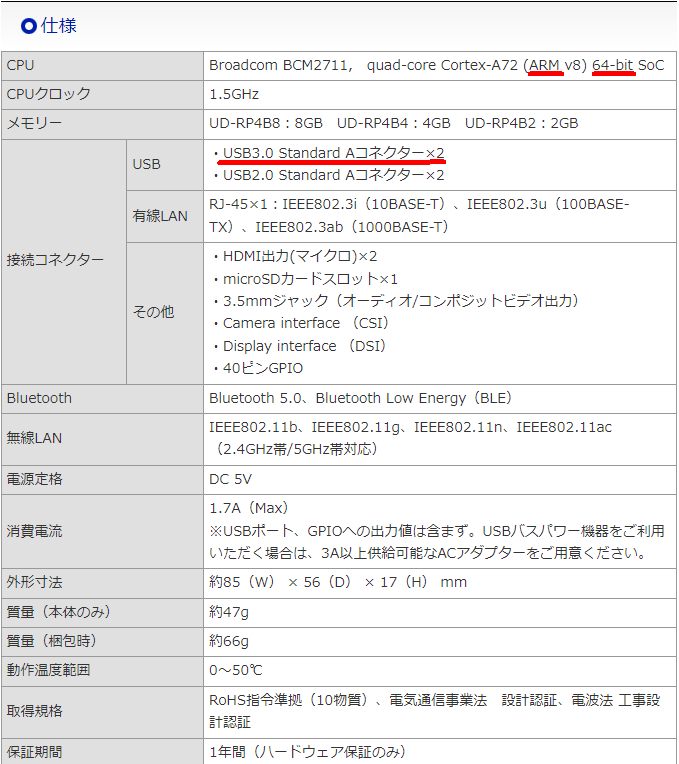
私が購入したときは、15K円くらいだったのですが、今、倍になっています。ラズパイって高価になっているんですね ―― それはさておき。
Raspberry Pi 4Bは、USB3対応のようですが、どちらのポートか分かりません。この写真を見ると右側のようです。

(出典 https://misoji-engineer.com/archives/raspberrypi-usb3.html)
まずは、ドライバのありかを探してみました。
あきらかに、これが当たりのように見えます。
ラズパイP4の石は、ARMのようです。
https://qiita.com/memakura/items/a77137856f91d6c4db43
何がどうなっているのかは分からないけど、
https://blog.csdn.net/weixin_42088912/article/details/118225949
を参考にして、/etc/udev/rule.d/40-flir-spinnaker.rules の
SUBSYSTEM=="usb", ATTRS{idVendor}=="1e10", GROUP="flirimaging"
SUBSYSTEM=="usb", ATTRS{idVendor}=="1724", GROUP="flirimaging"
SUBSYSTEM=="usb", ATTRS{idVendor}=="1e10", GROUP="flirimaging"
SUBSYSTEM=="usb", ATTRS{idVendor}=="1724", GROUP="flirimaging"
を
SUBSYSTEM=="usb", ATTRS{idVendor}=="1e10",ATTRS{idProduct}=="4000", MODE="0777", GROUP="flirimaging"
SUBSYSTEM=="usb", ATTRS{idVendor}=="1724", GROUP="flirimaging"
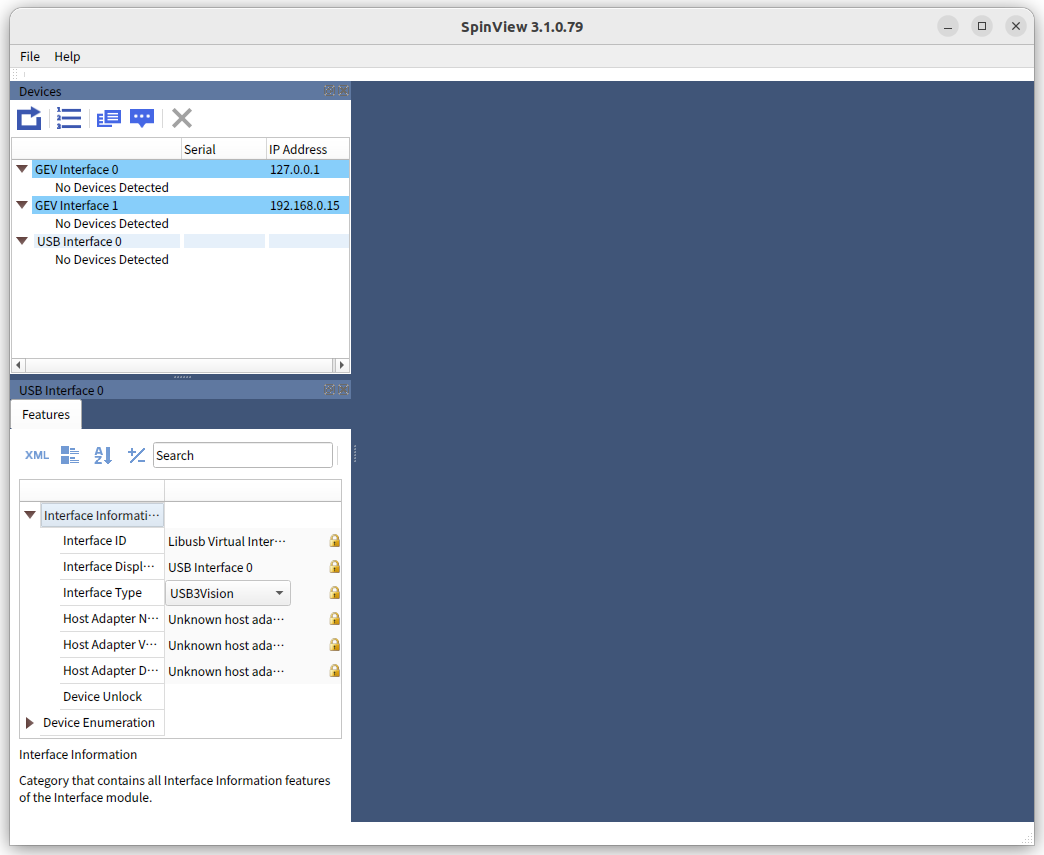
としたら、やっと"USB interface0"が出てきた
けど、映像が表示されないし、「SpinView_QTの応答がありません」、とか言われる。
sudo dmesg をやると
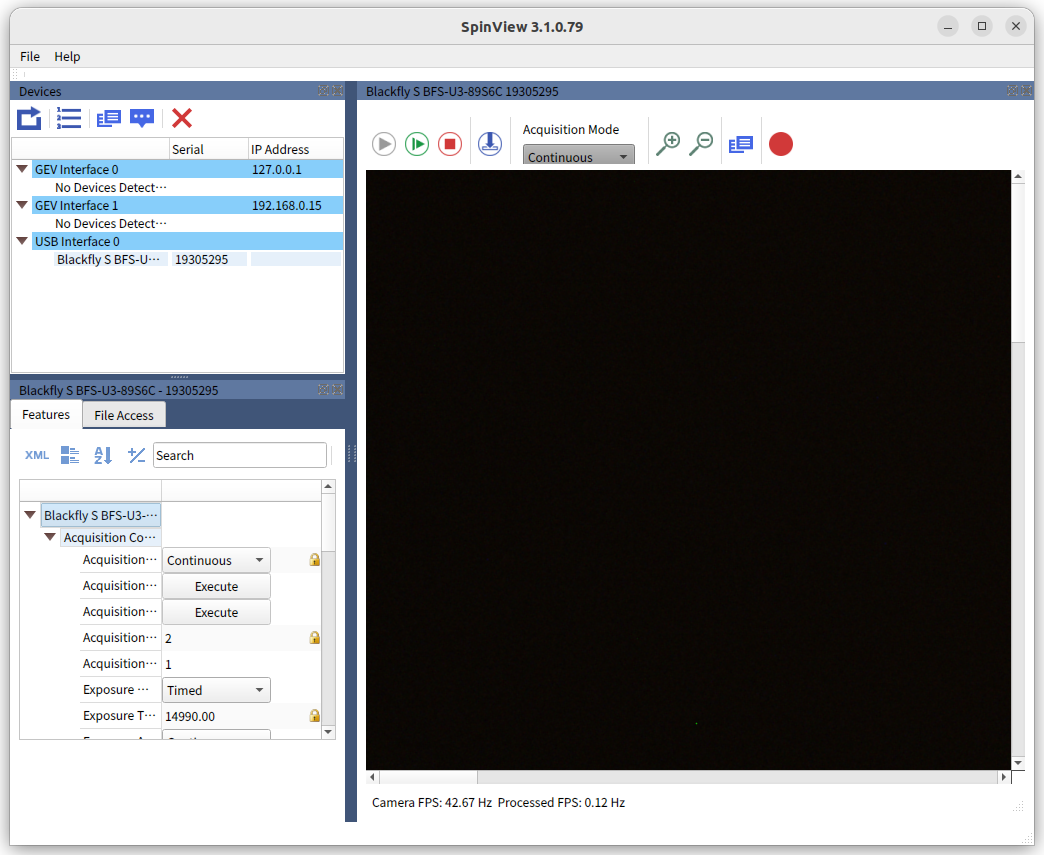
[ 533.947639] usb 2-1: Product: Blackfly S BFS-U3-89S6C
[ 533.947652] usb 2-1: Manufacturer: FLIR
[ 533.947663] usb 2-1: SerialNumber: 0126934F
[ 600.668167] usb 2-1: reset SuperSpeed USB device number 4 using xhci_hcd
[ 709.333799] xhci_hcd 0000:01:00.0: swiotlb buffer is full (sz: 16384 bytes), total 32768 (slots), used 32687 (slots)
のようなメッセージがでてくので、
https://zenn.dev/yonishi/scraps/e735a6ef11d8b5
を参考に対応。 改善なし。
https://wpitchoune.net/tricks/raspberry_pi3_increase_swap_size.html
の対応を実施

表示に成功! 詳しくは明日 ―― つかれはてました。

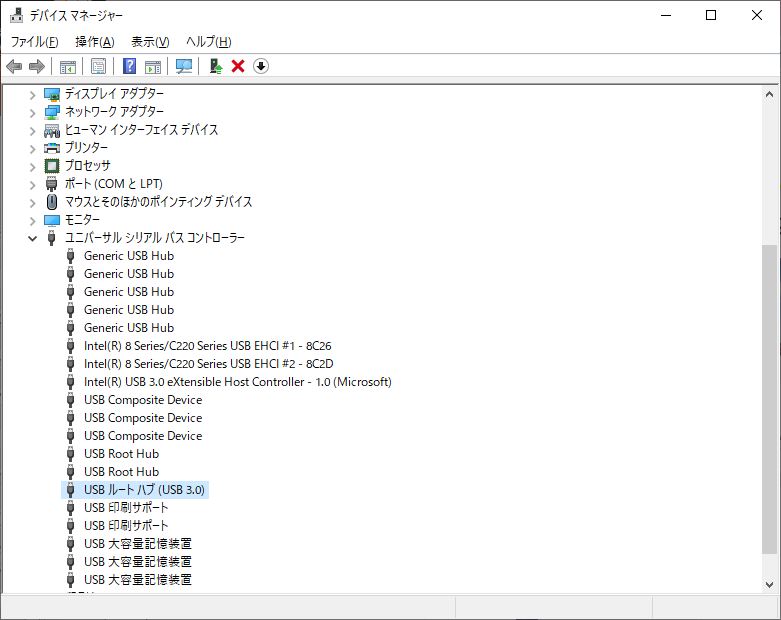
ドロップダウンリストを確認し、USB Root Hub (USB 3.0)を右クリック(またはタップ&ホールド)し、[Uninstall Device(デバイスのアンインストール)]を選択します(重複している場合は、1つずつすべてアンインストールしてください)。
必要であれば動作を確認し、デバイスを再起動します。再起動すると、Windows 10が自動的にUSBドライバを再インストールするはずです(私は、リブートしました)。
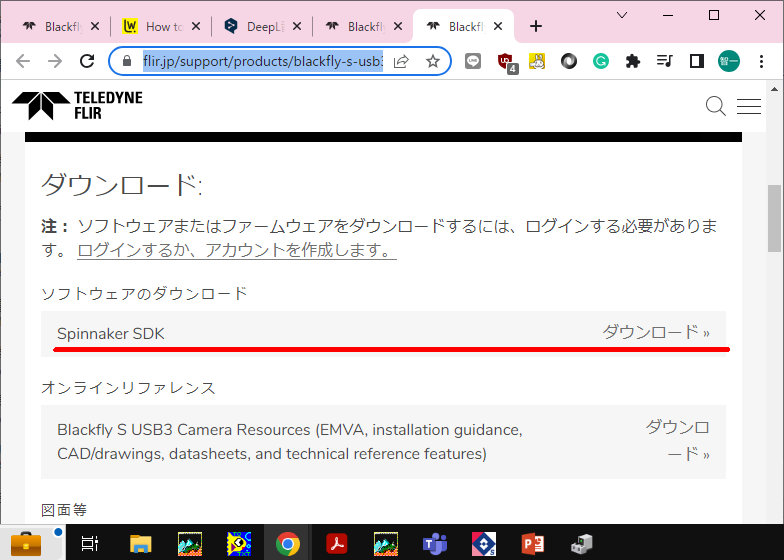

ここをクリックします。
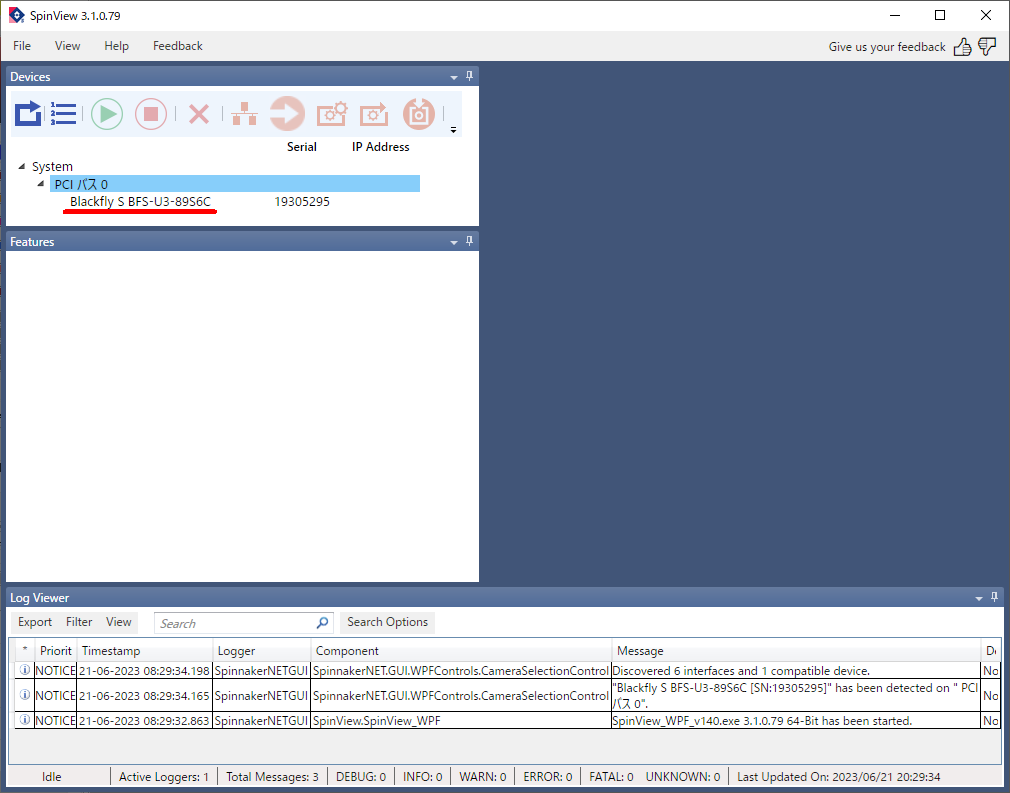
画面が出てくるので、以下のボタンを押して下さい。
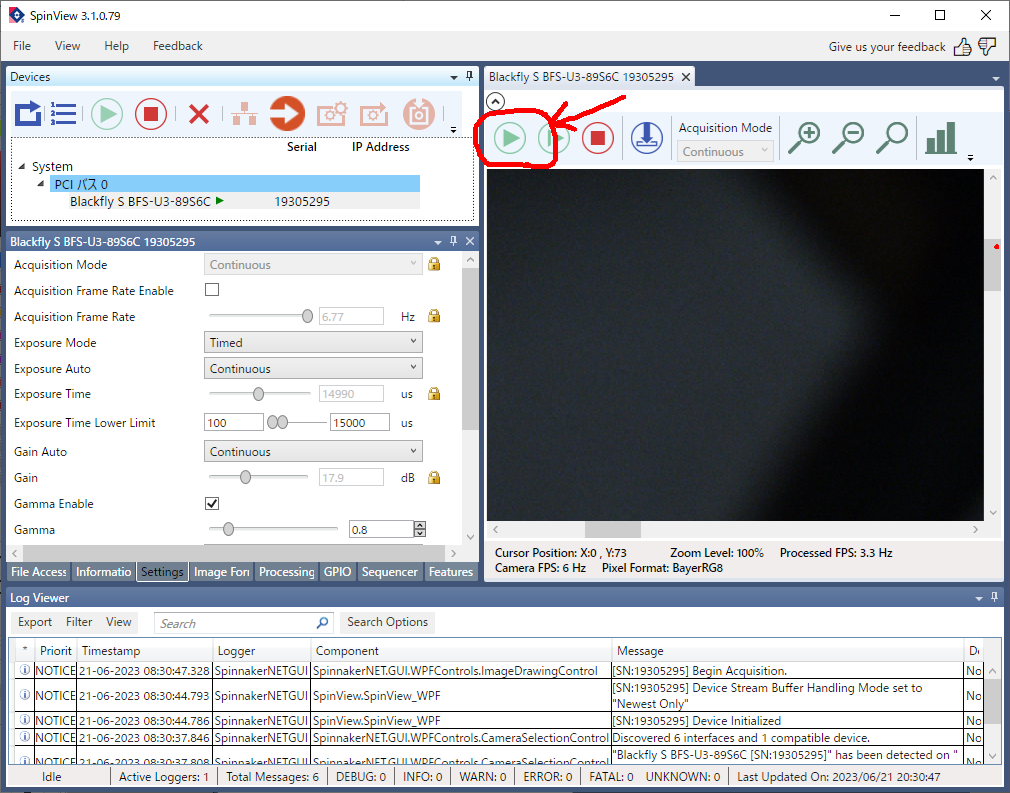
キャリブレーションに時間がかかるようですが、こんな感じの映像が出てきました
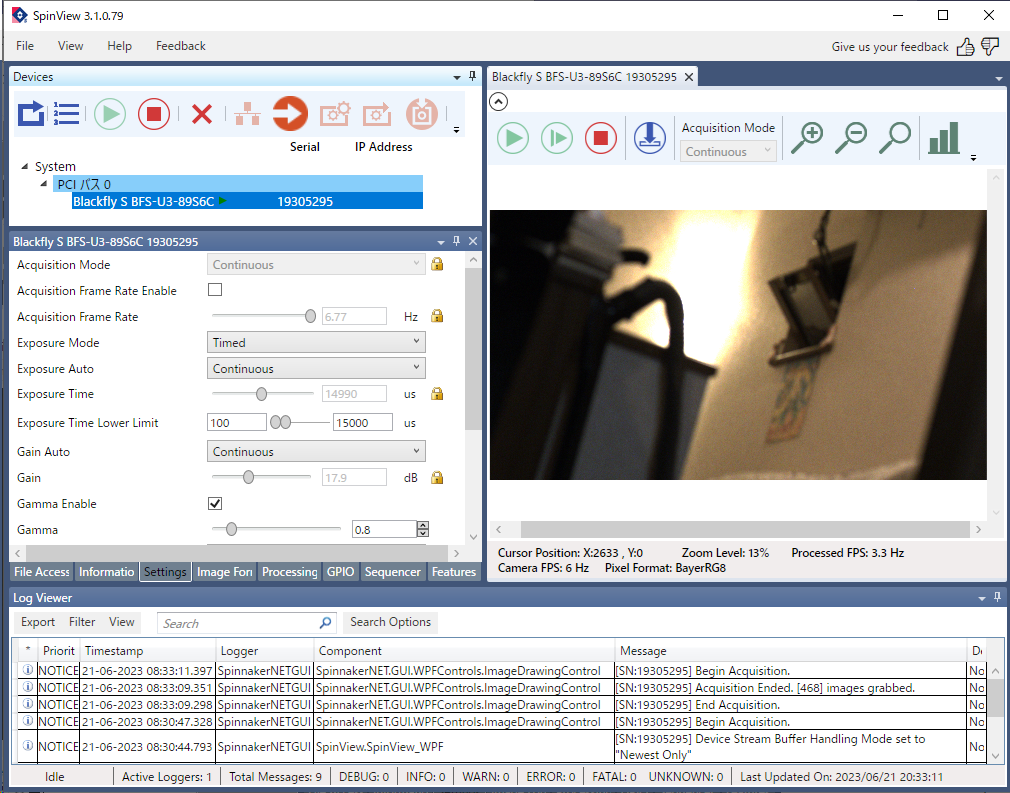
以上