import asyncio
from fastapi import FastAPI

app = FastAPI()

async def hello_timer():
    while True:
        print("hello")
        await asyncio.sleep(10)  # 10秒待機

@app.on_event("startup")
async def startup_event():
    # FastAPIアプリケーションの起動時にタイマーを開始
    asyncio.create_task(hello_timer())

@app.get("/")
async def get_hello():
return {"message": "hello"}fastapiのmain.pyを起動すると自動的に10秒おきに"hello"を自動的に表示するコードを作って下さい。
座標を入力して一番近いpostGISのノードIDを検知して、ダイクストラ計算を行い、ユーザ心理を計算するファジィ推論を行うサンプルプログラム
/*
C:\Users\ebata\yamaguchi\src_light

■このサンプルプログラムのキモ
(1)座標を入力して一番近いpostGISのノードIDを検知して、ダイクストラ計算を行うこと
(2)ユーザ心理を計算するファジィ推論を行うこと
が入っているプログラムである。

■自動計算を実施するバッチ、dummy.batの内容は以下の通り
go run light-sim.go data/mod_20220522holyday_visitor.csv data/new_20220522holyday_visitor.csv
go run light-sim.go data/mod_20220521holyday_visitor.csv data/new_20220521holyday_visitor.csv
go run light-sim.go data/mod_20220522holyday.csv data/new_20220522holyday.csv
go run light-sim.go data/mod_20220518weekday.csv data/new_20220518weekday.csv

■その入力用のcsvファイルの一つである、"data/mod_20220522holyday_visitor.csv"の内容は以下の通り
34.172891,131.456346,34.182418,131.474987,21
34.163801,131.444142,34.164454,131.449142,62
34.158856,131.435881,34.164727,131.431189,52
(中略)
34.146351,131.461154,34.167045,131.448468,20
34.145639,131.449237,34.149603,131.432828,29

■"data/bike_stations.csv"の中身
index,station,address,lat,lon,initial_stock,max_stock
1,null,null,34.102543,131.392639,20,20
2,null,null,34.102543,131.392639,20,20
3,null,null,34.102543,131.392639,20,20
4,山口県庁前バス停,山口市春日町2086-4,34.183621,131.471688,20,20
5,null,null,34.102543,131.392639,20,20
6,山口市役所 駐輪場,山口市亀山町2-1,34.178056,131.474204,20,20
7,一の坂川交通交流広場,山口市中河原7-1,34.17960577,131.4783006,20,20
8,null,null,34.102543,131.392639,20,20
9,コープやまぐちこことどうもん店 駐輪場,山口市道場門前1-1-18,34.174234,131.474885,20,20
10,山口駅 駐輪場,山口市惣太夫町288-9,34.172219,131.480013,20,20
11,山口市教育委員会 駐輪場,山口市中央5-14-22,34.170346,131.46915,20,20
12,null,null,34.102543,131.392639,20,20
13,ファミリーマート山口泉都町店,山口市泉都町9-2,34.167346,131.462048,20,20
14,防長苑,山口市熊野町4-29,34.167204,131.45973,20,20
15,null,null,34.102543,131.392639,20,20
16,ホテルニュータナカ,山口市湯田温泉2-6-24,34.163937,131.456115,20,20
17,null,null,34.102543,131.392639,20,20
18,湯田温泉駅 駐輪場,山口市今井町146-6,34.159954,131.459967,20,20
19,アルク平川店,山口市平井724-1,34.152742,131.464199,20,20
20,山口大学(正門),山口市吉田1677-1,34.149852,131.466214,20,20
21,小郡総合支所 駐輪場,山口市小郡下郷609番地1,34.102543,131.392639,20,20
22,KDDI維新ホール 駐輪場,山口市小郡令和1丁目1番地,34.09368,131.394,20,20
23,風の並木通り(新山口駅南口側),山口市小郡金町1-1付近,34.092322,131.397667,20,20
24,平成公園 駐車場内,山口市小郡平成町3-1,34.088168,131.401698,20,20
25,null,null,34.102543,131.392639,20,20
26,アルク小郡店,山口市小郡下郷2273番地1,34.097135,131.391295,20,20
27,null,null,34.102543,131.392639,20,20


*/
package main

import (
	"database/sql"
	"encoding/csv"
	"fmt"
	"log"

	"os"
	"strconv"

	_ "github.com/lib/pq"
)

// 自転車の型
type BikeParam struct {
	id            int // 自転車の識別番号
	destinationId int // 出発座標番号(*1)
	arrivalId     int // 到着座標番号

	// (*1)
	// 名前がdestination(目的地)となっているのは、バスがユーザを迎えに行き、載せた時点が「出発」扱いであった名残。
	// 自転車の場合は迎えに行く動作が無いので、名称変更が望ましい。

}

// 座標情報
type LocInfo struct {
	Lng    float64 // 経度
	Lat    float64 // 緯度
	Source int     // 地図DBのID
}

// 自転車の拠点
type BikeStation struct {
	location     LocInfo // 拠点の位置
	initialStock int     // 最初に配置する自転車の台数
	stationName  string  // 拠点の名称
}

// ステーションからの自転車の出入り
type StationStock struct {
	outgoing int
	incoming int
}

var stationstock [40]StationStock

const STATIONS_PATH string = "data/bike_stations.csv"

// 拠点情報を読み込み、BikeStation型の配列を返す
func getStationInfo(dbMap *sql.DB) []BikeStation {
	// ファイルをオープン
	csvFile, err := os.Open(STATIONS_PATH)
	if err != nil {
		log.Fatal(err)
	}
	defer csvFile.Close()

	// CSVファイルの中身を読み込み
	r := csv.NewReader(csvFile)
	rows, err := r.ReadAll()
	if err != nil {
		log.Fatal(err)
	}

	stationInfo := []BikeStation{} // 出力変数

	// 行ごとに
	for i, row := range rows {
		if i == 0 {
			continue // CSVのヘッダー行を無視
		}
		lat, err := strconv.ParseFloat(row[3], 64)
		if err != nil {
			log.Fatal(err)
		}
		lng, err := strconv.ParseFloat(row[4], 64)
		if err != nil {
			log.Fatal(err)
		}
		initialStockVal, err := strconv.Atoi(row[5])
		if err != nil {
			log.Fatal(err)
		}
		stationNameVal := row[1]

		// CSV読み込み時点の座標のログ(地図DBによって補正する前の座標)
		//log.Println("csv read result:", lng, lat, initialStock)

		// 地図DBを参照することによって、ステーションの位置をノードの位置にする
		source, lngModified, latModified := fixPosition(dbMap, lng, lat)
		loc := LocInfo{
			Lng:    lngModified,
			Lat:    latModified,
			Source: source,
		}

		// 読み込めていることの確認ログ
		//log.Println("Station", (i - 1), lngModified, latModified, initialStock, source)

		bikeStation := BikeStation{
			location:     loc,
			initialStock: initialStockVal,
			stationName:  stationNameVal,
		}
		stationInfo = append(stationInfo, bikeStation)
	}
	return stationInfo
}

// Scan用の仮変数
var source int
var longitude float64
var latitude float64
var dist float64

// 指定した座標に近いDB上の座標を取得
func fixPosition(db *sql.DB, _x1, _y1 float64) (int, float64, float64) {

	upperLimitMeter := 1500.0 // 近傍ノードの上限を1500 mに設定
	str := fmt.Sprintf(
		// 修正前: ways (道) の中から最近傍を取得
		// "SELECT source, x1 AS longitude, y1 AS latitude, ST_Distance('SRID=4326;POINT(%v %v)'::GEOGRAPHY, the_geom) AS dist FROM ways WHERE ST_DWithin(the_geom, ST_GeographyFromText('SRID=4326;POINT(%v %v)'), %.1f) ORDER BY dist LIMIT 1",
		// 修正後: ways_vertices_pgr (点座標) の中から最近傍を取得
		"SELECT id AS source, lon AS longitude, lat AS latitude, ST_Distance('SRID=4326;POINT(%v %v)'::GEOGRAPHY, the_geom) AS dist FROM ways_vertices_pgr WHERE ST_DWithin(the_geom, ST_GeographyFromText('SRID=4326;POINT(%v %v)'), %.1f) ORDER BY dist LIMIT 1",
		_x1, _y1, _x1, _y1, upperLimitMeter,
	)

	//fmt.Println(str)

	rows, err := db.Query(str)
	if err != nil {
		log.Fatal(err)
	}
	defer rows.Close()

	foundGoodMapNode := false

	for rows.Next() {
		foundGoodMapNode = true
		if err := rows.Scan(&source, &longitude, &latitude, &dist); err != nil {
			fmt.Println(err)
		}
		//fmt.Println(source, longitude, latitude, dist)
	}

	if !foundGoodMapNode {
		log.Println("Warning: in func fixPosition: Good Map Node not found for query point (",
			_x1, ",", _y1, ")")
	}

	return source, longitude, latitude
}

/*
func getShortestDistanceToBikeStation(dbMap *sql.DB, node int) int {

	StationId := -1
	distance := 1000000.0

	for i := 0; i < 2; i++ {
		rowsDijkstra, errDijkstra := dbMap.Query(
			"SELECT seq,source, target, x1, y1, x2, y2, agg_cost FROM pgr_dijkstra('SELECT gid as id, source, target, length_m as cost FROM ways', $1::bigint , $2::bigint , directed:=false) a INNER JOIN ways b ON (a.edge = b.gid) ORDER BY seq",
			node,

			Station[i].Node)
		if errDijkstra != nil {
			log.Fatal(errDijkstra)
		}
		defer rowsDijkstra.Close()

		var agg_cost float64

		for rowsDijkstra.Next() {
			var x1, y1, x2, y2 float64
			var seq, source, target int

			err := rowsDijkstra.Scan(&seq, &source, &target, &x1, &y1, &x2, &y2, &agg_cost)
			if err != nil {
				fmt.Println(err)
			}
		}

		if distance > agg_cost {
			distance = agg_cost
			StationId = i
		}
	}
	return StationId
}
*/

// 江端修正版
func getDijkstraPath(dbMap *sql.DB, locInfoStart, locInfoGoal LocInfo) ([]LocInfo, float64) {
	//log.Println("getDijkstraPath", locInfoStart, locInfoGoal)

	var path []LocInfo // 経路 (返り値の一つ目)
	var totalDistanceKm float64

	rowsDijkstra, errDijkstra := dbMap.Query(
		"SELECT seq,source, target, x1, y1, x2, y2, agg_cost FROM pgr_dijkstra('SELECT gid as id, source, target, length_m as cost FROM ways', $1::bigint , $2::bigint , directed:=false) a INNER JOIN ways b ON (a.edge = b.gid) ORDER BY seq",
		locInfoStart.Source,
		locInfoGoal.Source)

	if errDijkstra != nil {
		log.Fatal(errDijkstra)
	}
	defer rowsDijkstra.Close()

	var agg_cost float64

	isFirstCheck := true
	isSourceCheck := true

	for rowsDijkstra.Next() {

		var x1, y1, x2, y2 float64

		var seq int
		var target int

		// まずnodeを読む
		if err := rowsDijkstra.Scan(&seq, &source, &target, &x1, &y1, &x2, &y2, &agg_cost); err != nil {
			fmt.Println(err)
		}

		// 最初の1回だけ入る
		if isFirstCheck {
			if source == locInfoStart.Source {
				isSourceCheck = true
			} else {
				isSourceCheck = false
			}
			isFirstCheck = false
		}

		var loc LocInfo

		if isSourceCheck {
			loc.Source = source
			loc.Lng = x1
			loc.Lat = y1
		} else {
			loc.Source = target
			loc.Lng = x2
			loc.Lat = y2
		}

		loc.Source = target

		path = append(path, loc)
	}

	// ラストノードだけは手入力
	path = append(path, locInfoGoal)

	totalDistanceKm = agg_cost / 1000.0
	return path, totalDistanceKm
}

// 一番近いステーションのIDを取得
func getNearestStation(dbMap *sql.DB, stationInfo []BikeStation, queryLocation LocInfo) (int, float64) {
	bestDistanceKm := 1000.0 // 十分に大きい数
	var bestStationId int
	for i := 0; i < len(stationInfo); i++ {

		// ダイクストラ法による経路で決定する距離
		// SQLクエリを繰り返し実行するため、処理が遅くなる可能性がある
		_, distKm := getDijkstraPath(dbMap, queryLocation, stationInfo[i].location)

		// 直線距離の概算値(代替の計算方法)
		//distKm, _ := distanceKm(queryLocation.Lng, queryLocation.Lat,
		//	stationInfo[i].location.Lng, stationInfo[i].location.Lat)

		//log.Println("to station", i, "distanceKm=", distKm)

		if distKm < bestDistanceKm {
			bestDistanceKm = distKm
			bestStationId = i
		}
	}
	return bestStationId, bestDistanceKm
}

func main() {

	dbMap, err := sql.Open("postgres",
		"user=postgres password=password host=192.168.0.23 port=15432 dbname=yama_db sslmode=disable")
	log.Println("------------------ map db open ------------------")
	if err != nil {
		log.Fatal("OpenError: ", err)
	}
	defer dbMap.Close()

	// バイクステーション情報の読み込み
	stationInfo := getStationInfo(dbMap)

	//fmt.Println(stationInfo)

	//file2, err2 := os.Open("data/new_20220518weekday.csv")
	file2, err2 := os.Open(os.Args[1])
	if err2 != nil {
		log.Fatal(err2)
	}
	defer file2.Close()

	r2 := csv.NewReader(file2)
	rows2, err2 := r2.ReadAll() // csvを一度に全て読み込む
	if err != nil {
		log.Fatal(err2)
	}

	//file3, err3 := os.Create("data/calc2_new_20220518weekday.csv") // 第2パラメータ
	file3, err3 := os.Create(os.Args[2]) // 第2パラメータ
	if err3 != nil {
		panic(err)
	}
	w := csv.NewWriter(file3)

	output := []string{"id", "age", "origin_loc_Lng", "origin_loc_Lat", "dest_loc_Lng", "dest_loc_Lat", "distance_from_origin", "distance_between_stations", "distance_to_dest", "complain"}

	if err = w.Write(output); err != nil {
		log.Fatal(err)
	}

	for id, row := range rows2 {

		/*
			origin_lng := 131.4686813247102
			origin_lat := 34.17901518198008

			dest_lng := 131.45836175237153
			dest_lat := 34.160484344205294
		*/

		origin_lng, err := strconv.ParseFloat(row[1], 64)
		if err != nil {
			log.Fatal(err)
		}
		origin_lat, err := strconv.ParseFloat(row[0], 64)
		if err != nil {
			log.Fatal(err)
		}

		dest_lng, err := strconv.ParseFloat(row[3], 64)
		if err != nil {
			log.Fatal(err)
		}

		dest_lat, err := strconv.ParseFloat(row[2], 64)
		if err != nil {
			log.Fatal(err)
		}

		age, err := strconv.ParseFloat(row[4], 64) // 年齢も実数扱いする
		if err != nil {
			log.Fatal(err)
		}

		// 最接近のステーションを選ぶ

		var origin_loc, dest_loc LocInfo

		origin_loc.Source, origin_loc.Lng, origin_loc.Lat = fixPosition(dbMap, origin_lng, origin_lat)
		dest_loc.Source, dest_loc.Lng, dest_loc.Lat = fixPosition(dbMap, dest_lng, dest_lat)

		stationId_from_origin, distance_from_origin := getNearestStation(dbMap, stationInfo, origin_loc) // Originから最初のステーション
		stationId_to_dest, distance_to_dest := getNearestStation(dbMap, stationInfo, dest_loc)           // 最後のステーションからDest

		fmt.Println(stationInfo[stationId_from_origin])
		stationstock[stationId_from_origin].outgoing++

		fmt.Println(stationInfo[stationId_to_dest])
		stationstock[stationId_to_dest].incoming++

		_, distance_between_stations := getDijkstraPath(dbMap, stationInfo[stationId_from_origin].location, stationInfo[stationId_to_dest].location)
		_, shortest_distance_total := getDijkstraPath(dbMap, origin_loc, dest_loc)

		fmt.Println("stationId_from_origin, distance_from_origin", stationId_from_origin, distance_from_origin)
		fmt.Println("stationId_to_dest, distance_to_dest", stationId_to_dest, distance_to_dest)
		fmt.Println("distance_between_stations", distance_between_stations)
		fmt.Println("shortest_distance_total", shortest_distance_total)

		// 出発 ― _x[km]の歩行 ― 最初のステーション ― _y[km]の自転車走行 ― 最後のステーション ― _[km]の歩行 ―  到着
		complain := fuzzy_reasoning(distance_from_origin, distance_between_stations, distance_to_dest, age)
		fmt.Println("complain", complain)

		output := []string{
			fmt.Sprint(id),
			fmt.Sprint(age),
			fmt.Sprint(origin_loc.Lng),
			fmt.Sprint(origin_loc.Lat),
			fmt.Sprint(dest_loc.Lng),
			fmt.Sprint(dest_loc.Lat),
			fmt.Sprint(distance_from_origin),
			fmt.Sprint(distance_between_stations),
			fmt.Sprint(distance_to_dest),
			fmt.Sprint(complain)}

		fmt.Println(output)

		if err = w.Write(output); err != nil {
			log.Fatal(err)
		}
	}

	// test
	output = []string{"stationid", "outgoing", "incoming"}
	if err = w.Write(output); err != nil {
		log.Fatal(err)
	}

	for i := 0; i < 40; i++ {
		output = []string{fmt.Sprint(i + 1), fmt.Sprint(stationstock[i].outgoing), fmt.Sprint(stationstock[i].incoming)}
		// i+1しているのは、1からスタートする為
		if err = w.Write(output); err != nil {
			log.Fatal(err)
		}
	}

	defer w.Flush()

	if err := w.Error(); err != nil {
		log.Fatal(err)
	}
}

func fuzzy_reasoning(distance_from_origin, distance_between_stations, distance_to_dest, age float64) float64 {

	////// パラメータの作成

	// 絶対的歩行距離
	walk := min_2(distance_from_origin, distance_to_dest)
	// 総体的自転車移動距離
	ratio := distance_between_stations / (distance_from_origin + distance_between_stations + distance_to_dest)
	// 絶対的自転車移動距離
	bike := distance_between_stations

	// Age(前件部)
	Age_Less := new_condition_MF3(45, 20, "LESS")
	Age_Common := new_condition_MF3(45, 20, "COMMON") // 中央が 42歳
	Age_More := new_condition_MF3(45, 20, "MORE")

	// 絶対的歩行距離(前件部)
	Walk_Less := new_condition_MF3(0.4, 0.1, "LESS")
	Walk_Common := new_condition_MF3(0.4, 0.1, "COMMON")
	Walk_More := new_condition_MF3(0.4, 0.1, "MORE")

	// 相対的自転車移動比率(former)
	Bike_Ratio_Less := new_condition_MF3(0.7, 0.1, "LESS")
	Bike_Ratio_Common := new_condition_MF3(0.7, 0.1, "COMMON")
	Bike_Ratio_More := new_condition_MF3(0.7, 0.1, "MORE")

	// 絶対的自転車距離(前件部)
	Bike_Less := new_condition_MF3(1.5, 1.0, "LESS")
	Bike_Common := new_condition_MF3(1.5, 1.0, "COMMON")
	Bike_More := new_condition_MF3(1.5, 1.0, "MORE")

	// Complain(後件部)
	Complain_LessLess := new_action_MF5(0.5, 0.25, "LESSLESS")
	Complain_Less := new_action_MF5(0.5, 0.25, "LESS")
	Complain_Common := new_action_MF5(0.5, 0.25, "COMMON")
	Complain_More := new_action_MF5(0.5, 0.25, "MORE")
	Complain_MoreMore := new_action_MF5(0.5, 0.25, "MOREMORE")

	// [Rule A00]
	Rule_A00 := min_2(Age_Less.func_X(age), Walk_Less.func_X(walk))
	Complain_LessLess.func_Max(Rule_A00)
	//fmt.Println("Rule_A00", Rule_A00)

	// [Rule A01]
	Rule_A01 := min_2(Age_Less.func_X(age), Walk_Common.func_X(walk))
	Complain_Less.func_Max(Rule_A01)
	//fmt.Println("Rule_A01", Rule_A01)

	// [Rule A02]
	Rule_A02 := min_2(Age_Less.func_X(age), Walk_More.func_X(walk))
	Complain_Common.func_Max(Rule_A02)
	//fmt.Println("Rule_A02", Rule_A02)

	// [Rule A10]
	Rule_A10 := min_2(Age_Common.func_X(age), Walk_Less.func_X(walk))
	Complain_Common.func_Max(Rule_A10)
	//fmt.Println("Rule_A10", Rule_A10)

	// [Rule A11]
	Rule_A11 := min_2(Age_Common.func_X(age), Walk_Common.func_X(walk))
	Complain_Common.func_Max(Rule_A11)
	//fmt.Println("Rule_A11", Rule_A11)

	// [Rule A12]
	Rule_A12 := min_2(Age_Common.func_X(age), Walk_More.func_X(walk))
	Complain_More.func_Max(Rule_A12)
	//fmt.Println("Rule_A12", Rule_A12)

	// [Rule A20]
	Rule_A20 := min_2(Age_More.func_X(age), Walk_Less.func_X(walk))
	Complain_Common.func_Max(Rule_A20)
	//fmt.Println("Rule_A20", Rule_A20)

	// [Rule A21]
	Rule_A21 := min_2(Age_More.func_X(age), Walk_Common.func_X(walk))
	Complain_More.func_Max(Rule_A21)
	//fmt.Println("Rule_A21", Rule_A21)

	// [Rule A22]
	Rule_A22 := min_2(Age_More.func_X(age), Walk_More.func_X(walk))
	Complain_MoreMore.func_Max(Rule_A22)
	//fmt.Println("Rule_A22", Rule_A22)

	// [Rule B00]
	Rule_B00 := Bike_Ratio_Less.func_X(ratio)
	Complain_MoreMore.func_Max(Rule_B00)
	//fmt.Println("Rule_B00", Rule_B00)

	// [Rule B01]
	Rule_B01 := Bike_Ratio_Common.func_X(ratio)
	Complain_Common.func_Max(Rule_B01)
	//fmt.Println("Rule_B01", Rule_B01)

	// [Rule B02]
	Rule_B02 := Bike_Ratio_More.func_X(ratio)
	Complain_LessLess.func_Max(Rule_B02)
	//fmt.Println("Rule_B02", Rule_B02)

	// [Rule C00]
	Rule_C00 := min_2(Age_Less.func_X(age), Bike_Less.func_X(bike))
	Complain_LessLess.func_Max(Rule_C00)
	//fmt.Println("Rule_C00", Rule_C00)

	// [Rule C01]
	Rule_C01 := min_2(Age_Less.func_X(age), Bike_Common.func_X(bike))
	Complain_LessLess.func_Max(Rule_C01)
	//fmt.Println("Rule_C01", Rule_C01)

	// [Rule C02]
	Rule_C02 := min_2(Age_Less.func_X(age), Bike_More.func_X(bike))
	Complain_LessLess.func_Max(Rule_C02)
	//fmt.Println("Rule_C02", Rule_C02)

	// [Rule C10]
	Rule_C10 := min_2(Age_Common.func_X(age), Bike_Less.func_X(bike))
	Complain_Less.func_Max(Rule_C10)
	//fmt.Println("Rule_C10", Rule_C10)

	// [Rule C11]
	Rule_C11 := min_2(Age_Common.func_X(age), Bike_Common.func_X(bike))
	Complain_Common.func_Max(Rule_C11)
	//fmt.Println("Rule_C11", Rule_C11)

	// [Rule C12]
	Rule_C12 := min_2(Age_Common.func_X(age), Bike_More.func_X(bike))
	Complain_More.func_Max(Rule_C12)
	//fmt.Println("Rule_C12", Rule_C12)

	// [Rule C20]
	Rule_C20 := min_2(Age_More.func_X(age), Bike_Less.func_X(bike))
	Complain_Common.func_Max(Rule_C20)
	//fmt.Println("Rule_C20", Rule_C20)

	// [Rule C21]
	Rule_C21 := min_2(Age_More.func_X(age), Bike_Common.func_X(bike))
	Complain_More.func_Max(Rule_C21)
	//fmt.Println("Rule_C21", Rule_C21)

	// [Rule C22]
	Rule_C22 := min_2(Age_More.func_X(age), Bike_More.func_X(bike))
	Complain_MoreMore.func_Max(Rule_C22)
	//fmt.Println("Rule_C22", Rule_C22)

	// Reasoning calculations
	numerator :=
		Complain_LessLess.func_X()*Complain_LessLess.func_Y() +
			Complain_Less.func_X()*Complain_Less.func_Y() +
			Complain_Common.func_X()*Complain_Common.func_Y() +
			Complain_More.func_X()*Complain_More.func_Y() +
			Complain_MoreMore.func_X()*Complain_MoreMore.func_Y()

	denominator :=
		Complain_LessLess.func_Y() +
			Complain_Less.func_Y() +
			Complain_Common.func_Y() +
			Complain_More.func_Y() +
			Complain_MoreMore.func_Y()

	reasoning := numerator / denominator

	return reasoning

}

func max_2(a, b float64) float64 {
	if a > b {
		return a
	} else {
		return b
	}
}

func min_2(a, b float64) float64 {
	if a > b {
		return b
	} else {
		return a
	}
}

type condition_MF3 struct { // Base class for condition_MF3
	center  float64
	width   float64
	express string
}

func new_condition_MF3(_center, _width float64, _express string) *condition_MF3 {
	c3 := new(condition_MF3)
	c3.center = _center
	c3.width = _width
	c3.express = _express
	return c3
}

// Class for the membership function (3 mountains) of the former case
func (c3 *condition_MF3) func_X(_x float64) float64 {
	// x,y denote coordinates on the membership function
	x := _x
	y := 0.0 // The value of y is always greater than or equal to 0 and less than or equal to 1

	if c3.express == "LESS" {
		if x <= c3.center-c3.width {
			y = 1.0
		} else if x <= c3.center {
			y = -1.0 / c3.width * (x - c3.center)
		} else {
			y = 0.0
		}
	} else if c3.express == "COMMON" {
		if x <= c3.center-c3.width {
			y = 0.0
		} else if x <= c3.center {
			y = 1.0/c3.width*(x-c3.center) + 1.0
		} else if x <= c3.center+c3.width {
			y = -1.0/c3.width*(x-c3.center) + 1.0
		} else {
			y = 0.0
		}
	} else if c3.express == "MORE" {
		if x <= c3.center {
			y = 0.0
		} else if x <= c3.center+c3.width {
			y = 1.0 / c3.width * (x - c3.center)
		} else {
			y = 1.0
		}
	} else {
		fmt.Println("MF3: wrong expression")
		os.Exit(1)
	}
	return y
}

type condition_MF5 struct { // Base class for condition_MF5
	center  float64
	width   float64
	express string
}

func new_condition_MF5(_center, _width float64, _express string) *condition_MF5 {
	c5 := new(condition_MF5)
	c5.center = _center
	c5.width = _width
	c5.express = _express
	return c5
}

func (c5 *condition_MF5) func_X(_x float64) float64 {
	// Class for the former membership function (5 mountains)
	// x,y are the coordinates on the membership function

	x := _x
	y := 0.0 // The value of y is always greater than or equal to 0 and less than or equal to 1

	if c5.express == "LESSLESS" {
		if x <= c5.center-2.0*c5.width {
			y = 1.0
		} else if x <= c5.center-c5.width {
			y = -1.0/c5.width*(x-(c5.center-2.0*c5.width)) + 1.0
		} else {
			y = 0.0
		}
	} else if c5.express == "LESS" {
		if x <= c5.center-2.0*c5.width {
			y = 0.0
		} else if x <= c5.center-c5.width {
			y = 1.0/c5.width*(x-(c5.center-c5.width)) + 1.0
		} else if x <= c5.center {
			y = -1.0/c5.width*(x-(c5.center-c5.width)) + 1.0
		} else {
			y = 0.0
		}
	} else if c5.express == "COMMON" {
		if x <= c5.center-c5.width {
			y = 0.0
		} else if x <= c5.center {
			y = 1.0/c5.width*(x-c5.center) + 1.0
		} else if x <= c5.center+c5.width {
			y = -1.0/c5.width*(x-c5.center) + 1.0
		} else {
			y = 0.0
		}
	} else if c5.express == "MORE" {
		if x <= c5.center {
			y = 0.0
		} else if x <= c5.center+c5.width {
			y = 1.0/c5.width*(x-(c5.center+c5.width)) + 1.0
		} else if x <= c5.center+2.0*c5.width {
			y = -1.0/c5.width*(x-(c5.center+c5.width)) + 1.0
		} else {
			y = 0.0
		}
	} else if c5.express == "MOREMORE" {
		if x <= c5.center+c5.width {
			y = 0.0
		} else if x <= c5.center+2.0*c5.width {
			y = 1.0/c5.width*(x-(c5.center+2.0*c5.width)) + 1.0
		} else {
			y = 1.0
		}
	} else {
		fmt.Println("MF5 func_X(): wrong expression")
		os.Exit(1)
	}

	return y
}

/////////////////////////////

type action_MF5 struct { // Base class for action_MF5
	center  float64
	width   float64
	express string
	x       float64
	y       float64
}

type action_MF3 struct { // Base class for action_MF3
	center  float64
	width   float64
	express string
	x       float64
	y       float64
}

func new_action_MF5(_center, _width float64, _express string) *action_MF5 {
	a5 := new(action_MF5)
	a5.center = _center
	a5.width = _width
	a5.express = _express

	if a5.express == "LESSLESS" {
		a5.x = a5.center - 2.0*a5.width
	} else if a5.express == "LESS" {
		a5.x = a5.center - a5.width
	} else if a5.express == "COMMON" {
		a5.x = a5.center
	} else if a5.express == "MORE" {
		a5.x = a5.center + a5.width
	} else if a5.express == "MOREMORE" {
		a5.x = a5.center + 2.0*a5.width
	} else {
		fmt.Println("new_action_MF5: wrong scale expression")
		os.Exit(-1)
	}

	a5.y = 0.0

	return a5
}

func new_action_MF3(_center, _width float64, _express string) *action_MF3 {
	a3 := new(action_MF3)
	a3.center = _center
	a3.width = _width
	a3.express = _express

	if a3.express == "LESS" {
		a3.x = a3.center - a3.width
	} else if a3.express == "COMMON" {
		a3.x = a3.center
	} else if a3.express == "MORE" {
		a3.x = a3.center + a3.width
	} else {
		fmt.Println("new_action_MF3: wrong scale expression")
		os.Exit(-1)
	}

	a3.y = 0.0

	return a3
}

// The latter membership function (5 mountains) class
func (a5 *action_MF5) func_Y() float64 {
	return a5.y
}

// The latter membership function (3 mountains) class
func (a3 *action_MF3) func_Y() float64 {
	return a3.y
}

func (a5 *action_MF5) func_Max(b float64) {
	a5.y = max_2(b, a5.y)
}

func (a3 *action_MF3) func_Max(b float64) {
	a3.y = max_2(b, a3.y)
}

func (a5 *action_MF5) func_X() float64 {
	return a5.x
}

func (a3 *action_MF3) func_X() float64 {
	return a3.x
}
ある領域の中に任意の数の乱数座標を作る方法 + golang で文字列分割 (regexp.MustCompile("[() ,]").Split(msg, -1))
などと苦労しているのですが、結局のところ、私は地図のある領域を指定して、任意の緯度・軽度情報を出す乱数を作りたかったのです。
「川の中から人が歩き始める」とか「山の中で人が消える」とか、シミュレーションと言えども、ちょっと許されない設定だと思いまして。
で、上記の記事を読まれた師匠のSさんから「こんなのがあるよ」と教え貰いました。
https://aginfo.cgk.affrc.go.jp/docs/pgisman/2.3.0/ST_GeneratePoints.html
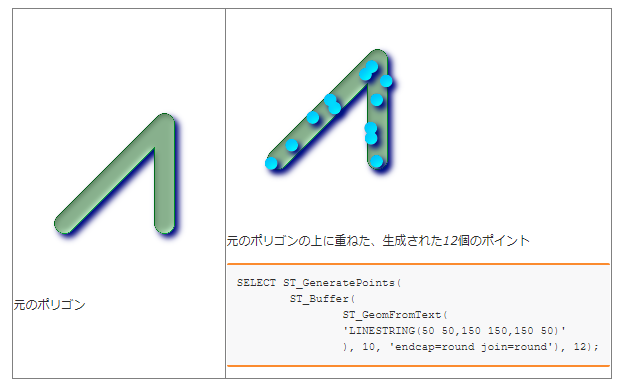
適当なdbに接続して、例題を試してみました。
yama_db=# SELECT ST_GeneratePoints(ST_Buffer(ST_GeomFromText('LINESTRING(50 50,150 150,150 50)'), 10, 'endcap=round join=round'), 12);
st_generatepoints
--------------------------------------------------------------------------------------------------------------------------------------------------------------------------------------------------------------------------------------------------------------------------------------------------------------------------------------------------------------------------------------------------------------------------------------------------------------------------------------------------------------------------------------------
01040000000C0000000101000000BBA9D0DF47496240F87F69424E0E5F400101000000B7F51F68D5646240F55A898F1F17504001010000003572FBDA8A5F5F400F87342089BE5E400101000000D4A38750931D5C40ED72799B370B5E4001010000006667943B23885B4066E8F671D97C5B400101000000EBA3152848526340221E78F6C3965D400101000000113BA23198BF6240C7234B9EF33D5840010100000069499F8062745540FF88E6BF407355400101000000A581F43AC300624042D083BD5A2262400101000000636CD355C19E62404AD3293D4D904B40010100000045F7B8041DAA4E405A849AF069A34F400101000000DE1370CF02E5564050D2988109CE5940
(1 row)
geom形式で出されても全然分からんので、st_asTextでラッピングしてみました。
yama_db=# SELECT st_asText(ST_GeneratePoints(ST_Buffer(ST_GeomFromText('LINESTRING(50 50,150 150,150 50)'), 10, 'endcap=round join=round'), 12));
st_astext
----------------------------------------------------------------------------------------------------------------------------------------------------------------------------------------------------------------------------------------------------------------------------------------------------------------------------------------------------------------------------------------------------------------------------------
MULTIPOINT(147.766265850576 102.733187047914,84.0318650671786 83.712367636874,149.077046025334 68.9777848138994,107.54047530747 106.78013766944,121.059921872846 120.108716631886,137.475992983887 141.067784163524,145.074876095804 96.5277972374404,92.7965422941866 103.656943557244,66.0805226475207 56.7924152255781,72.3801321221102 71.3671567226799,145.087956158666 41.5121740980702,151.631108302923 156.218459065337)
なるほど、乱数が出力されているようです。
'LINESTRING(50 50,150 150,150 50)'), 10 → 座標 (50,50)(150,150)(150,50)で繋がれた幅10の直線上に
'endcap=round join=round'), 12)); → 12個の座標乱数を作れ
という意味のようです。
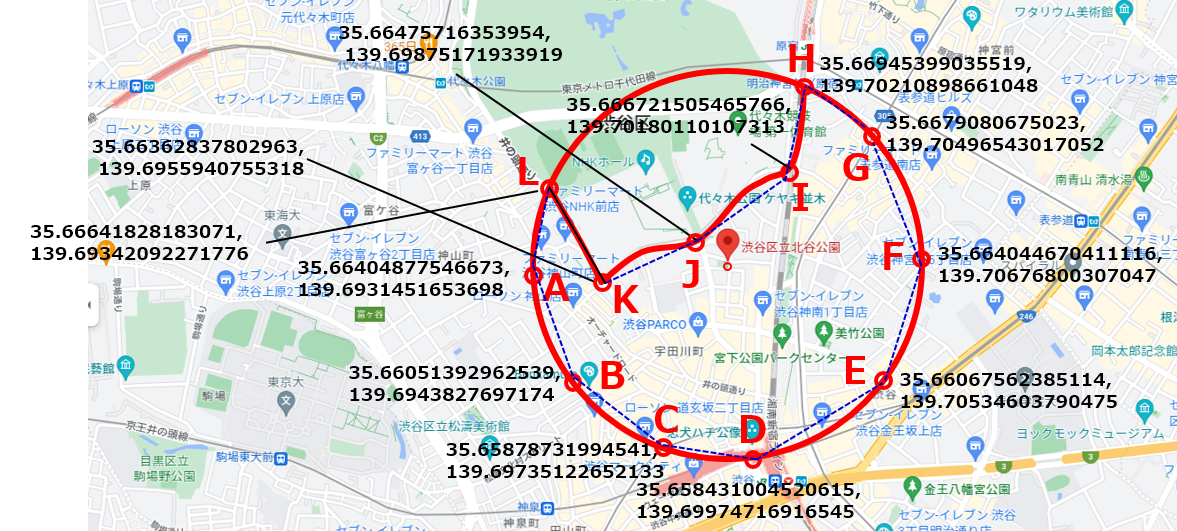
さて、実際の地図で試してみました。
kitaya_db=# SELECT st_asText(ST_GeneratePoints(ST_GeomFromText('POLYGON((35.66463989558893 139.69827111644202,35.663009879798764 139.6983247606236,35.663436999453225 139.7011571734108,35.665398233838545 139.7012966482829,35.66463989558893 139.69827111644202))'),12));
これは、以下の地図の4点で取り囲まれた地区で、任意の12点を抽出しろというSQL文になっています。

POLYGON((35.66463989558893 139.69827111644202,35.663009879798764 139.6983247606236,35.663436999453225 139.7011571734108,35.665398233838545 139.7012966482829,35.66463989558893 139.69827111644202))
ポリゴン(POLYGON)は、始点と終点(上の赤字)を同じ座標として閉じなればならないようなので、注意して下さい。
このSQL文のアウトプットは、以下のようになりました。
st_astext
-----------------------------------------------------------------------------------------------------------------------------------------------------------------------------------------------------------------------------------------------------------------------------------------------------------------------------------------------------------------------------------------------------------------------------------
MULTIPOINT(35.6638134136244 139.699085401991,35.6638440750173 139.700762425247,35.6634366319309 139.699705025931,35.6644917235626 ,35.66424835050 139.69868073913379 139.70025902483, 35.664689711471 139.700525986493,35.6635000403398 139.700601350665,35.6637472356065 139.698748086462,35.6641512918098 139.699288949827,35.6643791061995 139.701118277182,35.6636240715869 139.699272976596,35.6645803781279 139.699116246391)
エクセルで座標描いて、当ててみました。

全て領域の中に入っているようです。
さて、今度は、プログラム(go言語)でのこの座標の取り出し方です。
package main

import (
	"database/sql"
	"fmt"
	"log"
	"regexp"

	// "os"
	_ "github.com/lib/pq"
)


func main() {

	db, err := sql.Open("postgres",
		"user=postgres password=password host=192.168.0.23 port=15432 dbname=kitaya_db sslmode=disable")
	if err != nil {
		log.Fatal("OpenError: ", err)
	}
	defer db.Close()

	//rows, err := db.Query("select id, age, type, departure_name, departure_number, departure_lat, departure_lng, arrival_name, arrival_number, arrival_lat, arrival_lng from user_list")

	rows, err := db.Query("SELECT st_asText(ST_GeneratePoints(ST_GeomFromText('POLYGON((35.66404878 139.6931452,35.66051393 139.6943828,35.65878732 139.6973512,35.658431 139.6997472,35.66067562 139.705346,35.66404467 139.706768,35.66790807 139.7049654,35.66945399 139.702109,35.66672151 139.7018011,35.66475716 139.6987517,35.66362838 139.6955941,35.66641828 139.6934209,35.66404878 139.6931452))'),12))")
	if err != nil {
		log.Fatal(err)
	}
	defer rows.Close()

	var msg string

	for rows.Next() {
		if err := rows.Scan(&msg); err != nil {
			fmt.Println(err)
		}

		// まずはMULTIPOINTをバラバラに分解する
		arr1 := regexp.MustCompile("[() ,]").Split(msg, -1) // '('か、')'か、' 'か、","で分割する → "[中身]" という構造でまぎらわしい

		for _, s := range arr1 {
			fmt.Printf("%s\n", s)
		}
	}
}
出力結果
> go run main3.go
MULTIPOINT
35.6601418389163
139.702654481044
35.661087233013
139.694572689447
35.6617615089132
Keyword: postgis postgres エリア 領域 範囲 指定 乱数 座標 囲む
購入した木材を切断せずに、バイク用屋根付き車庫を作ってみました
嘘です。コンパネを真っ二つにする裁断を1回だけやりました(Unidyでやってもらった)。
使った材料は、1800x900のコンパネ3枚と、4X2の1800の角材5本、木ネジ60本、自宅の庭に放置されていたコンクリートの固定具です。制作時間は2時間強くらいでした。


「無償の愛」を『無期限』とする計画は、必ず破綻します ―― "必ず"です。
『6ヶ月』 ―― これが、私が計算と経験則から導き出した結論です。
Six months" is the conclusion I have drawn from my calculations and rule of thumb.
【新着記事】「江バ電」で人身事故をシミュレーションしてみた https://t.co/Qxr14X4COB pic.twitter.com/oJlAOsppaG
— EE Times Japan編集部 (@eetimes_jp) June 29, 2016
上記の私のコラムの5ページ目に、以下の記載があります。
You will find the following statement on page 5 of my column above.
■「この私」が、3・11の震災(東日本大震災)をどのように忘れていったのかを、定量的に知りたいと思いました。
- I wanted to know quantitatively how "this I" had forgotten about the 3/11 disaster (the Great East Japan)
■そこで、私がここ何年間、1日も欠かさずに記録し続けているブログを使って、以下のような調査をやってみました。
- I did the following survey using my blog, which I have kept track of without missing a single day for the past years.

-----
高齢者介護 ~医療の進歩の代償なのかhttps://t.co/R1DV5OshVJ pic.twitter.com/IiQbaWM0tR
— EE Times Japan編集部 (@eetimes_jp) July 30, 2018
上記の私のコラムの6ページ目に、以下の記載があります。
You will find the following statement on page 6 of my column above.
■ここから導かれる一つの仮説は、江戸時代以前の"寝たきり"とは、どんなに長くても半年程度であったということです。
- One hypothesis derived from this is that "bedridden" was only for about six months before the Edo period.
■当時の介護技術で、"寝たきり"を3年とか10年のオーダーで成立させるのは、無理だったはずです。
- With the care technology available at the time, it would have been impossible to keep a person "bedridden" for three or ten years.

-----
ウクライナ支援についても、各国の「支援疲れ」は、厳然たる事実です。
As for support for Ukraine, it is a stark fact that countries are "tired of supporting" Ukraine.
期限が定められていない支援に耐えられるほど、私たちは強くないのです。
We are not strong enough to withstand support without a set deadline.
-----
結論:
Conclusion:
(1)「他人への、条件のない愛情(無償の愛)のストックには上限がある」
(1) "There is an upper limit to the stock of unconditional love (free love) for others."
(2)「そのストックは、概ね6ヶ月で尽きる」
(2) "Its stock generally runs out in six months."
(3)「被災地支援、寝たきりの人への介護が「無償」で継続できる期間は、最長で"半年"である」
(3) "The maximum period during which support for disaster-affected areas and care for bedridden people can continue "free of charge" is "six months.
この現実をベースに、私たちは、被災者支援や高齢者介護を計画しなければならないと思います。
Based on this reality, we must plan to support the affected population and care for older people.
「無償の愛」を『無期限』とする計画は、必ず破綻します ―― "必ず"です。
The plan to make "free love" "indefinite" will surely fail -- "surely."
別のjsonのメッセージを送信して、それの受信が返ってこないと、APIが終了しません(デッドロックしてしまう)。この問題を解決するfastapiの簡単なプログラムを作成して下さい
■fastapi側プログラム dummy2.py
from fastapi import FastAPI
from pydantic import BaseModel
import asyncio  # asyncio モジュールをインポート

app = FastAPI()

class InputMessage(BaseModel):
    value: int

class OutputMessage(BaseModel):
    response: int  # 数値を含むレスポンスメッセージ

@app.post("/process")
async def process(input_message: InputMessage):

    # 5秒間の待機
    await asyncio.sleep(5)

    # サーバー側で数値を受け取り、同じ数値を含むレスポンスメッセージを返す
    response_value = input_message.value
    output_message = OutputMessage(response=response_value)
    return output_message
起動方法は、
uvicorn dummy2:app --host 0.0.0.0 --reload
■メッセージ送信側(クライアント)プログラム dummy3.py
import httpx
import sys
import asyncio  # asyncio モジュールをインポート

async def send_message_to_api(value: int):
    url = "http://localhost:8000/process"  # FastAPIサーバーのエンドポイントURLを指定

    input_message = {"value": value}  # 送信する数値をJSONメッセージに含める

    async with httpx.AsyncClient() as client:
        response = await client.post(url, json=input_message, timeout=10.0)

    if response.status_code == 200:
        data = response.json()
        print(f"APIからのレスポンス: {data['response']}")
    else:
        print(f"エラーが発生しました。ステータスコード: {response.status_code}")

if __name__ == "__main__":
    if len(sys.argv) != 2:
        print("使用法: python send.py <数値>")
        sys.exit(1)

    try:
        value_to_send = int(sys.argv[1])  # コマンドライン引数から数値を取得
    except ValueError:
        print("数値を指定してください。")
        sys.exit(1)

    asyncio.run(send_message_to_api(value_to_send))
起動方法は、
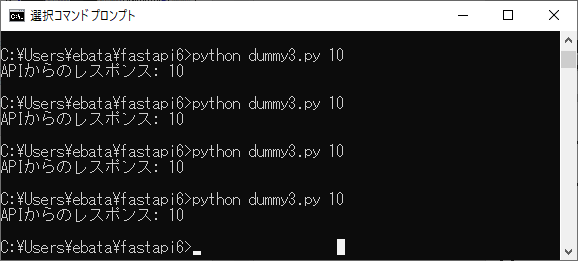
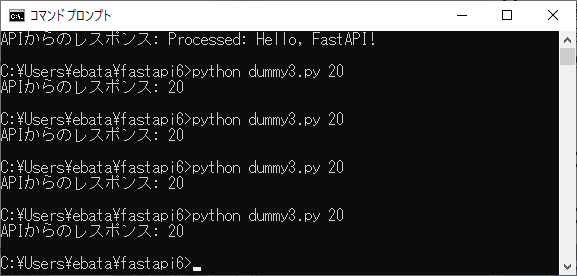
>python dummy3.py 10
平行に3つ起動しても、正確に非同期処理してくれるようです。
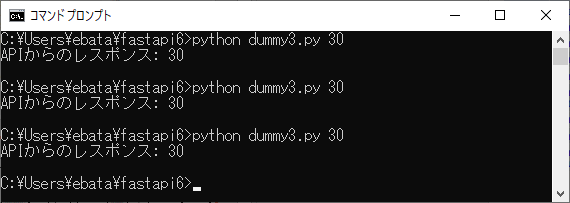
昨夜から、デッドロック問題で、困っていたので、原点に戻って考え中です。
ラズパイ SDカード イメージ コピー クローン レプリカ
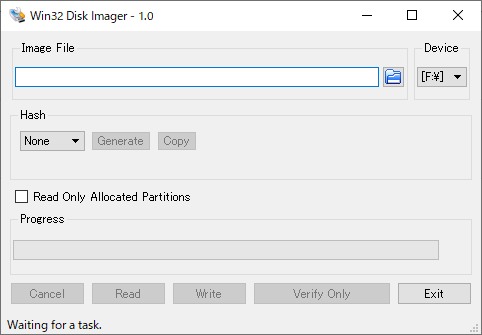
Win32 Disk Imager
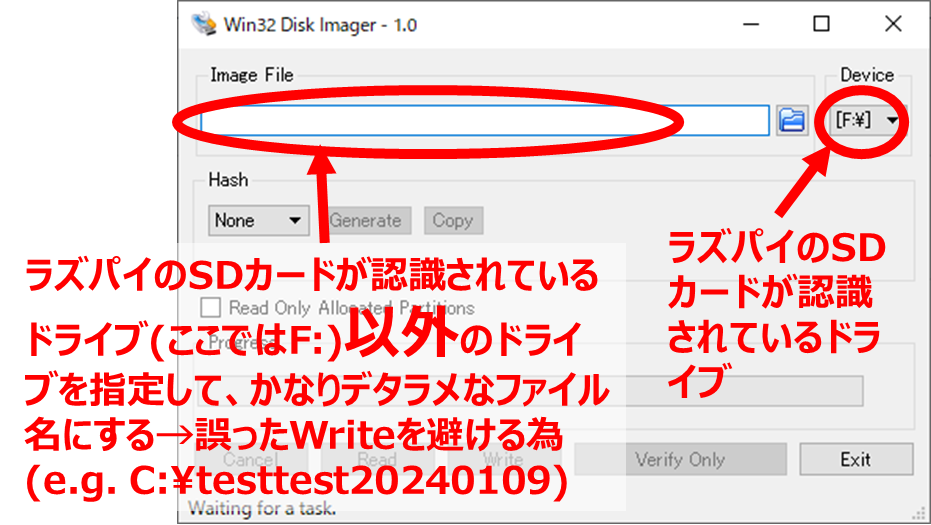
"Win32 Disk Imager"の使いかたが結構分けわからん
まず、SDカード→PCへのコピーは、
Deviceでドライブ"e.f.[G\]"を選んで→
Image Fileの方にテキトーな名前を(d:\testtest20231010とか、絶対に存在しないファイル名にして)つけて
"Read"ボタンを押す。絶対存在しないファイル名にすることによって、間違った読み込みをすることはなくなる(はず)
PC→SDカードへのコピーは、
上記の逆転をやって
"Write"をボタンを押す。
この"Read"と"Write"を間違えて、ハードディスク丸ごと破壊したことを、ゆめゆめ忘れるな
pythonからPIDをkillできない件
プロセスを強制終了しなければならないAPIを作っているのですが、「pythonからPIDをkillできない件」で困っていました。
で、以下の実験用プログラムを作成しました。
import sys
import os
import signal
def kill_process(pid):
    try:
        os.kill(pid, signal.SIGKILL)  # 指定したプロセスIDをSIGKILLシグナルで終了
        print(f"Process with PID {pid} has been killed.")
    except OSError:
        print(f"Failed to kill process with PID {pid}.")
if __name__ == "__main__":
    if len(sys.argv) != 2:
        print("Usage: python kill_process.py <PID>")
        sys.exit(1)
    try:
        pid = int(sys.argv[1])
        kill_process(pid)
    except ValueError:
        print("Invalid PID. Please enter a valid integer PID.")
で、
python3 kill_process.py 7870
を連発したのですが、全くプロセスが消えません(ps -ef | grep xxxxxなどでレビュー)
どうやら、最初に"sudo"を付けて、
sudo python3 kill_process.py 7870
で、起動してくれることが分かりました。
で、本家の問題ですが、fastapiを使ったプログラムを試してみたのですが、
sudo uvicorn test:app --host 0.0.0.0 --reload
では、エラーになります。これは環境変数を引きついでいない、とのことで、"-E"を付与することで、動くことを確認しました。
sudo -E uvicorn test:app --host 0.0.0.0 --reload
持っていかれた時間は4時間くらいかなぁ。
それでも、とりあえず動いて、次の開発に進めるので、安堵しています。
(こういう案件を夜に残すと、夜の眠りが浅くなる)。
コマンドを起動して、必要に応じて停止させ、プロセスID(PID)が消えるまでを監視するfastapiのプログラム
curl -X POST -H "Content-Type: application/json" -d "{\"count\": \"5\"}" http://localhost:8000/execute-command
curl -X POST -H "Content-Type: application/json" -d "{\"pid\": \"10164\"}" http://localhost:8000/terminate-process
# curl -X POST -H "Content-Type: application/json" -d "{\"count\": \"5\"}" http://localhost:8000/execute-command
# curl -X POST -H "Content-Type: application/json" -d "{\"pid\": \"10164\"}" http://localhost:8000/terminate-process

import subprocess
from fastapi import FastAPI
from pydantic import BaseModel

app = FastAPI()

class ExecuteRequest(BaseModel):
    count: int  # pingコマンドの実行回数を指定

class TerminateRequest(BaseModel):
    pid: int  # 終了させるプロセスのPID

# 実行中のプロセスを格納する辞書
running_processes = {}

@app.post("/execute-command")
def execute_command(request: ExecuteRequest):
    count = request.count

    try:
        command = f"ping -n {count} kobore.net"  # pingコマンドの回数をcountに指定
        # コマンドを非同期で実行し、プロセスを取得
        process = subprocess.Popen(command, shell=True, stdout=subprocess.PIPE, stderr=subprocess.PIPE)
        pid = process.pid  # プロセスのPIDを取得
        running_processes[pid] = process

        return {"pid": pid}  # PIDのみを返す
    except Exception as e:
        return {"message": f"コマンドの実行中にエラーが発生しました: {str(e)}"}


@app.post("/terminate-process")
def terminate_process(request: TerminateRequest):
    pid = request.pid
    print("pid in terminate-process", pid)

    try:
        # プロセスを取得し、終了させる
        process = running_processes.get(pid)

        process.terminate()  # プロセスを終了させる(SIGTERMを送信)
        process.wait()
        del running_processes[pid]  # プロセスを辞書から削除

        # 成功の場合は1を返す
        return {"status": 1}
    except Exception as e:
        return {"status": -1}  # 失敗の場合は-1を返す

if __name__ == "__main__":
    # FastAPIサーバーを開始
    import uvicorn
    uvicorn.run(app, host="0.0.0.0", port=8000)
出力結果
C:\Users\ebata\fastapi7>curl -X POST -H "Content-Type: application/json" -d "{\"count\": \"100\"}" http://localhost:8000/execute-command
{"pid":1784}
C:\Users\ebata\fastapi7>curl -X POST -H "Content-Type: application/json" -d "{\"pid\": \"1784\"}" http://localhost:8000/terminate-process
{"status":1}
C:\Users\ebata\fastapi7>curl -X POST -H "Content-Type: application/json" -d "{\"pid\": \"1784\"}" http://localhost:8000/terminate-process
{"status":-1}
起動したプロセスを監視して、プロセスが予定通り/突然停止した場合、それを通知する仕組みを追加しました。
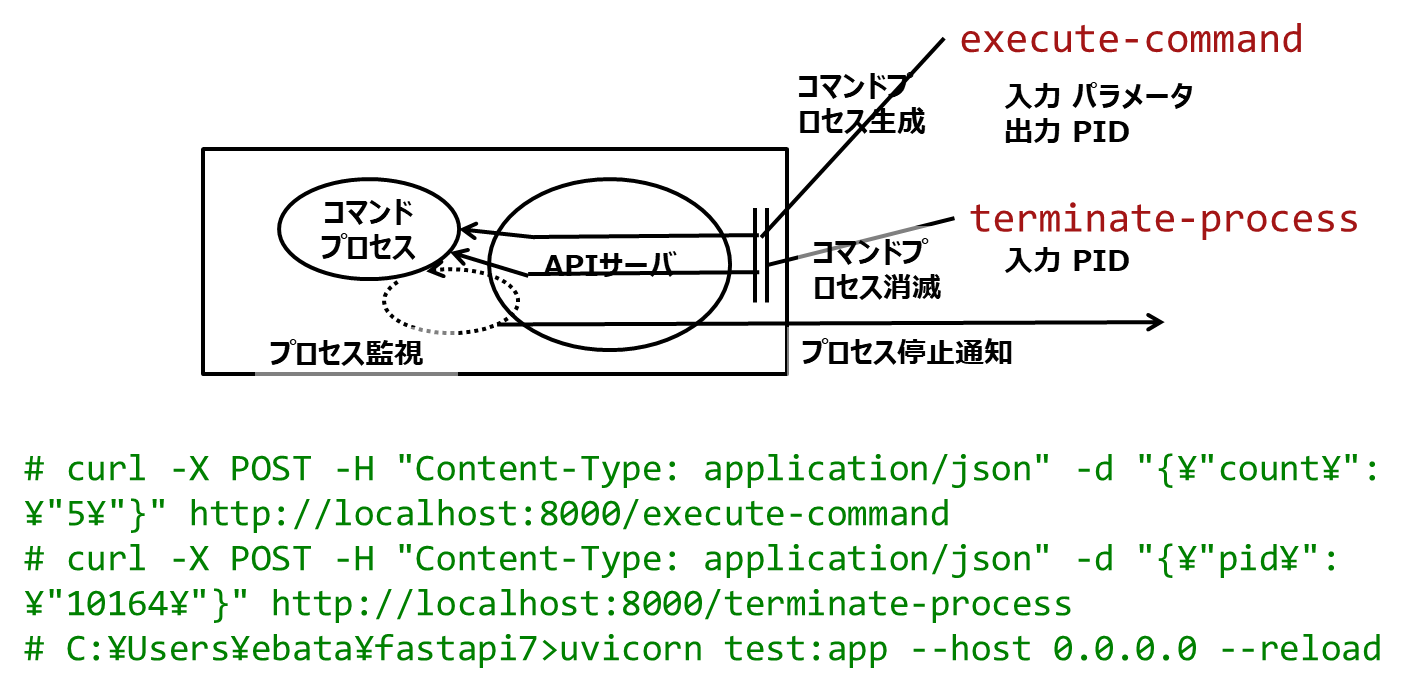
# curl -X POST -H "Content-Type: application/json" -d "{\"count\": \"5\"}" http://localhost:8000/execute-command
# curl -X POST -H "Content-Type: application/json" -d "{\"pid\": \"10164\"}" http://localhost:8000/terminate-process
# C:\Users\ebata\fastapi7>uvicorn test:app --host 0.0.0.0 --reload

import subprocess
import os
import time
import multiprocessing  # multiprocessingモジュールを追加
from fastapi import FastAPI
from pydantic import BaseModel

app = FastAPI()

class ExecuteRequest(BaseModel):
    count: int  # pingコマンドの実行回数を指定

class TerminateRequest(BaseModel):
    pid: int  # 終了させるプロセスのPID

# 実行中のプロセスを格納する辞書
running_processes = {}
process_monitor_processes = {}

@app.post("/execute-command")
def execute_command(request: ExecuteRequest):
    count = request.count

    try:
        command = f"ping -n {count} kobore.net"  # pingコマンドの回数をcountに指定
        # コマンドを非同期で実行し、プロセスを取得
        process = subprocess.Popen(command, shell=True, stdout=subprocess.PIPE, stderr=subprocess.PIPE)
        pid = process.pid  # プロセスのPIDを取得
        running_processes[pid] = process

        # プロセスを監視するプロセスを起動
        monitor_process = multiprocessing.Process(target=monitor_process_status, args=(pid,))
        monitor_process.start()
        process_monitor_processes[pid] = monitor_process

        return {"pid": pid}  # PIDのみを返す
    except Exception as e:
        return {"message": f"コマンドの実行中にエラーが発生しました: {str(e)}"}


@app.post("/terminate-process")
def terminate_process(request: TerminateRequest):
    pid = request.pid
    print("pid in terminate-process", pid)

    try:
        # プロセスを取得し、終了させる
        process = running_processes.get(pid)

        process.terminate()  # プロセスを終了させる(SIGTERMを送信)
        process.wait()
        del running_processes[pid]  # プロセスを辞書から削除

        # 成功の場合は1を返す
        return {"status": 1}
    except Exception as e:
        return {"status": -1}  # 失敗の場合は-1を返す

def monitor_process_status(pid):
    while True:
        if not is_process_running(pid):
            # プロセスが存在しない場合
            # メッセージを生成して出力(または送信)
            message = {
                "status": "Process Disappeared",
                "pid": pid
            }
            print("Process Disappeared:", message)

            # プロセス監視プロセスを停止
            ### del process_monitor_processes[pid]
            break

        # 一定の待機時間を設定して監視を継続
        time.sleep(10)  # 10秒ごとに監視

def is_process_running(pid):
    #try:
    #    os.kill(pid, 0)  # PIDを使ってプロセスにシグナルを送信し、存在を確認
    #    return True
    #except OSError:
    #    return False
    try:
        # ここの部分Windows特有のやりかたなので、後で、例の、os.kill(pid,0)を試してみること
        # tasklistコマンドを実行してプロセス一覧を取得
        result = subprocess.check_output(["tasklist", "/fi", f"PID eq {pid}"], universal_newlines=True)

        # 結果から指定したPIDの行を検索
        lines = result.splitlines()
        for line in lines:
            if f"{pid}" in line:
                return True

        # 指定したPIDが見つからない場合
        # ここに、停止時のメッセージ送信を組み込めばO.K.のはず

        return False
    except Exception as e:
        return False


if __name__ == "__main__":
    # FastAPIサーバーを開始
    import uvicorn
    uvicorn.run(app, host="0.0.0.0", port=8000)
コマンドを叩いてすぐにリターンするが、そのコマンドが終了するまで見張っているAPI
指定されたコマンド "ping -100 kobore.net" をFastAPIのエンドポイントから実行し、それが終了したらAPIを正常に終了させるコードは以下のようになります:
test.py
import subprocess
import threading
import os
from fastapi import FastAPI
from pydantic import BaseModel

app = FastAPI()

class CommandRequest(BaseModel):
    command: str

@app.post("/execute-command")
def execute_command(request: CommandRequest):
    command = request.command
    # コマンドを非同期で実行
    execution_thread = threading.Thread(target=execute_command_async, args=(command,))
    execution_thread.start()
    return {"message": f"コマンド '{command}' の実行を開始しました"}

def execute_command_async(command):
    process = subprocess.Popen(command, shell=True, stdout=subprocess.PIPE, stderr=subprocess.PIPE)
    process.wait()  # コマンドの終了を待つ
    print(f"コマンド '{command}' の実行が終了しました")
    # os._exit(0)  # FastAPIサーバーを終了させる

if __name__ == "__main__":
    # FastAPIサーバーを開始
    import uvicorn
    uvicorn.run(app, host="0.0.0.0", port=8000)
$ uvicorn test:app --host 0.0.0.0 --reload
C:\Users\ebata\fastapi7>curl -X POST -H "Content-Type: application/json" -d "{\"command\": \"ping -n 20 kobore.net\"}" http://localhost:8000/execute-command