2023,江端さんの技術メモ

"github.com/gorilla/websocket"の有名なバグ(らしい)

■PruneMobile側(sever.go)

■gtfs_hub側(gtfs_hub.go)

■対策

[Go言語/JavaScript]WebSocketsでチャットアプリを実装!~ユーザーリスト表示編~


PruneMobile側(sever.go)の方が先に落ちる(確認) → で書き込みできなくなってgtfs_hub側(gtfs_hub.go)も落ちる、と、多分、そんな感じ。

"repeated read on failed websocket connection"を普通に読めば、「間違ったWebsocket接続で、*何度*も読み込みを繰り返している」なので、read errorが発生したら、即コネクションクローズして、クライアントも落してしまえばいいのかな、と考えました。→ ダメでした。サーバが落ちて処理が止まります。

で、以前、

Golangのサーバなんか大嫌い

で、

"http.HandleFunc()"は、クライアントがやってくるごにに一つづつ立ち上があるfork()のようなものである

てなことを書いていたので、read errorqを検知したら、forループから直ちにbreakして、クライアントをクラッシュさせてしまうこと(ができるものと)しました。→ ダメでした。サーバが落ちて処理が止まります。


for (){
      (色々)
           err = webConn.ReadJSON(&locMsg2) // ここでPanic serving  ... repeated read on failed websocket connectionが発生している可能性あり
           fmt.Printf("c6: ")
           if err != nil{
              fmt.Printf("Before webConn.close(), After c6:")
               webConn.Close()
               break → ダメ
           }
}

javascript (onload.js) の方にも、終了理由がでるように、以下のコードを追加しました。

// サーバを止めると、ここに飛んでくる
  socket.onclose = function (event) {
      console.log("socket.onclose");
  
      let obj = JSON.parse(event.data);
  
      console.log("socket.onclose: obj.id:", obj.id);
      console.log("socket.onclose: obj.lat:", obj.lat);
      console.log("socket.onclose: obj.lng:", obj.lng);
      console.log("socket.onclose: obj.type:", obj.type);
      console.log("socket.onclose: obj.popup:", obj.popup);
  
      socket = null;
  
      // 切断が完全に完了したかどうか
      if(event.wasClean){
          var closed = "完了";
      } else {
          var closed = "未完了";
      }
      info.innerHTML += "切断処理:" + closed + "<br>";
      info.innerHTML += "コード:" + event.code + "<br>";
      info.innerHTML += "理由:" + event.reason + "<br>";
  
  }
  
  window.onunload = function(event){
      // 切断
      ws.close(4500,"切断理由");
  }

上記の「ダメ」の対策中

https://ja.stackoverflow.com/questions/12389/golang%E3%81%A7%E3%83%9A%E3%83%BC%E3%82%B8%E3%82%92%E5%86%8D%E8%AA%AD%E3%81%BF%E8%BE%BC%E3%81%BF%E3%81%99%E3%82%8B%E3%81%A8websocket-server%E3%81%8C%E8%90%BD%E3%81%A1%E3%82%8B


■問題解決編

色々問題があったのですが、順番に説明していきます。


	var addr = flag.String("addr", "192.168.0.8:8080", "http service address") // テスト
	....
	.....
	http.Handle("/", http.FileServer(http.Dir(".")))


	http.HandleFunc("/echo", echo)                                           // echo関数を登録 (サーバとして必要)
	log.Fatal(http.ListenAndServeTLS(*addr, "./cert.pem", "./key.pem", nil)) // localhost:8080で起動をセット
}

まず第一に、http.HandleFunc()の誤解がありました。私は、これを、fork()のようにプロセスかスレッドを発生さるものと思っていましたが、これは、一言で言えば、単なるコールバック関数でした。

乱暴に言えば、Webからアクセスがあると、echo()というファンクションに吹っ飛ばされる、という現象を発生させる"だけ"で、それ意外のことは何にもしてくれないのです。

では、echo()の方はどうなっているかというと、

func echo(w http.ResponseWriter, r *http.Request) { // JavaScriptとの通信
	webConn, err := upgrader.Upgrade(w, r, nil)
	if err != nil {
		log.Println("websocket connection err:", err)
		return
	}
	defer webConn.Close()

とすることで、webSocket通信の準備ができて、その通信路が"webConn"にできる、ということです。
で、それ意外のことは何もしてくれないのです。

つまり、2つのWebブラウザからアクセスがくると、その度、echo()に飛んできて、その度に、異なるwebConnを生成する、ということです。

ここまでの説明で分かると思いますが、つまり、Webブラウザがくる度に、それをどっかに格納しておかないと、通信路の情報が上書きされてしまいます

なので、基本的には、以下のwebConnを、配列に格納しておきます。

var clients = make(map[*websocket.Conn]bool) // 接続されるクライアント
という動的な配列を準備しておき、アクセスがある度に、
// クライアントを新しく登録(だけ)
    m1Mutex.Lock() // 同時書き込みを回避するため、ミューテックスロックで囲っておく
    clients[webConn] = true  // これで、Webからのアクセスがある度に、通信路情報が動的に追加される
    m1Mutex.Unlock()

というように、Webブラウザとの通信路を別々に管理しておきます。

もし、fork()みたいなことがしたいのであれば、goroutineを起動して、そのgoroutineにWebブラウザの通信路を明け渡す必要があります。それでも、通信路の全体管理は、echo()が握っているので、webConnを消滅されたい場合は、echo()の方でやって貰う必要があります。

この方法を実現する方法として、GO言語のサンプルプログラムで良く登場するのが、以下のような方法です。

// 江端のPCでは、c:\users\ebata\test20230412\main.go

package main

(中略)

func handleConnections(w http.ResponseWriter, r *http.Request) {
    // 送られてきたGETリクエストをwebsocketにアップグレード
    ws, err := upgrader.Upgrade(w, r, nil)
    if err != nil {
        log.Fatal(err)
    }
    // 関数が終わった際に必ずwebsocketnのコネクションを閉じる
    defer ws.Close()

    // クライアントを新しく登録
    clients[ws] = true

    for {
        var msg Message
        // 新しいメッセージをJSONとして読み込みMessageオブジェクトにマッピングする
        err := ws.ReadJSON(&msg)
        if err != nil {
            log.Printf("error: %v", err)
            delete(clients, ws)
            break
        }
        // 新しく受信されたメッセージをブロードキャストチャネルに送る
        broadcast <- msg
    }
}

func handleMessages() {
    for {
        // ブロードキャストチャネルから次のメッセージを受け取る
        msg := <-broadcast
        // 現在接続しているクライアント全てにメッセージを送信する
        for client := range clients {
            err := client.WriteJSON(msg)
            if err != nil {
                log.Printf("error: %v", err)
                client.Close()
                delete(clients, client)
            }
        }
    }
}

上記の例では、 http.HandleFunc("/ws", handleConnections) で、handleConnectionsをコールバック関数にしておき、こちらにWebブラウザからのアクセスを全部任せます

でもって、ついでにWebからやってくる通信の全てを受けつけています(ReadJSON())。さらに、webブラウザが突然閉じられた場合などは、通信エラーとして検知して、それをクローズした後に、webConnの配列から取り除いています。これで、このブラウザからの通信路は閉じらて、消されます。

で、この通信の内容を、チャネルを使って、go handleMessagerで作った、fork()みたいなgoroutineに流し込んでいます。

結論として、fork()みたなことがやりたければ、「自力で作れ」ということになります


しかし、WebSocket単位で別々のgoroutine作るのも面倒くさいです。それに、もしそのようなgoroutineを作ったとすれば、ブロードキャストを実現しなければなりませんが、チャネルには、ブロードキャスト機能がありません(どうしても使わなければならない時は、私はredisを使っています)。

ですので、私、チャネルの配列を作って疑似的なブロードキャストを実現しようとしたのですが、このサンプルプログラムが見るからなくて、困っていました。

『echo()関数の中で、全てのWebコネクションを相手にできないかな』と考え始めました。

基本形はこんな形

for {
     message <- channel // 外部から送られてきたデータ
     for client := range clients{ //clientsはWebConnのリスト
           client.WriteJSON(message)
           client.ReadJSON(message2}
     }
}

問題は、Webブラウザは終了処理などなどをせずに、閉じられてしまうことにあります(私たちが普通にやっていることです)。

とすれば、echo()の中でコネクションの切断を検知して、それをWebConnのリスト から取り除く必要があります。

で、こんなことやってみたんですよ。

for {
     message <- channel // 外部から送られてきたデータ
     for client := range clients{ //clientsはWebConnのリスト
           err = client.WriteJSON(message)
           if err != nil{
               client.Close()
               delete(client, clients)
           err =  client.ReadJSON(message2}
           if err != nil{
               client.Close()
               delete(client, clients)
     }
}

これでは、for ルーチンの中で、回している変数を減らすという処理が不味かったようで、この場合、 echo()が終了してしまうようでした。当然、repeated.....も含めて、エラーの嵐になりました。

なので、こんな風に変更しました。


var delete_client *websocket.Comm
for {
     delete_client = nil
     message <- channel // 外部から送られてきたデータ
     for client := range clients{ //clientsはWebConnのリスト
           err = client.WriteJSON(message)
           if err != nil{
               delete_client = client
           }
           err =  client.ReadJSON(message2}
           if err != nil{
               delete_client = client
           }
     }
     if delete_client != nil{
        delete_client.Close()
        delete(clients, delete_client)
}

つまり、ループの外でコネクション処理を行う、ということです。
ただ、この方法では、ループを回っている途中に2つ以上のWebブラウザが落された場合にどうなるか、という問題が残ります。
この場合、「次のループでエラーを検知するのを待つ」という処理で対応する、と腹を括りました。
なぜなら、repeat..... のエラーは、積り積って発生することを経験的に知っていましたので、それまで通信障害したまま走って貰えばいい、と割り来って考えることにしました。


結論としては、

(1)http.HandleFunc()は、Webからの接続要求時に、飛される先の関数を記述するもの(コールバック関数)であり、
(2)そのコールバック関数の中だけで、入出力処理がしたいのであれば、ループを壊さないような工夫をして、上手く運用すれば、上手くいく(ことがある)

という結論になりそうです。


2023,江端さんの技術メモ

公開回、秘密鍵の対応

log.Fatal(http.ListenAndServeTLS(*addr, "./cert.pem", "./key.pem", nil)) // localhost:8080で起動をセット

if httpErr = http.ListenAndServeTLS(*addr, "./fullchain.pem", "./privkey.pem", nil);

ということで、 cert.pem = fullchain.pem  key.pem = privkey.pem で良いのだろう

Let's encrypt を試してみた件(整理は明日)

2023,江端さんの技術メモ

T研究所のKさん。ありがとうございました。


(4)PruneClusterにおいて、クラスタリングを解除する方法 → leafletView の定義の後に、「leafletView.Cluster.Size = -1」のよう     に負の値を設定することによって、実現可能です。     - 参考URL:https://github.com/SINTEF-9012/PruneCluster/issues/52

2023,江端さんの技術メモ

バスのリアルタイム情報を格納するサーバを作ることになりました(経緯が色々あって)。

情報を提供しているサーバから、JSONを定期的に取りに行けばいいんだろう、とか思っていたのですが、このProtocol Bufferというデータ形式を、私は聞いたことがありません。

実際にデータを取得してセーブしてみたのですが、明らかにバイナリです。

しかも、どのエディタでも自動整形しない。ということは、どうやらテキストではない。

で、色々調べたのですが、どうも要領を得ないのですが、下の動画でやっと分かった気になりました。

乱暴に言えば、Protocol Buffersとは「圧縮されたJSON または XML(のようなもの)」です。

まあ、JSONもXMLもテキストメッセージで、しかも構造を保持したまま送信するので「通信効率悪そうだなぁ」と前々から思っていましたので、こういうものが必要となるのは分かります。

Googleが提供していることもあり、また、リアルタイム系のデータでは必要となるのは分かりますが ―― また、覚えることが増えたなぁ、と少々ウンザリしています。


とりあえず、Go言語で動かすことを目的として、ここまでの経緯を記載しておきます。

私の環境は、Windows10です。GOはインストール済みです

(1)https://protobuf.dev/downloads/ から "Latest Version" →  "*-win64.zip"

をダウンロード。私はC:\の直下に展開しました。

でもって、この両方のフォルダーにpathを通しておきました。必要なのは"protoc.exe"です。

(2)私の場合、C:\Users\ebata\protocol_bufferesというディレクトリを作って、そこにソースを展開することにしました。

とりあえず、main.goという名前でファイルを作っておきます(後で必要になります)

package main

import "fmt"

func main() {
	fmt.Println("Hello World!!")
}

さらに、person.proto という名前で、

syntax = "proto3";
package main;

message Person{
    string name = 1;
    int32 age = 2;
}

というファイルを作ります。これがxmlやらJSONのスタイルファイルにようなものです。

で、ここから、person.pb.goというファイルを作らなければならないのですが、これに苦労しました。

C:\Users\ebata\protocol_bufferesの中で、

$ protoc --go_out=. *.proto
protoc-gen-go: unable to determine Go import path for "person.proto"
Please specify either:
    • a "go_package" option in the .proto source file, or
      • a "M" argument on the command line.
See https://developers.google.com/protocol-buffers/docs/reference/go-generated#p
ackage for more information.
--go_out: protoc-gen-go: Plugin failed with status code 1.

のようなことを繰り返していたのですが、person.proto の中に、一行追加したら、サクっと通りました。

syntax = "proto3";

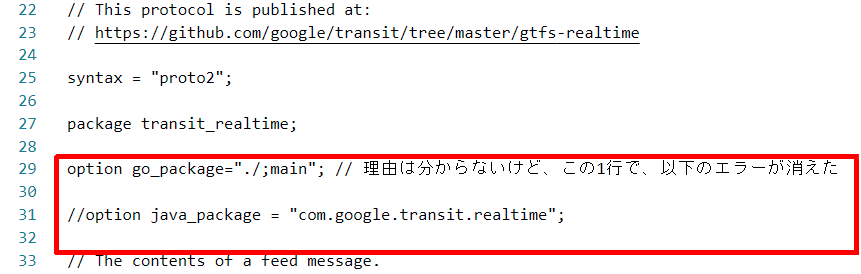
option go_package="./;main"; // 理由は分からないけど、この1行で、以下のエラーが消えた

//$ protoc --go_out=. *.proto
//protoc-gen-go: unable to determine Go import path for "person.proto"
//Please specify either:
//        • a "go_package" option in the .proto source file, or
//        • a "M" argument on the command line.
//See https://developers.google.com/protocol-buffers/docs/reference/go-generated#p
//ackage for more information.
//--go_out: protoc-gen-go: Plugin failed with status code 1.

package main;

message Person{
    string name = 1;
    int32 age = 2;
}

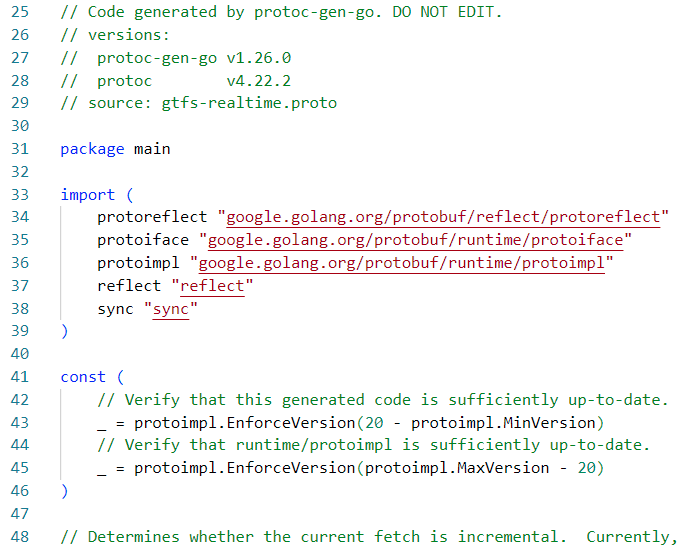
この結果、以下のようなperson.pb.goが生成されました。

// Code generated by protoc-gen-go. DO NOT EDIT.
// versions:
// 	protoc-gen-go v1.26.0
// 	protoc        v4.22.2
// source: person.proto

package main

import (
	protoreflect "google.golang.org/protobuf/reflect/protoreflect"
	protoimpl "google.golang.org/protobuf/runtime/protoimpl"
	reflect "reflect"
	sync "sync"
)

const (
	// Verify that this generated code is sufficiently up-to-date.
	_ = protoimpl.EnforceVersion(20 - protoimpl.MinVersion)
	// Verify that runtime/protoimpl is sufficiently up-to-date.
	_ = protoimpl.EnforceVersion(protoimpl.MaxVersion - 20)
)

type Person struct {
	state         protoimpl.MessageState
	sizeCache     protoimpl.SizeCache
	unknownFields protoimpl.UnknownFields

	Name string `protobuf:"bytes,1,opt,name=name,proto3" json:"name,omitempty"`
	Age  int32  `protobuf:"varint,2,opt,name=age,proto3" json:"age,omitempty"`
}

func (x *Person) Reset() {
	*x = Person{}
	if protoimpl.UnsafeEnabled {
		mi := &file_person_proto_msgTypes[0]
		ms := protoimpl.X.MessageStateOf(protoimpl.Pointer(x))
		ms.StoreMessageInfo(mi)
	}
}

func (x *Person) String() string {
	return protoimpl.X.MessageStringOf(x)
}

func (*Person) ProtoMessage() {}

func (x *Person) ProtoReflect() protoreflect.Message {
	mi := &file_person_proto_msgTypes[0]
	if protoimpl.UnsafeEnabled && x != nil {
		ms := protoimpl.X.MessageStateOf(protoimpl.Pointer(x))
		if ms.LoadMessageInfo() == nil {
			ms.StoreMessageInfo(mi)
		}
		return ms
	}
	return mi.MessageOf(x)
}

// Deprecated: Use Person.ProtoReflect.Descriptor instead.
func (*Person) Descriptor() ([]byte, []int) {
	return file_person_proto_rawDescGZIP(), []int{0}
}

func (x *Person) GetName() string {
	if x != nil {
		return x.Name
	}
	return ""
}

func (x *Person) GetAge() int32 {
	if x != nil {
		return x.Age
	}
	return 0
}

var File_person_proto protoreflect.FileDescriptor

var file_person_proto_rawDesc = []byte{
	0x0a, 0x0c, 0x70, 0x65, 0x72, 0x73, 0x6f, 0x6e, 0x2e, 0x70, 0x72, 0x6f, 0x74, 0x6f, 0x12, 0x04,
	0x6d, 0x61, 0x69, 0x6e, 0x22, 0x2e, 0x0a, 0x06, 0x50, 0x65, 0x72, 0x73, 0x6f, 0x6e, 0x12, 0x12,
	0x0a, 0x04, 0x6e, 0x61, 0x6d, 0x65, 0x18, 0x01, 0x20, 0x01, 0x28, 0x09, 0x52, 0x04, 0x6e, 0x61,
	0x6d, 0x65, 0x12, 0x10, 0x0a, 0x03, 0x61, 0x67, 0x65, 0x18, 0x02, 0x20, 0x01, 0x28, 0x05, 0x52,
	0x03, 0x61, 0x67, 0x65, 0x42, 0x09, 0x5a, 0x07, 0x2e, 0x2f, 0x3b, 0x6d, 0x61, 0x69, 0x6e, 0x62,
	0x06, 0x70, 0x72, 0x6f, 0x74, 0x6f, 0x33,
}

var (
	file_person_proto_rawDescOnce sync.Once
	file_person_proto_rawDescData = file_person_proto_rawDesc
)

func file_person_proto_rawDescGZIP() []byte {
	file_person_proto_rawDescOnce.Do(func() {
		file_person_proto_rawDescData = protoimpl.X.CompressGZIP(file_person_proto_rawDescData)
	})
	return file_person_proto_rawDescData
}

var file_person_proto_msgTypes = make([]protoimpl.MessageInfo, 1)
var file_person_proto_goTypes = []interface{}{
	(*Person)(nil), // 0: main.Person
}
var file_person_proto_depIdxs = []int32{
	0, // [0:0] is the sub-list for method output_type
	0, // [0:0] is the sub-list for method input_type
	0, // [0:0] is the sub-list for extension type_name
	0, // [0:0] is the sub-list for extension extendee
	0, // [0:0] is the sub-list for field type_name
}

func init() { file_person_proto_init() }
func file_person_proto_init() {
	if File_person_proto != nil {
		return
	}
	if !protoimpl.UnsafeEnabled {
		file_person_proto_msgTypes[0].Exporter = func(v interface{}, i int) interface{} {
			switch v := v.(*Person); i {
			case 0:
				return &v.state
			case 1:
				return &v.sizeCache
			case 2:
				return &v.unknownFields
			default:
				return nil
			}
		}
	}
	type x struct{}
	out := protoimpl.TypeBuilder{
		File: protoimpl.DescBuilder{
			GoPackagePath: reflect.TypeOf(x{}).PkgPath(),
			RawDescriptor: file_person_proto_rawDesc,
			NumEnums:      0,
			NumMessages:   1,
			NumExtensions: 0,
			NumServices:   0,
		},
		GoTypes:           file_person_proto_goTypes,
		DependencyIndexes: file_person_proto_depIdxs,
		MessageInfos:      file_person_proto_msgTypes,
	}.Build()
	File_person_proto = out.File
	file_person_proto_rawDesc = nil
	file_person_proto_goTypes = nil
	file_person_proto_depIdxs = nil
}

さて、ここで、

package main

import (
	"fmt"
	"log"

	"google.golang.org/protobuf/proto"
)

func main() {
	fmt.Println("Hello World!!")

	elliot := &Person{
		Name: "Elliot",
		Age:  24,
	}

	data, err := proto.Marshal(elliot)
	if err != nil {
		log.Fatal("Marshalling error", err)
	}

	fmt.Println(data)
}

とした上で、

$ go run main.go person.pb.go

をすると、

main.go:7:2: no required module provides package google.golang.org/protobuf/prot
o: go.mod file not found in current directory or any parent directory; see 'go h
elp modules'
person.pb.go:10:2: no required module provides package google.golang.org/protobu
f/reflect/protoreflect: go.mod file not found in current directory or any parent
directory; see 'go help modules'
person.pb.go:11:2: no required module provides package google.golang.org/protobu
f/runtime/protoimpl: go.mod file not found in current directory or any parent di
rectory; see 'go help modules'

というエラーがでてくるので、
$go mod init m
$ go get google.golang.org/protobuf/reflect/protoreflect
$ go get google.golang.org/protobuf/proto
$ go get google.golang.org/protobuf/runtime/protoimpl

を実行して、再度、

$ go run main.go person.pb.go

を行うと

Hello World!!
[10 6 69 108 108 105 111 116 16 24]

とい値が出力されます。

package main

import (
	"fmt"
	"log"

	"google.golang.org/protobuf/proto"
)

func main() {
	fmt.Println("Hello World!!")

	elliot := &Person{
		Name: "Elliot",
		Age:  24,
	}

	data, err := proto.Marshal(elliot)
	if err != nil {
		log.Fatal("Marshalling error", err)
	}

	fmt.Println(data)

	newElliot := &Person{}
	err = proto.Unmarshal(data, newElliot)
	if err != nil {
		log.Fatal("unmarshalling error: ", err)
	}

	fmt.Println(newElliot.GetAge())
	fmt.Println(newElliot.GetName())

}

のプログラムを実行すると、

$ go run main.go person.pb.go
Hello World!!
[10 6 69 108 108 105 111 116 16 24]
24
Elliot

となる。


動的バス情報フォーマット(GTFSリアルタイム)ガイドライン

やっと見つけた

ここからダウンロードすると、こんな感じのprotoファイルが得られます。

で、これを以下のように修正して、

として、

$ protoc --go_out=. *.proto

を実施すると、さくっとgtfs-realtime.pb.goができました。

ここまでできれば、後はクライアントを作れば、できるはずです。

問題は、どうやってサーバにアクセスするか、を考えれば、いくはずです。
(が、基本的に最後に動くまで、どうなるかは分からないですが)。


さて、今回の私の狙いは、

https://ckan.odpt.org/dataset/b_bus_gtfs_rt-yokohamamunicipal

の、リアルタイムデータを取得して保存しておくことです。

これは、こちらに記載されているように

URL: https://api.odpt.org/api/v4/gtfs/realtime/YokohamaMunicipalBus_vehicle?acl:consumerKey=[発行されたアクセストークン/YOUR_ACCESS_TOKEN]

なので、このデータを所得するためには、「発行されたアクセストークン」というのを貰う必要があります。これ、"f4954c3814b207512d8fe4bf10f79f0dc44050f1654f5781dc94c4991a574bf4"(江端ルールで変更済み)というやつになります。

これは、https://developer.odpt.org/ から、申請してメールで付与してもらえます(2日くらいかな)。これがないと、データの取得ができないので注意して下さい。

さて、ここから、とりあえず、この横浜市交通局の市営バスのバス関連リアルタイム情報を取得するコードを、https://gtfs.org/realtime/language-bindings/golang/ をパクって、ちょっと修正してみました。

私は、c:\Users\ebata\protocol_bufferes\gtfs-realtime というディレクトリを掘って、上記のページ通りのことを実施しました。

$ go get github.com/MobilityData/gtfs-realtime-bindings/golang/gtfs

$ go get google.golang.org/protobuf/proto

以下のファイルを作成しました(トークンは自分のものに置き替えて下さい)。エラーの出てくるところは、コメントアウトしています。

// https://gtfs.org/realtime/language-bindings/golang/

package main

import (
	"fmt"
	"io/ioutil"
	"log"
	"net/http"

	"github.com/MobilityData/gtfs-realtime-bindings/golang/gtfs"
	proto "github.com/golang/protobuf/proto"
)

func main() {
	var (
		username = "xx@gmail.com" // 横浜市交通局の市営バスのサイトでは不要のようだからダミーを放り込んでおく
		password = "xx"           // (同上)
	)

	client := &http.Client{}
	req, err := http.NewRequest("GET", "https://api.odpt.org/api/v4/gtfs/realtime/YokohamaMunicipalBus_vehicle?acl:consumerKey=f4954c3814b207512d8fe4bf10f79f0dc44050f1654f5781dc94c4991a574bf4", nil)
	if err != nil {
		log.Fatal(err)
	}

	req.SetBasicAuth(username, password)
	resp, err := client.Do(req)
	if err != nil {
		log.Fatal(err)
	}

	defer resp.Body.Close()
	if err != nil {
		log.Fatal(err)
	}
	body, err := ioutil.ReadAll(resp.Body)
	if err != nil {
		log.Fatal(err)
	}

	fmt.Println(body)

	feed := gtfs.FeedMessage{}
	err = proto.Unmarshal(body, &feed)
	if err != nil {
		log.Fatal(err)
	}
	fmt.Println(feed)

	/*

		for _, entity := range feed.Entity {
			tripUpdate := entity.TripUpdate
			trip := tripUpdate.Trip
			tripId := trip.TripId
			fmt.Printf("Trip ID: %s\n", *tripId)
		}
	*/
}

で、fmt.Println(body) のところを表示するとこんな感じになっています。

[10 13 10 3 50 46 48 16 0 24 165 246 160 161 6 18 41 10 9 118 105 99 108 95 49 56 48 54 34 28 18 10 13 252 214 13 66 21 192 155 11 67 40 165 205 159 161 6 66 6 10 4 49 56 48 54 72 0 18 41 10 9 118 105 99 108 95 49 48 48 50 34 28 18 10 13 188 173 13 66 21 205 159 11 67 40 233 176 159 161 6 66 6 10 4 49 48 48 50 72 0 18 41 10 9 118 105 99 108 95 51 57 57 50 34 28 18 10 13 83 131 13 66 21 28 146 11 67 40 216 210 159 161 6 66 6 10 4 51 57 57 .....

fmt.Println(feed)は、こんな風に表示されます。

{{{} [] [] 0xc00013f800} 0 [] map[] gtfs_realtime_version:"2.0" incrementality:FULL_DATASET timestamp:1680358181 [id:"vicl_1806" vehicle:{vehicle:{id:"1806"} position:{latitude:35.459946 longitude:139.6084} timestamp:1680336549 occupancy_status:EMPTY} id:"vicl_1002" vehicle:{vehicle:{id:"1002"} position:{latitude:35.419662 longitude:139.62422} timestamp:1680332905 occupancy_status:EMPTY} id:"vicl_3992" vehicle:{vehicle:{id:"3992"} position:{latitude:35.378246 longitude:139.57074} timestamp:1680337240 occupancy_status:EMPTY} id:"vicl_1732" vehicle:{trip:{trip_id:"04117_12202301042041P01910" schedule_relationship:SCHEDULED} vehicle:{id:"1732"}.....

あとは、ここをパースすれば、必要な情報は取り出せるはずです。


さて、ここから ~/protocol_bufferes/gtfs-realtime に環境を作ってみます。

$go mod init m
$ go get google.golang.org/protobuf/reflect/protoreflect
$ go get google.golang.org/protobuf/proto
$ go get google.golang.org/protobuf/runtime/protoimpl

で、

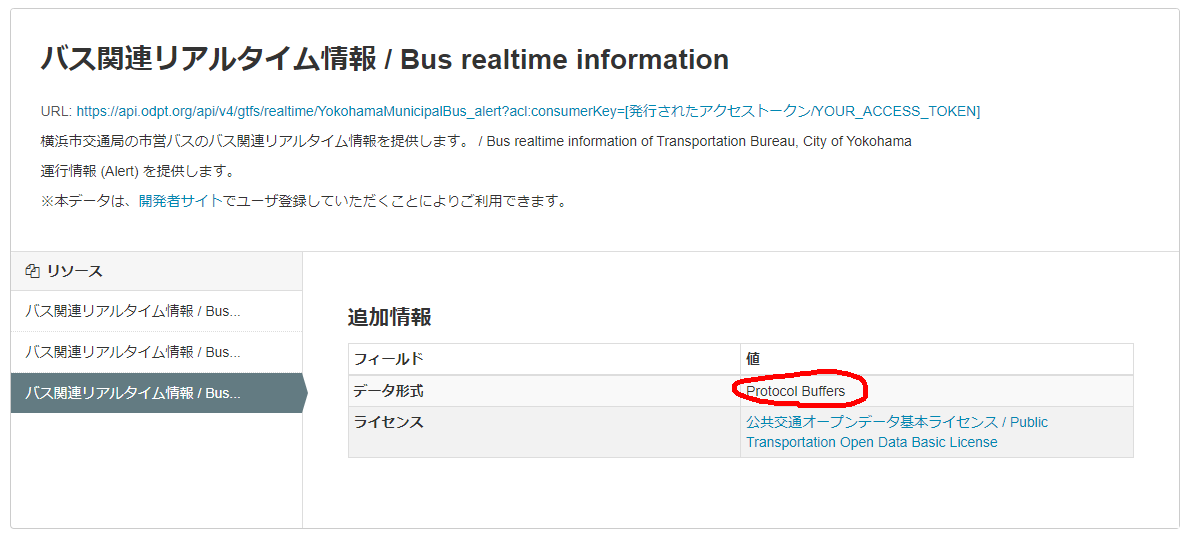
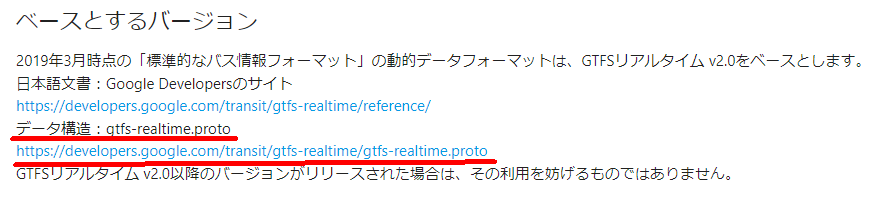
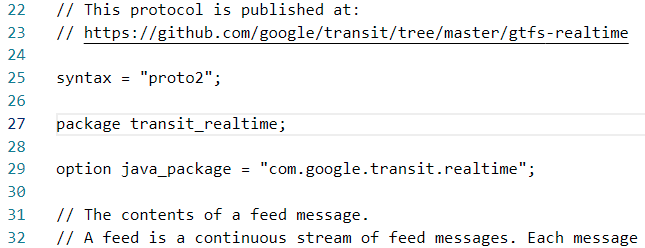
こちらの環境でも、上記と同じ手続で、gtfs-realtime.pb.goを作り、

$ go run main.go gtfs-realtime.pb.go

を実施してみましたところ、

main.go:11:2: no required module provides package github.com/MobilityData/gtfs-realtime-bindings/golang/gtfs; to
add it:
go get github.com/MobilityData/gtfs-realtime-bindings/golang/gtfs
main.go:12:2: missing go.sum entry for module providing package github.com/golang/protobuf/proto; to add:
go mod download github.com/golang/protobuf

と言われたので、言われた通りのことを実施してみました

ebata@DESKTOP-P6KREM0 MINGW64 ~/protocol_bufferes/gtfs-realtime
$ go get github.com/MobilityData/gtfs-realtime-bindings/golang/gtfs
go get: added github.com/MobilityData/gtfs-realtime-bindings/golang/gtfs v1.0.0
でもって、
ebata@DESKTOP-P6KREM0 MINGW64 ~/protocol_bufferes/gtfs-realtime
$ go mod download github.com/golang/protobuf
再度やってみました。
$ go run main.go gtfs-realtime.pb.go
go: updates to go.mod needed; to update it:
        go mod tidy
ここも言われた通り、
$ go mod tidy
をやりました。
でもって、また繰り返しました。
$ go run main.go gtfs-realtime.pb.go
panic: proto: file "gtfs-realtime.proto" is already registered
        previously from: "github.com/MobilityData/gtfs-realtime-bindings/golang/gtfs"
        currently from:  "main"
See https://protobuf.dev/reference/go/faq#namespace-conflict
goroutine 1 [running]:
google.golang.org/protobuf/reflect/protoregistry.glob..func1({0xea9240, 0xeb92b8}, {0xea9240, 0xc000058d70})
        c:/go/pkg/mod/google.golang.org/protobuf@v1.30.0/reflect/protoregistry/registry.go:56 +0x1f4
(以下、色々)
エラー文を見てみると、"gtfs-realtime.proto"が既に登録されている、とあります。
まあ、 ~/protocol_bufferes/ で、色々やったので、多分、登録してしまったのだろうと思います。
が、それを色々変えるのは面倒ですので、とりあえず対処方として、環境変数を変えてしまう、という手があるようです。
$ export GOLANG_PROTOBUF_REGISTRATION_CONFLICT=warn
で、ここの部分は回避できるようです(本格的な修正は後回しとします)。
とりあえず、エラーが出てこないように、main.goでコメントしていた部分を解いて、エラーが出てこないように修正しました。
feed := gtfs.FeedMessage{}
	err = proto.Unmarshal(body, &feed)
	if err != nil {
		log.Fatal(err)
	}
	//fmt.Println(feed)

	for _, entity := range feed.Entity {
		//tripUpdate := entity.TripUpdate
		fmt.Println(entity)
		fmt.Println()
		//trip := tripUpdate.Trip
		//tripId := trip.TripId
		//fmt.Printf("Trip ID: %s\n", *tripId)
	}
とりあえずentity(が、何かよく分からんのですが)を表示してみました。
この結果、以下のような表示が得られました。
id:"vicl_1780"  vehicle:{trip:{trip_id:"05406_09202304031054P00218"  schedule_relationship:SCHEDULED}  vehicle:{id:"1780"}  position:{latitude:35.415165  longitude:139.66798}  current_stop_sequence:10  stop_id:"5899_02"  current_status:IN_TRANSIT_TO  timestamp:1680534894  occupancy_status:EMPTY}
id:"vicl_3944"  vehicle:{trip:{trip_id:"03903_22202304031012A01309"  schedule_relationship:SCHEDULED}  vehicle:{id:"3944"}  position:{latitude:35.50719  longitude:139.55861}  current_stop_sequence:32  stop_id:"6219_01"  current_status:IN_TRANSIT_TO  timestamp:1680528244  occupancy_status:EMPTY}
id:"vicl_1705"  vehicle:{vehicle:{id:"1705"}  position:{latitude:35.378166  longitude:139.57071}  timestamp:1680522432  occupancy_status:FEW_SEATS_AVAILABLE}
id:"vicl_4607"  vehicle:{vehicle:{id:"4607"}  position:{latitude:35.492794  longitude:139.66455}  timestamp:1680526330  occupancy_status:NOT_ACCEPTING_PASSENGERS}
さて、次は、この内容を理解しなければなりません。
とりあえず、バスのID、緯度、経度が取れればよく、これでデータが取れるようです.
for _, entity := range feed.Entity {
			//tripUpdate := entity.TripUpdate
			//fmt.Println(entity)

			// データの読み込み
			uniName := *(entity.Vehicle.Vehicle.Id)
			lat := *(entity.Vehicle.Position.Latitude)
			lon := *(entity.Vehicle.Position.Longitude)

			fmt.Println(uniName, lat, lon)
}

2023,江端さんの技術メモ

wsl -d Ubuntu-20.04で起動しようとして、Error: 0x80040326 Error code: Wsl/Service/0x80040326 と言われた時の対応

で対応できたのは良いのですが、今度はDocker Desktopが動かなくなりました。

いわゆる、"これ"です。

error during connect: This error may indicate that the docker daemon is not running.: Get http://%2F%2F.%2Fpipe%2Fdocker_engine/v1.24/containers/json: open //./pipe/docker_engine: The system cannot find the file specified.

以下のページを参考にさせて頂きながら、色々対策していました。

https://remix-yh.net/2139/#:~:text=%E3%81%8C%E3%80%81%E5%A4%89%E6%9B%B4%E3%81%A7%E3%81%8D%E3%81%AA%E3%81%84%E3%80%82-,%E8%A7%A3%E6%B1%BA%E7%AD%96,%E3%82%88%E3%81%86%E3%81%AB%E3%81%AA%E3%82%8A%E3%81%BE%E3%81%97%E3%81%9F%E3%80%82

https://engineer-ninaritai.com/docker-desktop-not-work/

などを調べていましたが、

「Docker Desktop for Windows」が起動しなくなった?

を最後の手段として腹を括ったところで、動かなかったDocker Desktopでボタン押したアップデートが突然走り出しました。

で、DBのDockerを起動して、psqlでアクセスしたらちゃんとDBが動いていることが確認できました。

こーゆーことが多いので、Docker Desktopは嫌いなんですよ。
(こんなトラブルが「顧客デモの直前」に起きたら、と思うとゾっとします)

2023,江端さんの技術メモ

英語論文の現在形と過去形の使い分け

person agent か、human agentか?

person:普段「1人の人」を指す。
persons:フォーマルな場面で使う。
people:普段「複数の人」を指す
human:神や動物、ロボットではなく「人間」。
man:「男性」「人」「人類」。最近は「人」「人類」の意味で使うのは避ける傾向にある。
guy、fellow、bloke:口語で「やつ」。

"human agent"で良いように思う。


「自律判断」という英訳で悩む → ここは、"Google裁定"に任せる
"autonomous behavior":149,000
"autonomous decision":383,000
"self-determination": 510,000,000
"autonomous decision" & "algorithm": 82,200
"autonomous behavior algorithm" 146
"autonomous decision" & "algorithm":82,200
"autonomous decision algorithm":1,300
"self-determination" & "algorithm": 421,000
"self-determination algorithm":1,520

結論: "self-determination"が勝者だと思うけど、論文の下書きみたら、"behavioral psychology"が乱発されていた。今、ここで、これを換えると、前後の文章も替えなければならないので、本件は放置する。


住民 resident と inhabitant の違い

どちらも住民という意味ですが
resident は、特定の地域の居住者のことを指し、一時居住者も含むのに対し、
inhabitant は、その地域に長く住む集団に属するものを指します。
どちらも通例では、sをつけた複数形で使われることが多いようです。

resident は、「住民」の他に「居住者」とも訳されますし、名詞の他に形容詞としても使われますが、inhabitant は、名詞のみで、「住民」の他に「定住者」や「生息動物」という意味にもなります。この動詞形は inhabit となり、「に居住している」「に宿る」「巣食う」という意味です。


「課題」をどう訳すか?
→"技術課題"は、"technical problems"でいいみたい(problemを使うと、"問題点"みたいに聞こえるので、"challenge"を使いたくなるけど)
https://www.bizmates.jp/blog/kadai-eigo/

Problem(課題、問題)

Problemは「解決すべき問題」という意味で表現したい時に使います。不利益や不都合を来たす物事を指します。

[例文1]
This is a problem our company needs to work to resolve in the long term.
これは我が社が長期的に取り組まなくてはならない課題です。
[例文2]
Does anyone have a good idea to resolve the problem?
この課題を解決するためのいいアイディアはありますか?
[例文3]
The biggest problem of this project is the lack of human resources.
このプロジェクトの一番大きな課題は、人材が不足していることです。

Task(課題)

Taskは「やらなければならない作業・仕事」というニュアンスです。日常的な業務レベルで与えられた軽めの仕事や宿題を指します。

[例文1]
The only task I have left for this week is making my presentation slides.
今週残る課題はプレゼンテーションの資料作りです。
[例文2]
Thanks for helping me out. I was able to complete my task by the due date.
手伝ってくさってありがとうございました。なんとか期日までに課題を終えられました。
[例文3]
The president gave me a task to come up with a better marketing message.
社長からより良いマーケティングメッセージを策定するように、という課題をいただきました。

Assignment(課題)

AssignmentはTaskに似た意味合いを持ちますが、「任務」や「任された仕事」と、大きめの課題といたニュアンスです。上司から割り当てられた課題は、このAssignmentで表現します。ビジネスシーンだけでなく、学校でも宿題の意味で使われる表現です。

[例文1]
Let’s complete this assignment with everyone in the department.
この課題は部署全員で協力して完了させましょう。
[例文2]
I got a new assignment from my boss. I need to get it done within this year.
上司から新しい課題を渡されました。今年中に完了しなければなりません。
[例文3]
I’d like to give this assignment to Gabriel. It’s not going to be easy, but I think it will help him gain experience.
この課題はガブリエルにアサインしようと思います。難しいでしょうが、彼にはいい経験になると思います。

Issue(課題)

Issueは「議論すべき事象や問題」というニュアンスの表現です。Problemはそのもの自体がトラブルになりかねない問題を意味しますが、Issueはその事柄について賛成する人・反対する人に二分されている場合など、明らかに問題と言いきれない時や、角が立たないよう「問題」と呼ぶのを避けたい時に使います。

[例文1]
We should resolve this issue ASAP.
この課題は早急に解決したいですね。
[例文2]
The rising costs of our factories in Asia are a serious issue for our company.
アジア圏の工場でのコストの増加は弊社にとって大きな課題となっています。
[例文3]
At our company, we are taking social issues such as SDGs seriously.
弊社では、SDGsをはじめとした社会の課題に熱心に取り組んでいます。

Business(課題)

Businessは一般的に「仕事・事業・業務」という意味で使われますが、「片付けなければならない仕事」という意味でも使用されます。頻繁に使われる表現ではありませんが、これもissue のように婉曲な「問題」の言い方になります。

[例文1]
That is none of your business. I will take care of it.
それは私の課題なので責任を持って終わらせます。
[例文2]
I have some business I really need to take care of by the end of the day.
どうしても今日中に片付けなくてはならない課題があります。
[例文3]
It looks like we’ve got some business to do.
どうやら課題がでてきたようですね。

2023,江端さんの技術メモ

単純だけど、これでオブジェクトを書いたり消したりすれば、実現できるかな?


<!doctype html>
<html>
<head>
    <title>Many Points with  leaflet Canvas</title>
    <meta charset="utf-8">

    <style>
        
        #map {
            position: absolute;
            height: 100%;
            width: 100%;
            background-color: #333;
        }
    </style>

</head>
<body>
    <div id="map"></div>
    <link rel="stylesheet" href="http://cdn.leafletjs.com/leaflet-0.7.2/leaflet.css" />
    <script src="http://cdn.leafletjs.com/leaflet-0.7.2/leaflet.js"></script>
    <script src="L.CanvasOverlay.js"></script>
    <script src="http://www.sumbera.com/gist/data.js" charset="utf-8"></script>


    <script>

        var points = data; // data loaded from data.js
        var leafletMap = L.map('map').setView([50.00, 14.44], 9);
        L.tileLayer("http://{s}.sm.mapstack.stamen.com/(toner-lite,$fff[difference],$fff[@23],$fff[hsl-saturation@20])/{z}/{x}/{y}.png")
            .addTo(leafletMap);

        L.canvasOverlay()
            .drawing(drawingOnCanvas)
            .addTo(leafletMap);

        function drawingOnCanvas(canvasOverlay, params) {
            var ctx = params.canvas.getContext('2d');
            ctx.clearRect(0, 0, params.canvas.width, params.canvas.height);
            ctx.fillStyle = "rgba(255,116,0, 0.2)";


            //for (var i = 0; i < data.length; i++) {
            for (var i = 0; i < data.length; i=i+300) {
                var d = data[i];
                if (params.bounds.contains([d[0], d[1]])) {
                    dot = canvasOverlay._map.latLngToContainerPoint([d[0], d[1]]);
                    ctx.beginPath();
                    //ctx.arc(dot.x, dot.y, 3, 0, Math.PI * 2);
                    ctx.arc(dot.x, dot.y, 10, 0, Math.PI * 2);
                    ctx.fill();
                    ctx.closePath();
                }
            }

            //for (var i = 0; i < data.length ; i++) {
            for (var i = 0; i < data.length ; i=i+10) {
                var d = data[i];
                if (params.bounds.contains([d[0], d[1]])) {
                    dot = canvasOverlay._map.latLngToContainerPoint([d[0], d[1]]);
					//ctx.beginPath();
					ctx.clearRect(dot.x-10, dot.y-10, dot.x+0, dot.y+0);
                    //ctx.closePath();
                }
            }


        };
    </script>
</body>
</html>


2023,江端さんの技術メモ

https://prideout.net/emulating-double-precision の ざっくり翻訳

頂点変換の精度を向上させる
WebGLとOpenGL ESは64ビット演算をサポートしていませんが、頂点シェーダーで少し足掻くだけでエミュレートできます。
まず、この記事に興味を持たれた方は、Patrick CozziとKevin Ringが出版した「3D Engine Design for Virtual Globes」というとても素晴らしい本に興味を持たれたのではないでしょうか。この本には、精度についての章があり、その他にも多くのことが書かれています。
地図画像を読み込むと、以下の2つのインタラクティブなWebGLキャンバスが表示されます。青い十字線は、バークレー・マリーナのすぐ北にあるセザール・チャベス公園の展望台です。ここは、私の2人の子供たちのお気に入りの場所で、十分に拡大すると見ることができます。Googleマップと同じように、ズームやパンをしてみてください。
子供たちが見えるくらいまで拡大すると、左のキャンバスでは十字線が揺れていますが、右のキャンバスでは揺れていないことに気がつくかもしれません。左のキャンバスでは従来のモデル・ビュー・プロジェクション・マトリックスを使用していますが、右のキャンバスでは MVP を計算する際にカメラが (0,0,0) にあるように見せかけ、バーテックスシェーダーで手動で変換を行っています。このためのGLSLを以下に示します。
ハイパートとローパートの2つのユニフォームを使って、目の位置をGPUに送信していることに注意してください。この2つのパーツを抽出するために、以下のCPUサイドのコードを使用することができます:
C言語ではなくJavaScriptを使用している場合、Float32Arrayを使用して、上記のスニペットで見られるdouble-to-floatキャストを行うことができるかもしれません。
64ビット頂点
これまで、64ビットのカメラ位置の扱い方について説明してきましたが、これは上記のデモで十分です。では、64ビットの頂点が必要な場合はどうでしょうか。この場合も、GPUに送る前に各2倍を2つの浮動小数点に分割することができます。この場合、VBOが2倍になり、バーテックスシェーダが少し複雑になるため、よりコストがかかります。
私はこれを完全にテストしたわけではありませんが、ドナルド・クヌース(Donald Knuth)の研究に基づく古い数学精度ライブラリであるDSFUN90で使用されている「ダブル・シングル」ルーチンをGLSLで移植したものがあります!
いくつかの脚注
このページの地図デモは、私が取り組んでいる小さなC99ライブラリを使い、MODULARIZE=1、PRECISE_F32=1のフラグを付けてEmscriptenで実行したものです。PRECISE_F32を使用しない場合、Emscriptenはfloat変数でもdoubleを使用するため、split_doubleのコードが壊れてしまいます。
デモ用のマップテクスチャを得るために、mapbox.comの本当に素晴らしいStatic maps APIを使用しました。

2023,江端さんの技術メモ

■wsl2は通常状態ではdockerにアクセスできない。
→ Docker Desktopで、wsl2を使えるようにチェックを付ける

■wsl2からpsqlを使えるようにできるように、"sudo apt psql なんとか"で、psqlをインストールしておく
→ 要するに、wsl2からDBアクセスできなければ、お話にならない
こんなエラーで面倒な目にあった(なんか色々やっているうちに動くようになった)

psql: error: connection to server at "localhost" (::1), port 15432 failed: Connection refused (0x0000274D/10061)
Is the server running on that host and accepting TCP/IP connections?
connection to server at "localhost" (127.0.0.1), port 15432 failed: Connection refused (0x0000274D/10061)
Is the server running on that host and accepting TCP/IP connections?

とか、

psql: error: connection to server on socket "/var/run/postgresql/.s.PGSQL.5432" failed: No such file or directory

などが出てくるが、やっかいなことに、DBを3回くらい作り直すと、直っていたりするので、原因が特定できないことが多い。

T.B.D.