Sync.Cond、broadcastを使うには、条件があるようです
の、最後に記載した、
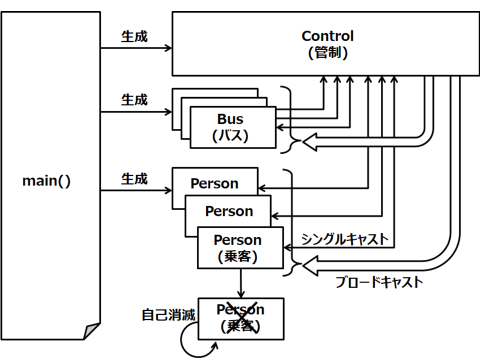
そういえば、ブロードキャストの送信者が1であった場合は問題がなかったけど、今回は、送信者が3になったところから、変な動きをしだしたことから鑑みて、
・送信者、受信者は1:Nの関係でないとだめ
なのかもしれないです。
として、別方式を考えているのですが、「Goの複数のgoroutineに対する、一斉ブロードキャスト」の便利さが、どうにも諦めきれなくて、まだ調べています。
そこで、簡易プログラムで以下の検証を行いました。
目的は以下の通り。
・送信者(sender)(ただし1人)や、受信者(receiver)がランダムなタイミングで出現・消滅しても、ちゃんと動くか
を検証してみました。
// go run main3.go
/*
	boardcast sync.bc 実験
	(1) 送信側(sender)をgoroutineにて大丈夫か
	(2) 受信側(sender)のgoroutineを、送信側の前後で、
	適当なタイミングで生成して、消滅させても大丈夫か
*/

package main

import (
	"fmt"
	"log"
	"math/rand"
	"sync"
	"time"
)

type BroadCaster struct {
	cond *sync.Cond
	id   int64
	msg  string
}

func (bc *BroadCaster) Send(msg string) {
	bc.cond.L.Lock()
	defer bc.cond.L.Unlock()
	bc.id++
	bc.msg = msg
	bc.cond.Broadcast()
}

func (bc *BroadCaster) Recv(last int64) (int64, string) {
	bc.cond.L.Lock()
	defer bc.cond.L.Unlock()
	for bc.id == last {
		bc.cond.Wait()
	}
	return bc.id, bc.msg
}

var (
	broadcaster = &BroadCaster{
		cond: sync.NewCond(&sync.Mutex{}),
	}
)

func receiver(i int) {

	delete_count := 5 + rand.Intn(10) // ループ回数は5~14回のどれか

	log.Println("recv:", i, " start")
	defer log.Println("recv:", i, " stop")

	last := int64(0)
	for k := 0; k < delete_count; k++ {
		id, msg := broadcaster.Recv(last)
		last = id
		log.Println("recv:", i, msg)
	}

}

func sender() {
	for i := 0; i < 20; i++ { // 20回程度送ってみる
		time.Sleep(1 * time.Second)
		broadcaster.Send(fmt.Sprintf("hello, world: %d", i))
	}
}

func main() {
	for i := 0; i < 3; i++ {
		go receiver(i)
	}

	/*
		for i := 0; i < 100; i++ {
			time.Sleep(1 * time.Second)
			broadcaster.Send(fmt.Sprintf("hello, world: %d", i))
		}
	*/

	go sender()

	for i := 4; i < 6; i++ {
		go receiver(i)
		time.Sleep(1 * time.Second)
	}

	time.Sleep(100 * time.Second) // 排他処理を書くのが面倒なので、ここでmainを眠らせておく

}
これで得られた結果です。
c:\Users\ebata\goga\1-7\test>go run main3.go
go run main3.go
go run main3.go
2022/03/18 12:39:02 recv: 0  start
2022/03/18 12:39:02 recv: 2  start
2022/03/18 12:39:02 recv: 4  start
2022/03/18 12:39:02 recv: 1  start
2022/03/18 12:39:03 recv: 1 hello, world: 0
2022/03/18 12:39:03 recv: 4 hello, world: 0
2022/03/18 12:39:03 recv: 2 hello, world: 0
2022/03/18 12:39:03 recv: 0 hello, world: 0
2022/03/18 12:39:03 recv: 5  start
2022/03/18 12:39:03 recv: 5 hello, world: 0
2022/03/18 12:39:04 recv: 4 hello, world: 1
2022/03/18 12:39:04 recv: 5 hello, world: 1
2022/03/18 12:39:04 recv: 2 hello, world: 1
2022/03/18 12:39:04 recv: 0 hello, world: 1
2022/03/18 12:39:04 recv: 1 hello, world: 1
2022/03/18 12:39:05 recv: 5 hello, world: 2
2022/03/18 12:39:05 recv: 1 hello, world: 2
2022/03/18 12:39:05 recv: 4 hello, world: 2
2022/03/18 12:39:05 recv: 2 hello, world: 2
2022/03/18 12:39:05 recv: 0 hello, world: 2
2022/03/18 12:39:06 recv: 1 hello, world: 3
2022/03/18 12:39:06 recv: 5 hello, world: 3
2022/03/18 12:39:06 recv: 4 hello, world: 3
2022/03/18 12:39:06 recv: 2 hello, world: 3
2022/03/18 12:39:06 recv: 0 hello, world: 3
2022/03/18 12:39:07 recv: 0 hello, world: 4
2022/03/18 12:39:07 recv: 4 hello, world: 4
2022/03/18 12:39:07 recv: 2 hello, world: 4
2022/03/18 12:39:07 recv: 5 hello, world: 4
2022/03/18 12:39:07 recv: 1 hello, world: 4
2022/03/18 12:39:08 recv: 1 hello, world: 5
2022/03/18 12:39:08 recv: 4 hello, world: 5
2022/03/18 12:39:08 recv: 0 hello, world: 5
2022/03/18 12:39:08 recv: 5 hello, world: 5
2022/03/18 12:39:08 recv: 0  stop
2022/03/18 12:39:08 recv: 5  stop
2022/03/18 12:39:08 recv: 2 hello, world: 5
2022/03/18 12:39:09 recv: 2 hello, world: 6
2022/03/18 12:39:09 recv: 1 hello, world: 6
2022/03/18 12:39:09 recv: 4 hello, world: 6
2022/03/18 12:39:10 recv: 4 hello, world: 7
2022/03/18 12:39:10 recv: 2 hello, world: 7
2022/03/18 12:39:10 recv: 1 hello, world: 7
2022/03/18 12:39:11 recv: 1 hello, world: 8
2022/03/18 12:39:11 recv: 4 hello, world: 8
2022/03/18 12:39:11 recv: 2 hello, world: 8
2022/03/18 12:39:12 recv: 2 hello, world: 9
2022/03/18 12:39:12 recv: 4 hello, world: 9
2022/03/18 12:39:12 recv: 1 hello, world: 9
2022/03/18 12:39:13 recv: 1 hello, world: 10
2022/03/18 12:39:13 recv: 2 hello, world: 10
2022/03/18 12:39:13 recv: 4 hello, world: 10
2022/03/18 12:39:14 recv: 4 hello, world: 11
2022/03/18 12:39:14 recv: 1 hello, world: 11
2022/03/18 12:39:14 recv: 1  stop
2022/03/18 12:39:14 recv: 2 hello, world: 11
2022/03/18 12:39:14 recv: 4  stop
2022/03/18 12:39:15 recv: 2 hello, world: 12
2022/03/18 12:39:16 recv: 2 hello, world: 13
2022/03/18 12:39:16 recv: 2  stop
結論としては、
・recvierは、データを重複することなく、またロストすることなく、1つづつキレイに受けとっていた
ということになります。
さて、ここで、今度は、送信者を2人にしてみます。送信者の名前が見易いように、"111"と"999"の番号を付けてます(冗長ですが、プログラムリスト全部を掲載します(私の為に))
// go run main3.go
/*
	boardcast sync.bc 実験
	(1) 送信側(sender)のgoroutineを2つにしたらどうなるか
*/

package main

import (
	"fmt"
	"log"
	"math/rand"
	"sync"
	"time"
)

type BroadCaster struct {
	cond *sync.Cond
	id   int64
	msg  string
}

func (bc *BroadCaster) Send(msg string) {
	bc.cond.L.Lock()
	defer bc.cond.L.Unlock()
	bc.id++
	bc.msg = msg
	bc.cond.Broadcast()
}

func (bc *BroadCaster) Recv(last int64) (int64, string) {
	bc.cond.L.Lock()
	defer bc.cond.L.Unlock()
	for bc.id == last {
		bc.cond.Wait()
	}
	return bc.id, bc.msg
}

var (
	broadcaster = &BroadCaster{
		cond: sync.NewCond(&sync.Mutex{}),
	}
)

func receiver(i int) {

	delete_count := 5 + rand.Intn(10) // ループ回数は5~14回のどれか

	log.Println("recv:", i, " start")
	defer log.Println("recv:", i, " stop")

	last := int64(0)
	for k := 0; k < delete_count; k++ {
		id, msg := broadcaster.Recv(last)
		last = id
		log.Println("recv:", i, msg)
	}

}

func sender(i int) {
	for k := 0; k < 20; k++ { // 20回程度送ってみる
		time.Sleep(1 * time.Second)
		broadcaster.Send(fmt.Sprintf("hello, world: %d from %d", k, i))
	}
}

func main() {
	for i := 0; i < 3; i++ {
		go receiver(i)
	}

	/*
		for i := 0; i < 100; i++ {
			time.Sleep(1 * time.Second)
			broadcaster.Send(fmt.Sprintf("hello, world: %d", i))
		}
	*/

	go sender(111) // ここに注意
	go sender(999) // ここに注意

	for i := 4; i < 6; i++ {
		go receiver(i)
		time.Sleep(1 * time.Second)
	}

	time.Sleep(100 * time.Second) // 排他処理を書くのが面倒なので、ここでmainを眠らせておく

}
結果は以下の通りになりました。
2022/03/18 12:56:45 recv: 4  start
2022/03/18 12:56:45 recv: 1  start
2022/03/18 12:56:45 recv: 0  start
2022/03/18 12:56:45 recv: 2  start
2022/03/18 12:56:46 recv: 2 hello, world: 0 from 999
2022/03/18 12:56:46 recv: 2 hello, world: 0 from 111
2022/03/18 12:56:46 recv: 5  start
2022/03/18 12:56:46 recv: 5 hello, world: 0 from 111
2022/03/18 12:56:46 recv: 0 hello, world: 0 from 111
2022/03/18 12:56:46 recv: 4 hello, world: 0 from 111
2022/03/18 12:56:46 recv: 1 hello, world: 0 from 111
2022/03/18 12:56:47 recv: 1 hello, world: 1 from 111
2022/03/18 12:56:47 recv: 4 hello, world: 1 from 999
2022/03/18 12:56:47 recv: 1 hello, world: 1 from 999
2022/03/18 12:56:47 recv: 2 hello, world: 1 from 999
2022/03/18 12:56:47 recv: 0 hello, world: 1 from 999
2022/03/18 12:56:47 recv: 5 hello, world: 1 from 111
2022/03/18 12:56:47 recv: 5 hello, world: 1 from 999
2022/03/18 12:56:48 recv: 1 hello, world: 2 from 999
2022/03/18 12:56:48 recv: 5 hello, world: 2 from 999
2022/03/18 12:56:48 recv: 2 hello, world: 2 from 999
2022/03/18 12:56:48 recv: 0 hello, world: 2 from 999
2022/03/18 12:56:48 recv: 4 hello, world: 2 from 999
2022/03/18 12:56:49 recv: 4 hello, world: 3 from 999
2022/03/18 12:56:49 recv: 1 hello, world: 3 from 999
2022/03/18 12:56:49 recv: 5 hello, world: 3 from 999
2022/03/18 12:56:49 recv: 2 hello, world: 3 from 999
2022/03/18 12:56:49 recv: 0 hello, world: 3 from 999
2022/03/18 12:56:49 recv: 0 hello, world: 3 from 111
2022/03/18 12:56:49 recv: 1 hello, world: 3 from 111
2022/03/18 12:56:49 recv: 4 hello, world: 3 from 111
2022/03/18 12:56:49 recv: 5 hello, world: 3 from 111
2022/03/18 12:56:49 recv: 5  stop
2022/03/18 12:56:49 recv: 2 hello, world: 3 from 111
2022/03/18 12:56:49 recv: 1  stop
2022/03/18 12:56:50 recv: 2 hello, world: 4 from 111
2022/03/18 12:56:50 recv: 2 hello, world: 4 from 999
2022/03/18 12:56:50 recv: 0 hello, world: 4 from 111
2022/03/18 12:56:50 recv: 0 hello, world: 4 from 999
2022/03/18 12:56:50 recv: 4 hello, world: 4 from 999
2022/03/18 12:56:51 recv: 4 hello, world: 5 from 999
2022/03/18 12:56:51 recv: 4 hello, world: 5 from 111
2022/03/18 12:56:51 recv: 2 hello, world: 5 from 111
2022/03/18 12:56:51 recv: 0 hello, world: 5 from 111
2022/03/18 12:56:52 recv: 0 hello, world: 6 from 999
2022/03/18 12:56:52 recv: 0 hello, world: 6 from 111
2022/03/18 12:56:52 recv: 4 hello, world: 6 from 111
2022/03/18 12:56:52 recv: 2 hello, world: 6 from 111
2022/03/18 12:56:53 recv: 2 hello, world: 7 from 111
2022/03/18 12:56:53 recv: 2 hello, world: 7 from 999
2022/03/18 12:56:53 recv: 0 hello, world: 7 from 999
2022/03/18 12:56:53 recv: 4 hello, world: 7 from 999
2022/03/18 12:56:54 recv: 4 hello, world: 8 from 111
2022/03/18 12:56:54 recv: 4 hello, world: 8 from 999
2022/03/18 12:56:54 recv: 4  stop
2022/03/18 12:56:54 recv: 2 hello, world: 8 from 111
2022/03/18 12:56:54 recv: 2 hello, world: 8 from 999
2022/03/18 12:56:54 recv: 2  stop
2022/03/18 12:56:54 recv: 0 hello, world: 8 from 111
2022/03/18 12:56:54 recv: 0  stop
ちょっと見難いので、"recv: 2"を、それぞれ異なる送信者ごとに整理してみます。
c:\Users\ebata\goga\1-7\test>grep "recv: 2" dummy.txt | grep 999
grep "recv: 2" dummy.txt | grep 111
2022/03/18 12:56:46 recv: 2 hello, world: 0 from 111
2022/03/18 12:56:49 recv: 2 hello, world: 3 from 111
2022/03/18 12:56:50 recv: 2 hello, world: 4 from 111
2022/03/18 12:56:51 recv: 2 hello, world: 5 from 111
2022/03/18 12:56:52 recv: 2 hello, world: 6 from 111
2022/03/18 12:56:53 recv: 2 hello, world: 7 from 111
2022/03/18 12:56:54 recv: 2 hello, world: 8 from 111
2番がロストしています。
c:\Users\ebata\goga\1-7\test>grep "recv: 2" dummy.txt | grep 999
grep "recv: 2" dummy.txt | grep 999
2022/03/18 12:56:46 recv: 2 hello, world: 0 from 999
2022/03/18 12:56:47 recv: 2 hello, world: 1 from 999
2022/03/18 12:56:48 recv: 2 hello, world: 2 from 999
2022/03/18 12:56:49 recv: 2 hello, world: 3 from 999
2022/03/18 12:56:50 recv: 2 hello, world: 4 from 999
2022/03/18 12:56:53 recv: 2 hello, world: 7 from 999
2022/03/18 12:56:54 recv: 2 hello, world: 8 from 999
5、6番がロストしています。
「送信者を1人にすれば、問題が発生する可能性はなくなる」という仮説は成り立ちそうです。
考えてみれば、このプログラムでは、2つの送信者を区別する方法を入れていないのですから、当然かもしれません。
という訳で、送信者を1人にする方法の実装で、もうちょっとがんばってみたいと思います。
ただ、この方式では、送受信の際にロックをかけているので、受信者の数が膨大になれば、プログラム全体のパフォーマンスが劣化する可能性があります。
リアルタイム系のプログラムには、使わない方が良いかもしれません。
ただ、プログラムの動作状況を簡単に見たいようなケースでは、とても便利なので、当面は手放せないと思います。
以上