
【QGIS】緯度・経度をもつCSVデータを読み込み、地図に表示する
【QGIS】緯度・経度をもつCSVデータを読み込み、地図に表示する
(1)CSVファイル
Lat, Lng
35.3663 , 139.6225
35.3669 , 139.6245
35.3673 , 139.6259
35.3672 , 139.6268
35.3673 , 139.6296
35.3668 , 139.6296
35.367 , 139.6296
35.3671 , 139.6297
35.3672 , 139.6298
35.368 , 139.622(以下、省略)
(2)CSVファイルの読み込み
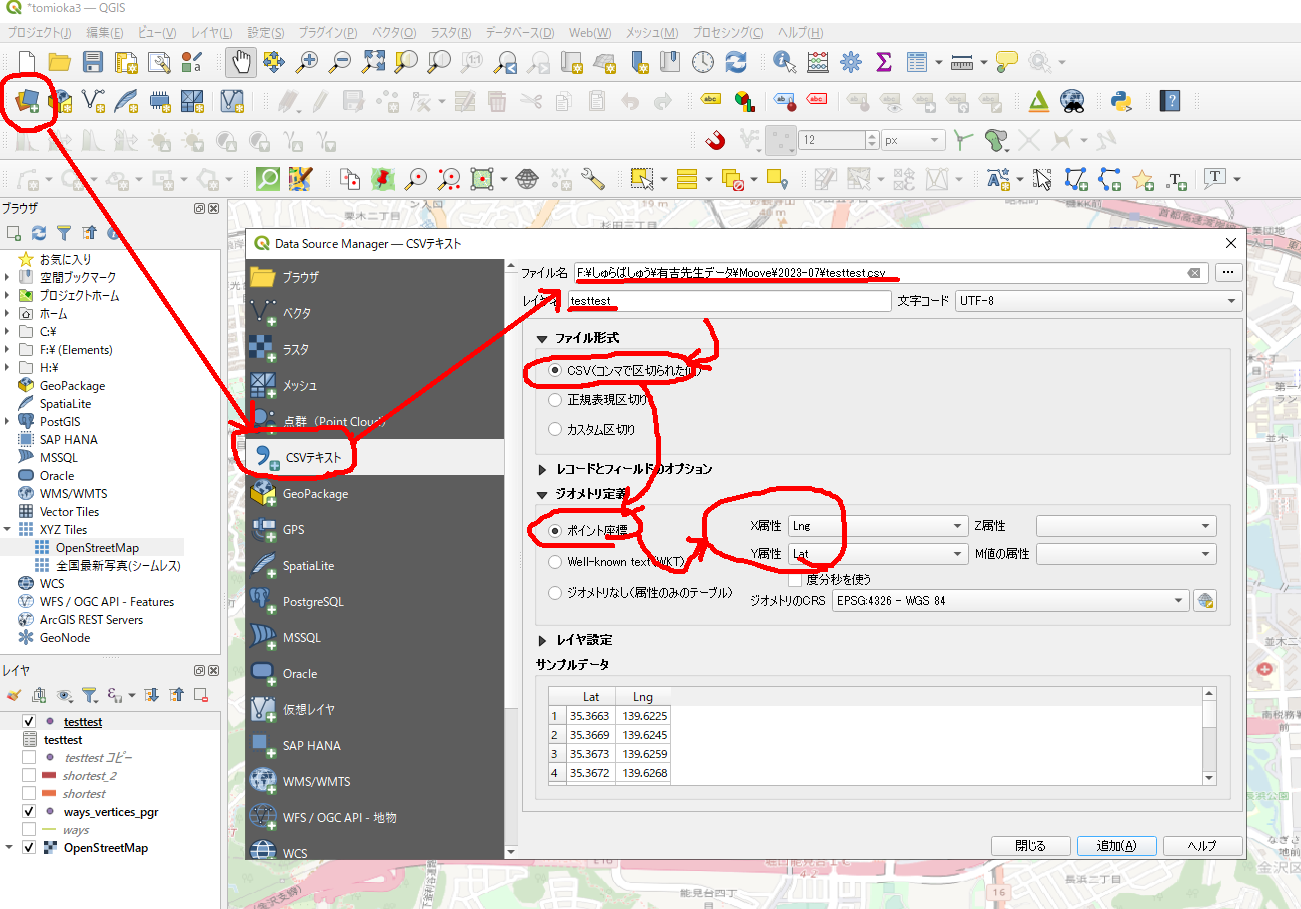
(3)結果

以上
街の中に道路を作って、ダイクストラ計算ができるか試してみた件 ―― JOSMを使った道路追加の方法を試す
この投稿の最後に書いた『経路が繋がっていないと、ダイクストラ計算はできないはずなので』を、JOSMを使ってなんとかできないか実験中しています。
で、こちらの本で例題として出している街のデータを使って実験します(宇都宮のデータはデカすぎるので)。
https://github.com/TomoichiEbata/hirohakama/tree/main/hiro_db の hirohakama.osmを使って実験します。
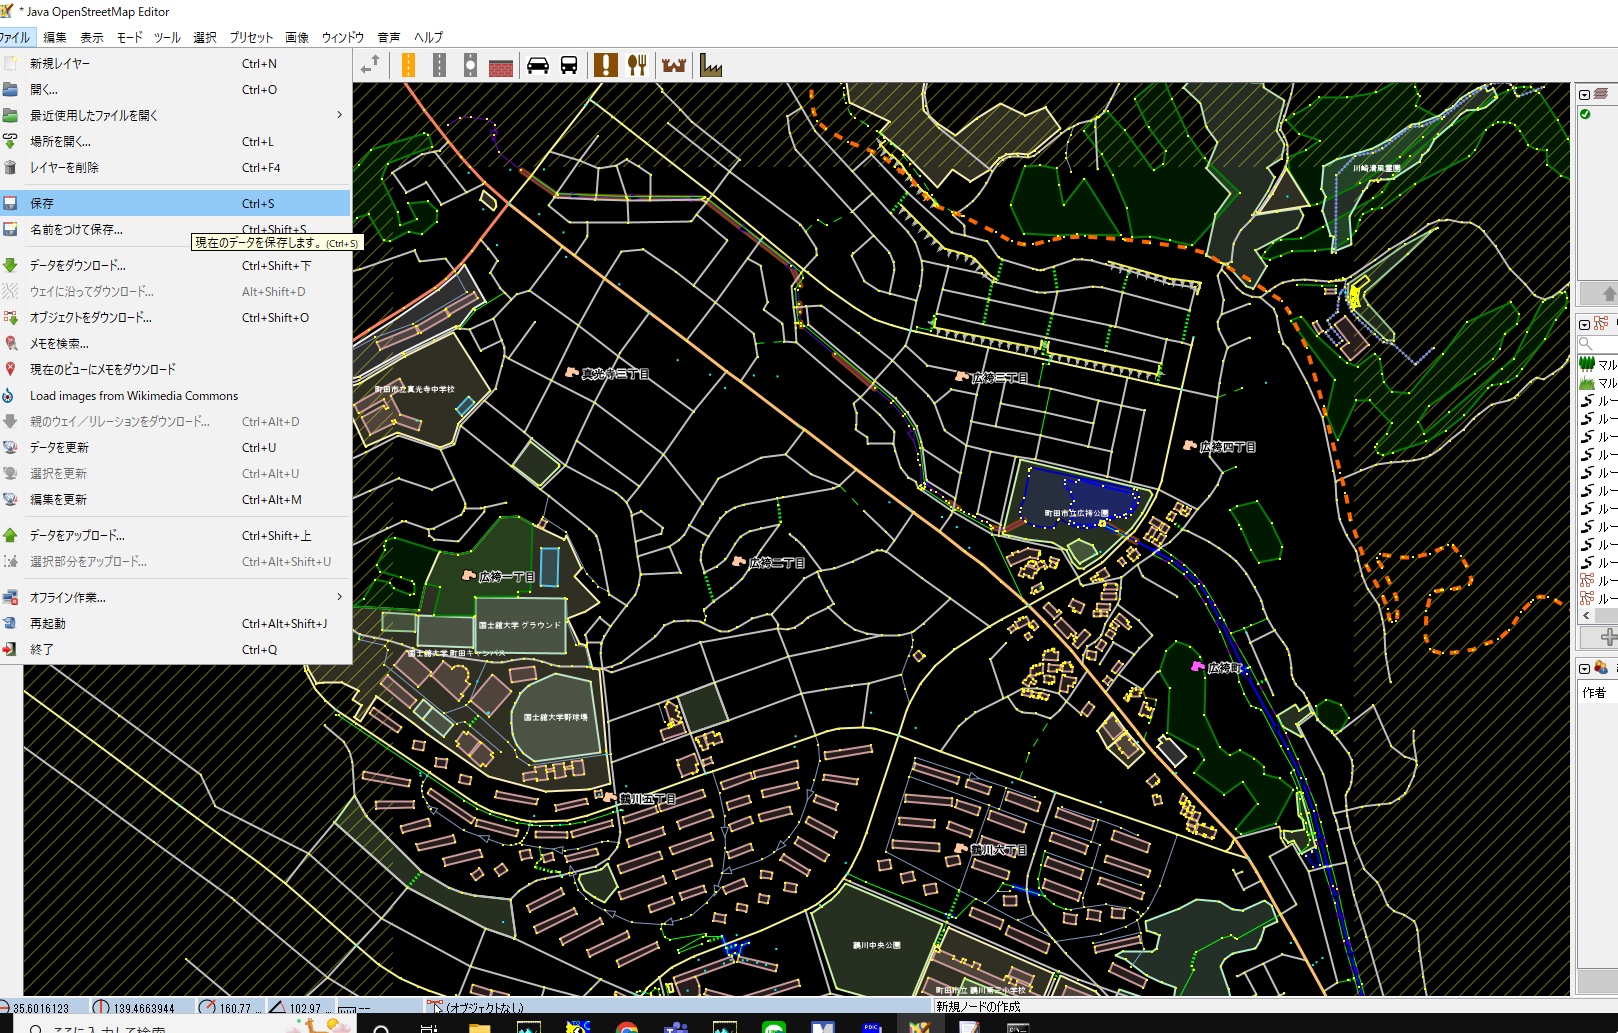
まず、hirohakama.osm から hirohakama1.osmを複製して、さらに、このhirohakama1.osmを、JOSMにローディングして、ファイル → 保存をします。JOSMに入れるだけで、フォーマットの一部が変更されるからです。
こうしておいて、さらに、hirohakama1.osmのコピー、hirohakama2.osmを作成します。
以後、この2つのファイルを比較することで、作成状況を把握していきたいと思います。
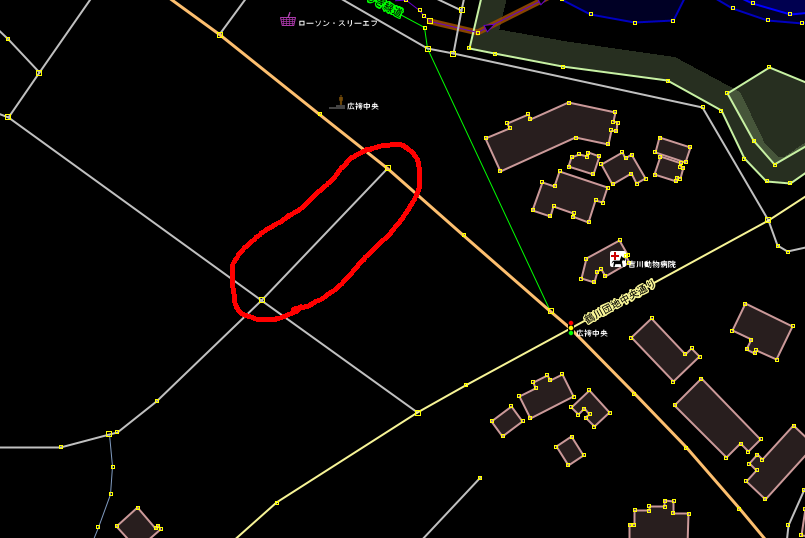
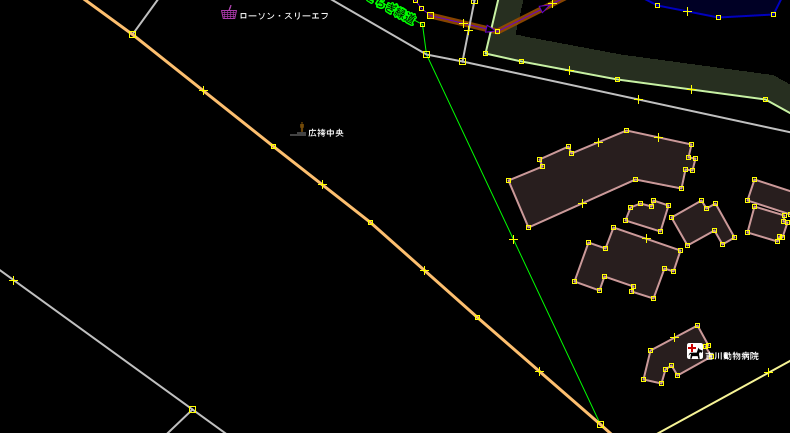
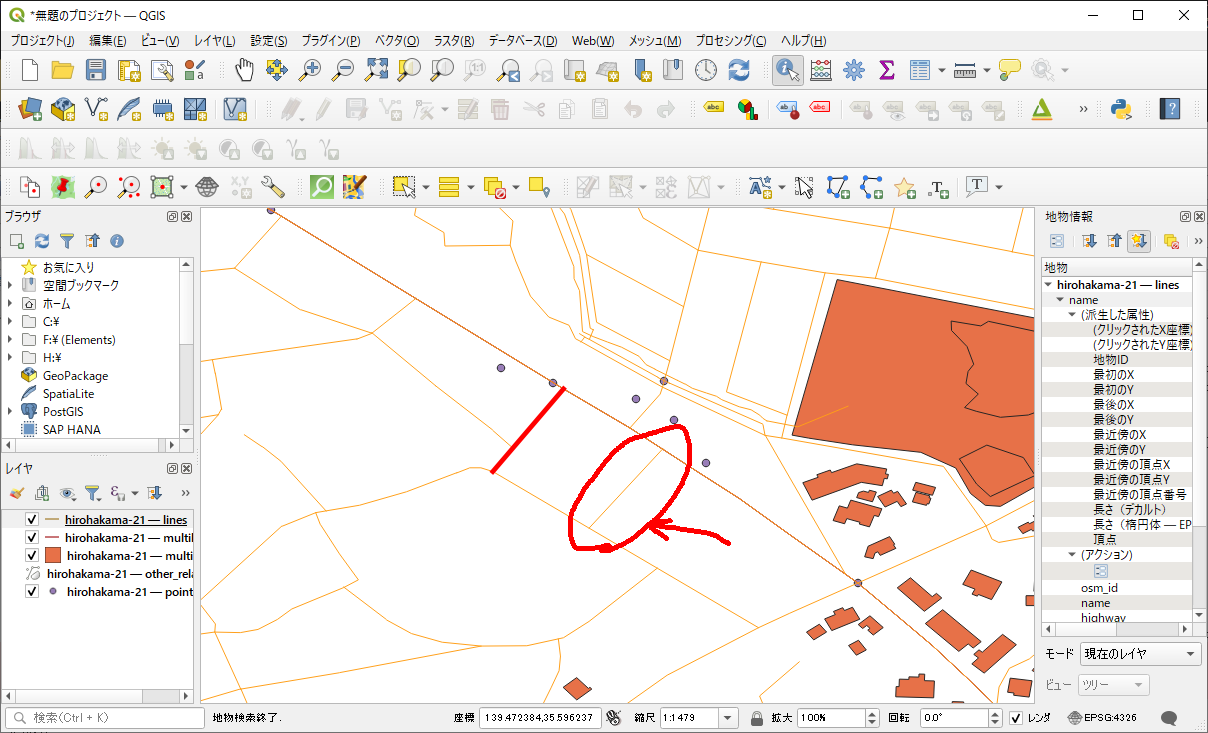
まず、すでにあるノード(node)間を繋いで道路を作ってみます。(小さい□がnodeです)
をクリックして、
この2点間に線を引きます。
で、その後、このhirohakama2.osmをセーブして、hirohakama1.osmと比較してみました。
結果は以下の通り。way id='220736115' に、ref='3813457320'のノードが追加されています(この一行だけ)。
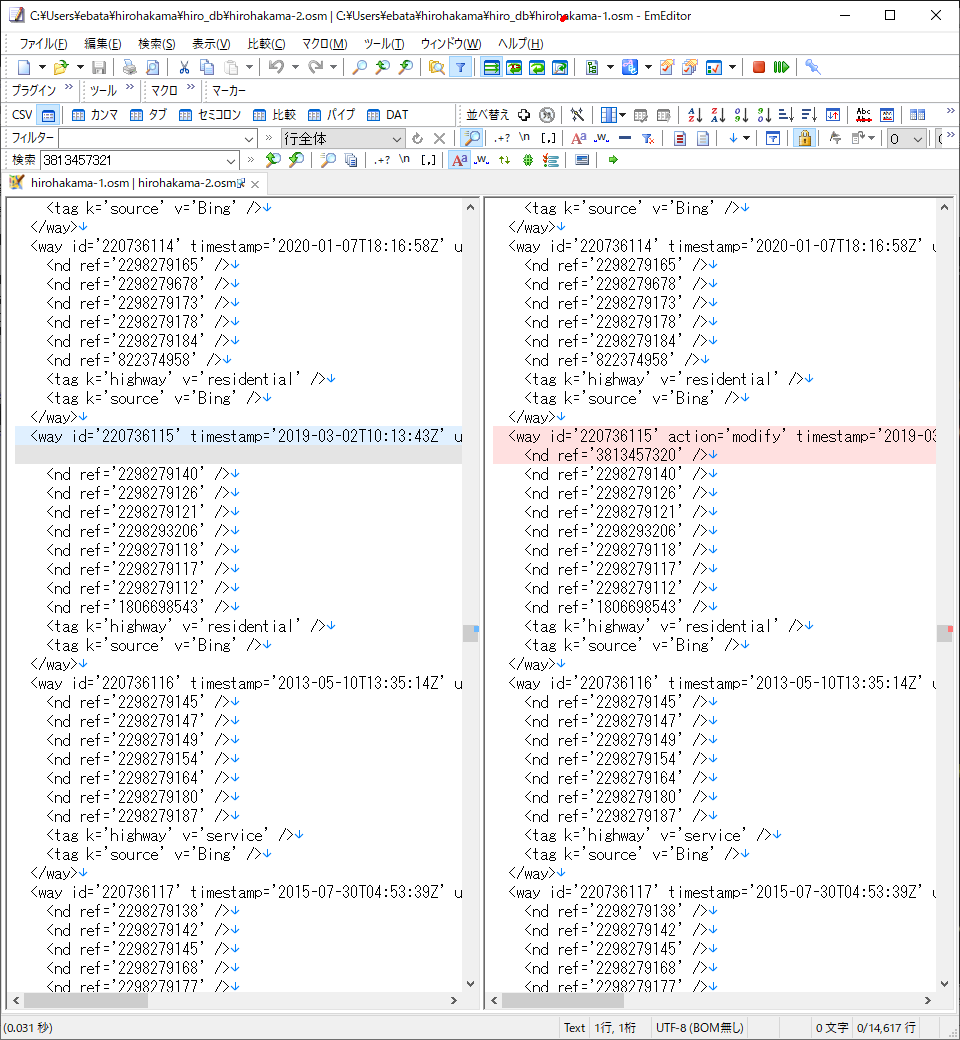
ちなみに、ref='3813457320'のノードの情報は、
<node id='3813457320' timestamp='2015-11-02T07:07:06Z' uid='3057995' user='oini' visible='true' version='1' changeset='35026994' lat='35.5957559' lon='139.4735283' />
となっています。
既存のノード同士をくっ付けるのであれば、結構簡単にできそうです。
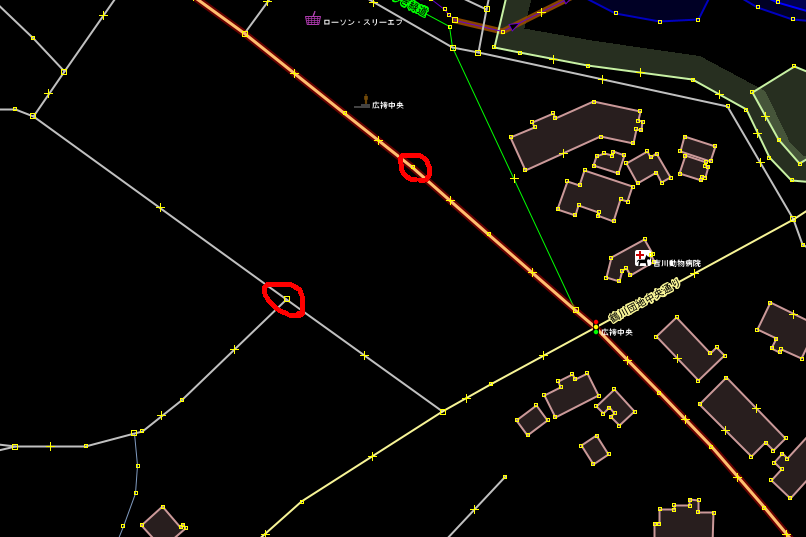
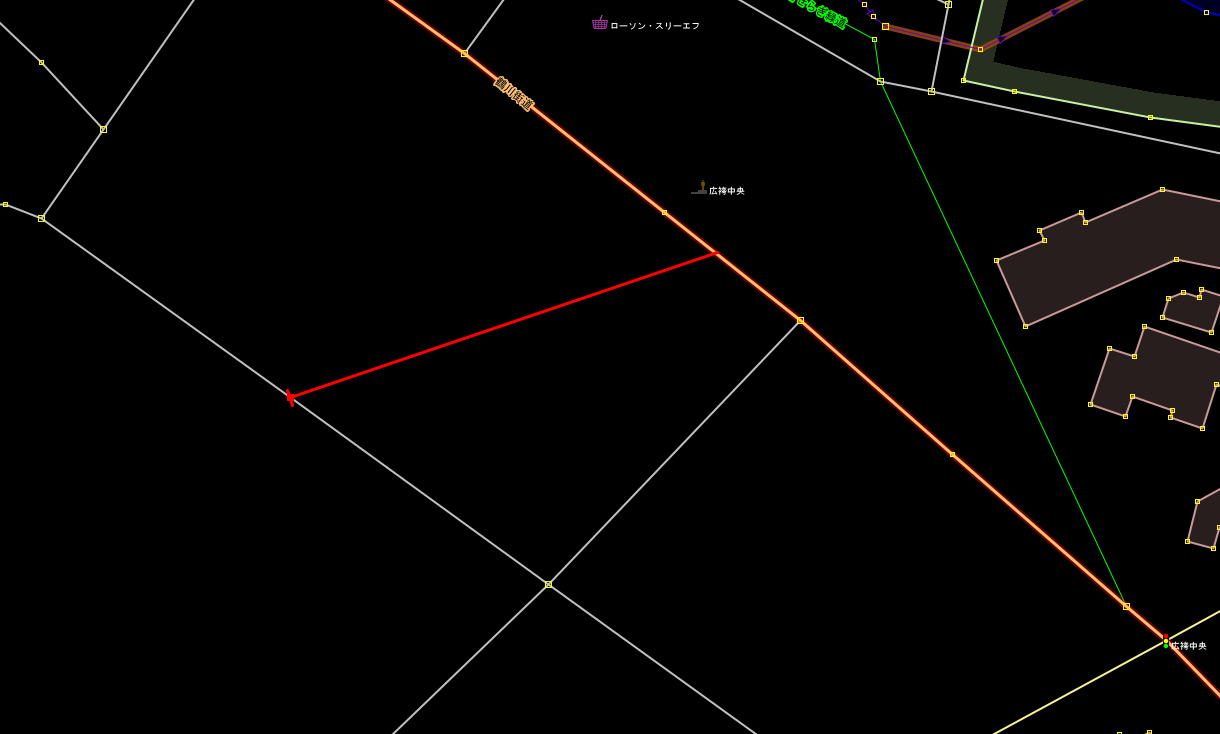
では、ノード以外の道路を適当に繋げるとどうなるかを、調べてみます。
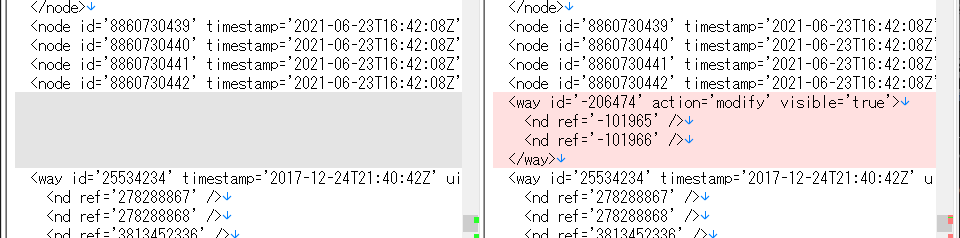

で、ノード番号 -101965, -101966 の座標は入っていませんでした(作られていませんでした)。多分ダイクストラやっても、無視されると思います。
見落していました。作られていました(ファイルの最初の方だったので)。
<node id='-101792' action='modify' visible='true' lat='35.59604489421' lon='139.47307912887' />
<node id='-101793' action='modify' visible='true' lat='35.59558383511' lon='139.47265061383' />
ノードを動かしたら、
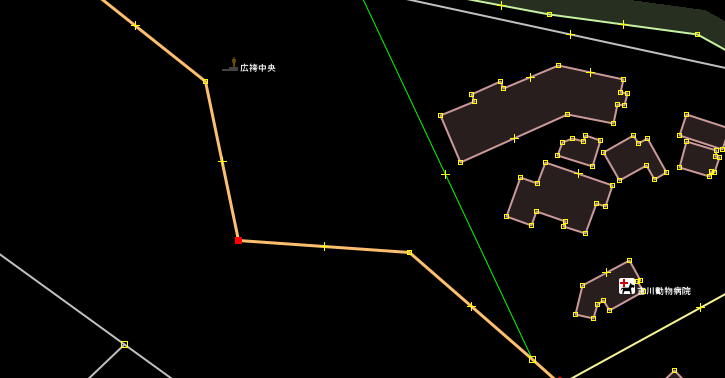
ちゃんと、ノードの座標も動いていました。

ただ、ノードでない場所(×の部分)とかを動かしてノードを増やしても、先程のようにマイナスのノード番号が出てきて、座標も追加されませんでした。
しかし、ノードの追加はしたいなぁ(今後のことを考えると)
で、"JOSM" "ノードの追加" で検索したら、このページが出てきました。
しかし、ただノードを追加すれば良いってもんじゃない。既存のWAYに埋め込まなれば意味がない。さて、どうしようか。
今考えている、最も安直なアイデアは、
OSMファイルに、ノード番号 -101965, -101966 の座標を手で書き込む、です。
試してみて、上手くいったら、またご報告します。
不要です。座標(ノード)はできていました。現時点の問題は、QGISとかに表示されない、ということです。
私が、人工的に追加したノードの記述は、
<node id='-101792' action='modify' visible='true' lat='35.59604489421' lon='139.47307912887' />
ですが、オリジナルのノードは、
<node id='278288868' timestamp='2015-11-02T07:00:53Z' uid='3057995' user='oini' visible='true' version='4' changeset='35026937' lat='35.5997134' lon='139.4660138' />
と、だいぶ表示形式が違うようです。
JOSMでは表示されますが、QGISでは表示されません。
に、
JOSMは、どの要素が変更されたかを正確に記録しています。アップロード時には、あなたが触っていないオブジェクトはすべて無視されます。タグを追加して後で削除した場合など、例外があるかもしれません。
この情報はOSM XMLファイルにも保存されます。action='modify' と action='delete' の要素だけが、OSM データベースにアップロードされます。
との記載がありました。つまり、本番情報として認識されないのかな、と思っています。
https://wiki.openstreetmap.org/wiki/JA:%E3%83%8E%E3%83%BC%E3%83%89
には、
| 名前 | 値 | 説明 |
|---|---|---|
| id | 整数(>=1) | ノードのIDはノードの中でのみ一意となる。(同じIDを持つウェイが存在しても良い。)一般的なエディターでは、サーバーに保存される前のノードのIDに負数が用いられる。サーバー上のノードのIDは不変であり、既存のノードに割り当てられたIDは将来にわたって変更されない。削除されたノードのIDが最利用されることはない(削除を取り消した場合を除く)。 |
という記載があるので、少なくとも負数を使うのは、ダメみたい。
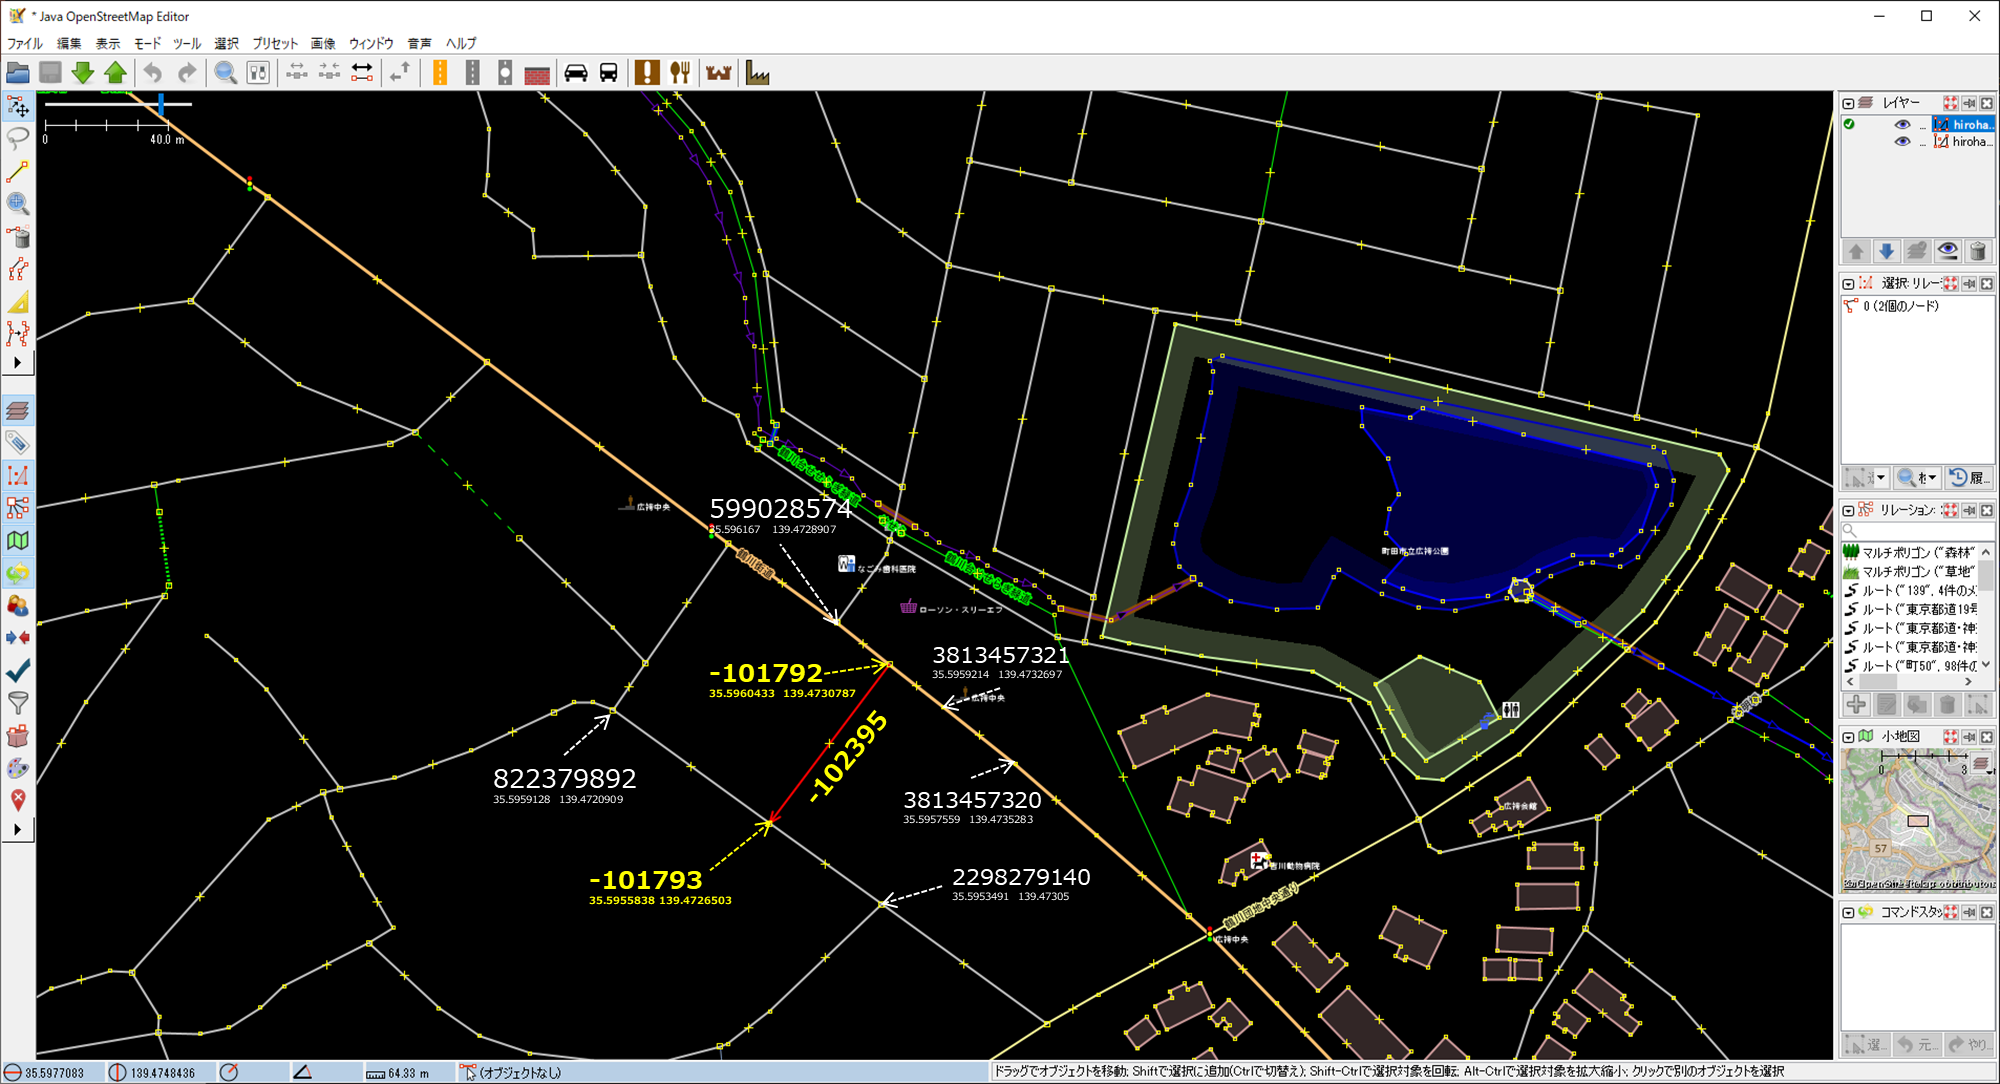
近くにある、このNodeとWayを参照してみる。
(宇都宮レールウェイの場合)<tag k='construction' v='tram'/>と記載されていましたので、これを、強制的に<tag k='railway' v='tram'/>に置換する
(1)node id, way idの負数から、マイナスを取って、強制的に正数にする(他のnodeやwayとぶつかっていないことを確認する)
(2)"action='modify'" を削除してみる
(2)<tag k='highway' v='residential' />を追加してみる。
<way id='102395' visible='true'>
<nd ref='101792' />
<nd ref='101793' />
<tag k='highway' v='residential' />
</way>
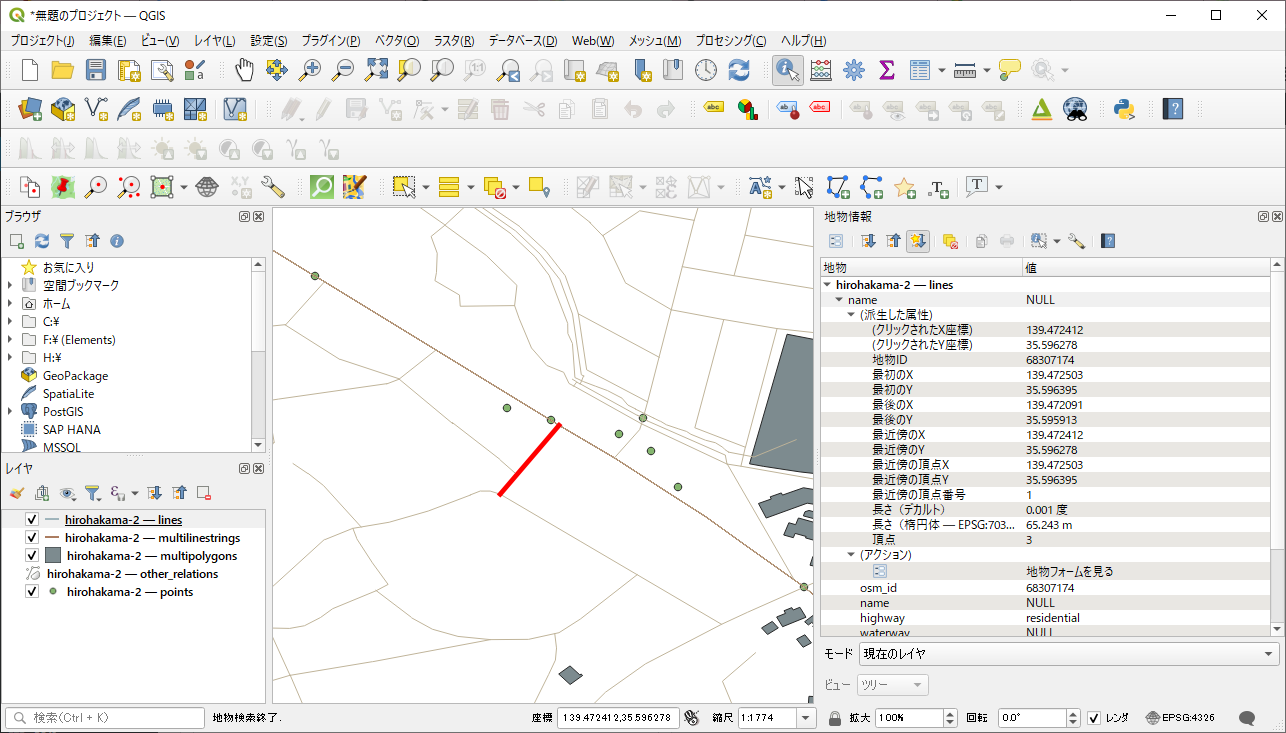
で、これでQGISで表示したら、やっと出てきました。
この、手動で変更したhirohakama-21.osmが、postgreSQL+postGISに載るかやってみました。
詳しい手続は、このWebサイトから探していただくか、面倒なら、GISをDIYで作ろう―PostGISを使い倒すを手に入れて下さい。
root@abbab13a933e:/# psql -U postgres
psql (12.5 (Debian 12.5-1.pgdg100+1))
Type "help" for help.postgres=# CREATE DATABASE hiro_db21;
CREATE DATABASE
postgres=# \c hiro_db21
You are now connected to database "hiro_db21" as user "postgres".
hiro_db21=# create extension postgis;
CREATE EXTENSION
hiro_db21=# create extension pgrouting;
CREATE EXTENSIONhiro_db21=# \dt
List of relations
Schema | Name | Type | Owner
--------+-----------------+-------+----------
public | spatial_ref_sys | table | postgres
(1 row)hiro_db21=# exit
root@abbab13a933e:/# osm2pgrouting -f /hiro_db/hirohakama-21.osm -c /usr/local/share/osm2pgrouting/mapconfig_for_cars.xml -d hiro_db21 -U postgres
さて、ダイクストラがちゃんと働いているかを調べてみました。
hiro_db21=# SELECT seq, node, edge, cost FROM pgr_dijkstra('SELECT gid as id,
source, target,length as cost, reverse_cost FROM ways',31, 262);
seq | node | edge | cost
-----+------+------+------------------------
1 | 31 | 1 | 0.0002245334340526014
2 | 1 | 3 | 0.000629444702259577
3 | 2 | 356 | 0.00046326006156789223
4 | 262 | -1 | 0
(4 rows)
QGISで調べてみました。
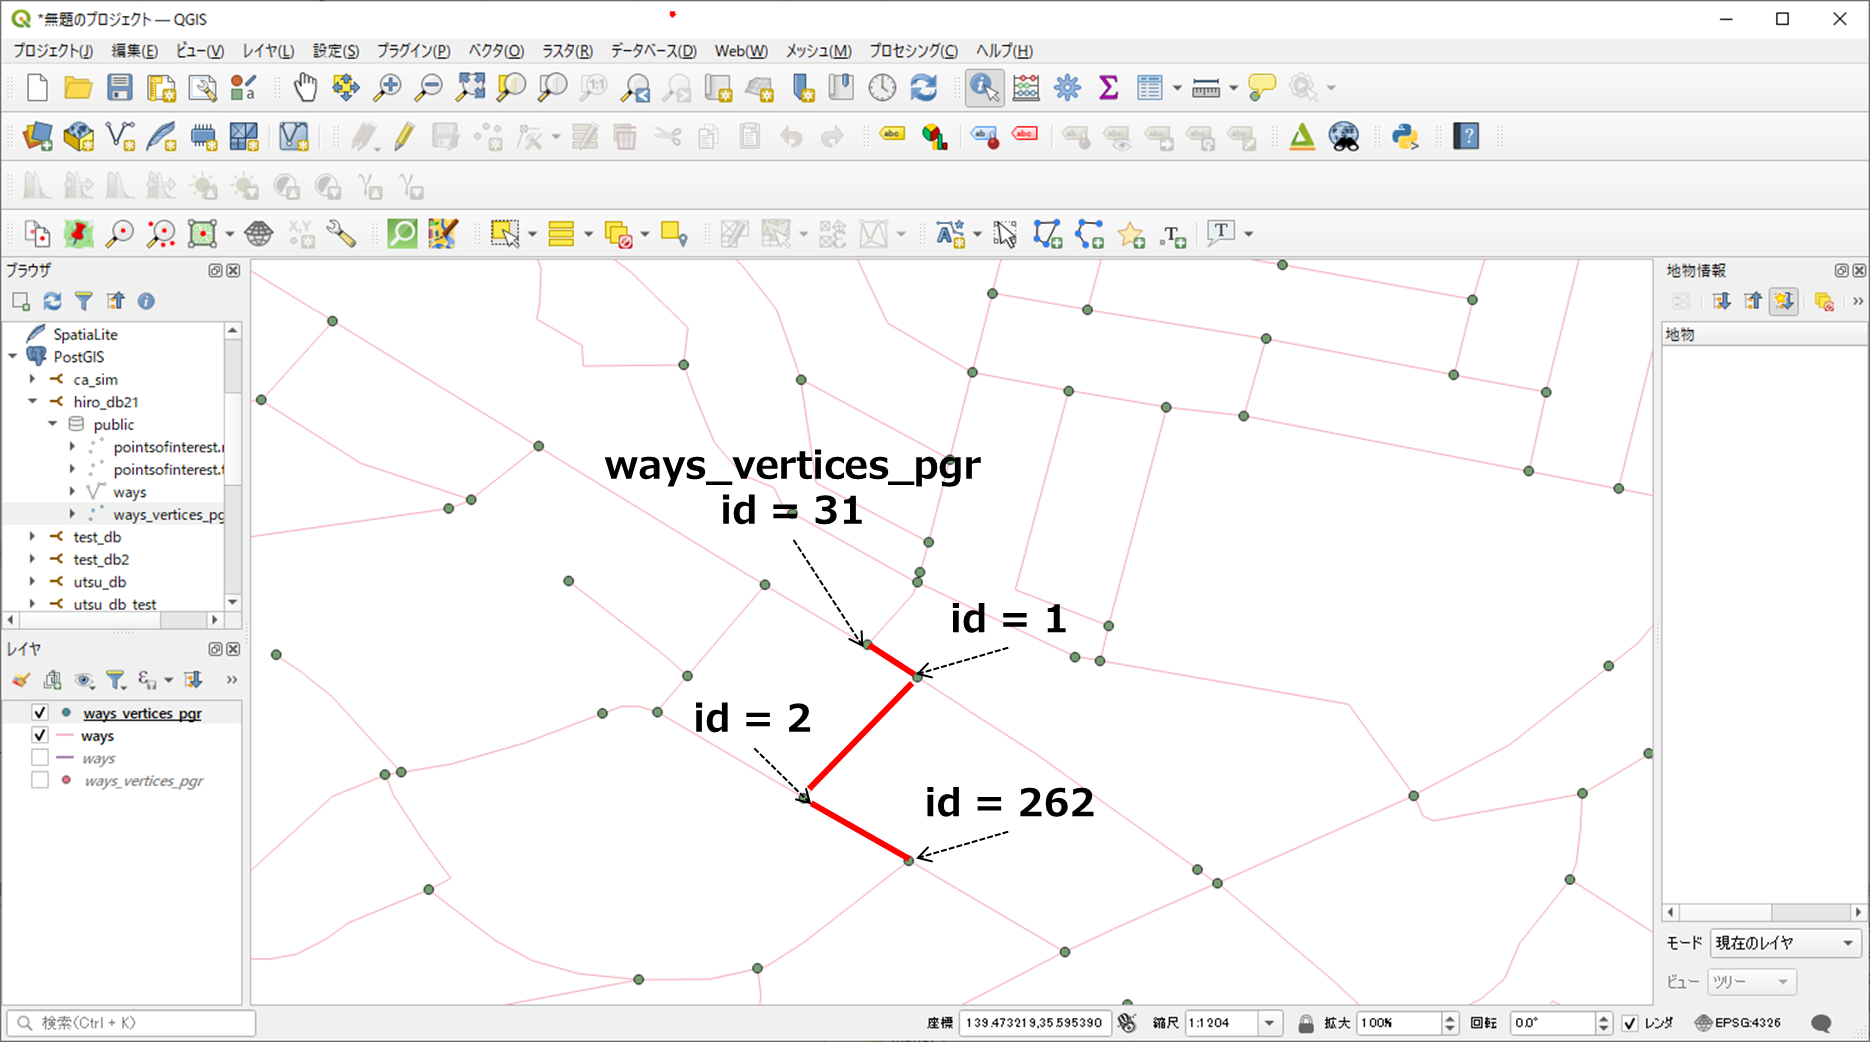
新しい道路で、ダイクストラ計算ができていることが確認できました。
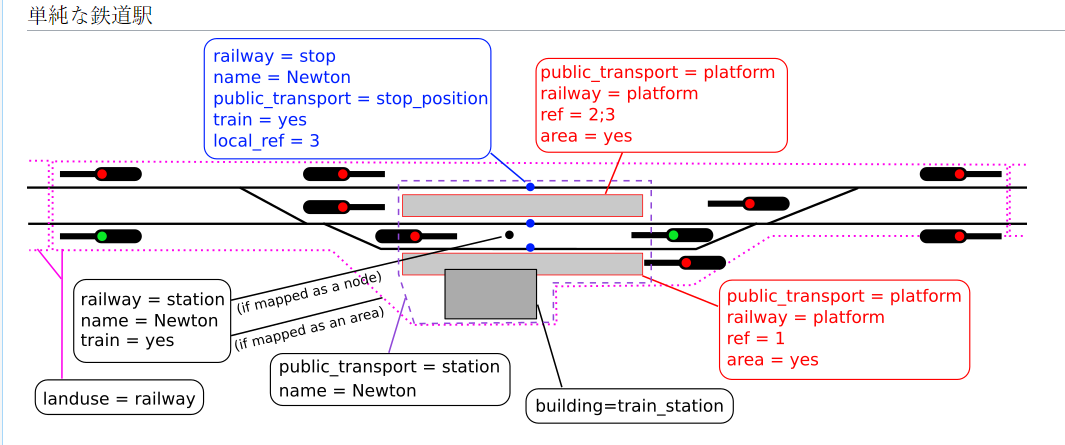
P.S. 調べていたら、駅の構成についての説明文を見つけました。後程、参考にさせて貰おうと思います。
万人に共通に使いやすい注文システムの究極は ―― 『タブレットを使わない、口頭でのオーダー』、つまり従来通りです。
多くの飲食店で、テーブルに備えつけられたタブレットからメニューをオーダーするシステムが、導入されています。
Many restaurants have installed systems allowing customers to order tablet menu items at each table.
今や、そういうシステムがない店舗の方が珍しいくらいです。
Nowadays, finding a restaurant without such a system is so rare.
最低賃金が上がり、人不足が深刻な中、これは当然の流れと言えます。
This is a natural trend, with minimum wages rising and a severe labor shortage.
ただ、言うまでもないのですが、これらのタブレットのインターフェースは、『絶望的なまでに使いにくい』。
But needless to say, the interface of these tablets is 'hopelessly difficult to use.
『このタブレットのインターフェースを設計しているヤツは、バカなのか』と思います ―― かなり本気で。
I think, 'Are the people designing this tablet interface stupid?' -- quite seriously.
しかし、面倒なので、このインターフェースについての批判は割愛します。
However, since it is tedious, I will omit the criticism of this interface.
-----
万人に共通に使いやすい注文システムの究極は ―― 『タブレットを使わない、口頭でのオーダー』、つまり従来通りです。
The ultimate ordering system that is easy for everyone is -- "no tablets, verbal orders," in other words, the same as before.
ですので、現在のタブレット注文システムが、「音声入力」と「生成AI」からなる、音声による自動オーダシステムになっていくことは、ほぼ確実です。
Therefore, it is almost certain that the current tablet ordering system will be replaced by an automated voice-based ordering system consisting of "voice input" and "generated AI.
近い未来、『音声入力生成AIと客が、オーダーの違いで、口論になる』という場面を見られるようになるでしょう。
We will soon see voice input generation AI and customers arguing over different orders.
そして、100%完全録音された会話によって、多くの場合、『客の過失(オーダーのミス)が、簡単に確認される』ということになるでしょう。
And, in many cases, a 100% fully recorded conversation will 'easily confirm the customer's negligence (mistake in ordering).
-----
気になるのは、その開始時期です。
What is of interest is the timing of its service-in.
私は、年内に登場、来年はトライアル期間、再来年あたりには飲食業界では普通になる、という気がしています。
They will appear by the end of the year; next year will be a trial period, and around the year after that, they will become the norm in the food and beverage industry.
ssh 192.168.0.232でログインしようとしたのですが、ユーザIDを聞いてこずに、いきなりパスワードを聞かれてログインに失敗しました。どうすれば良いでしょうか
ssh ユーザID@192.168.0.232
ftpサーバの停止方法
UbuntuでFTPサーバを停止するには、サーバソフトウェアによって異なります。一般的に、Ubuntuでよく使われるFTPサーバソフトウェアはvsftpd(Very Secure FTP Daemon)です。以下に、vsftpdを停止する方法を説明します。もし他のFTPサーバーソフトウェアを使用している場合は、それに対応した手順を適用してください。
vsftpdを停止する手順:
- ターミナルを開きます。
vsftpdサービスを停止します。次のコマンドを使用します:sudo systemctl stop vsftpd
vsftpdサービスが停止したことを確認するために、次のコマンドを使用してサービスのステータスを確認します:sudo systemctl status vsftpd
ステータスが「inactive」(非アクティブ)になっているはずです。
vsftpdサービスが自動起動しないように設定したい場合、次のコマンドを使用して自動起動を無効にします:sudo systemctl disable vsftpd
これにより、システムの再起動時にvsftpdサービスが起動しないようになります。
以上の手順に従うことで、vsftpd FTPサーバーを停止し、必要に応じて自動起動を無効にできます。
ftpサーバの"vsftpd.conf"の内容
/etc/vsftpd.conf
listen=NO
listen_ipv6=YES
anonymous_enable=NO
local_enable=YES
write_enable=YES
dirmessage_enable=YES
use_localtime=YES
xferlog_enable=YES
connect_from_port_20=YES
xferlog_file=/var/log/vsftpd.log
ascii_upload_enable=YES
ascii_download_enable=YES
secure_chroot_dir=/var/run/vsftpd/empty
pam_service_name=vsftpd
rsa_cert_file=/etc/ssl/certs/ssl-cert-snakeoil.pem
rsa_private_key_file=/etc/ssl/private/ssl-cert-snakeoil.key
ssl_enable=NO
utf8_filesystem=YES
"docker compose"をマシン起動時に自動的に起動させる方法
pt@pt-desktop:~/www$ more docker-compose.yml
version: '3'

services:
  nginx:
    build: ./
    image: nginx
    ports:
      - 8888:80
    volumes:
      - ./src:/usr/share/nginx/html

restart: alwaysの(ネストの位置に気をつけて)"restart: always"を付けた後、"$ docker compose build"をしておくこと。
以上
TP-LINK / Archer C2300 を再度設定しなおす
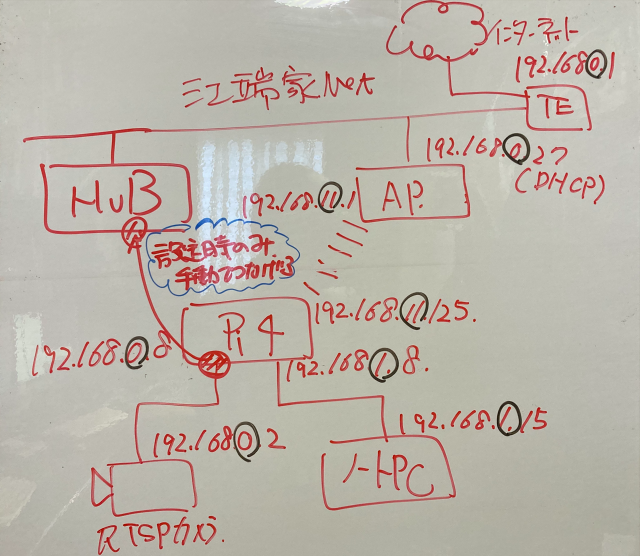
今の我が家は、アクセスポイント5、無線ネットワーク2、 有線ネットワーク1(ハブ区分で勘定であれば、10は軽く超える)という、IPネットワークのテストフィールドです。最近、ここにカメラ3台・・・いや、業務用と監視用を入れれば7台か。もうめちゃくちゃです。
そんでもって、できるだけ設定を変更せずに、システムを騙しながら、新しい実験システムを追加するのは、なかなかトリッキーな技が必要となります。
まあ、愚痴はさておき。
今、私の目の前には、設定をすっかり忘れた、TP-LINK / Archer C2300
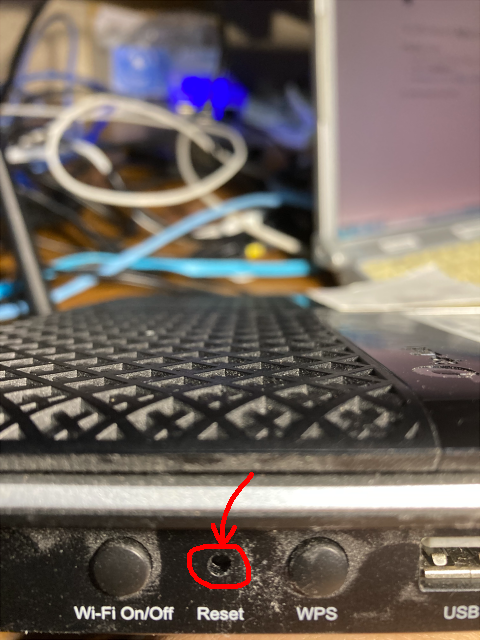
ここを、細い棒で、10秒以上押し続ける。こうすると、
黄色のポートの方が、192.168.0.1/255.255.255.0が設定されるので、ブラウザから192.168.0.1を入力して、設定画面を出すことができる。
パスワードもリセットさせているので、再設定する必要がある。
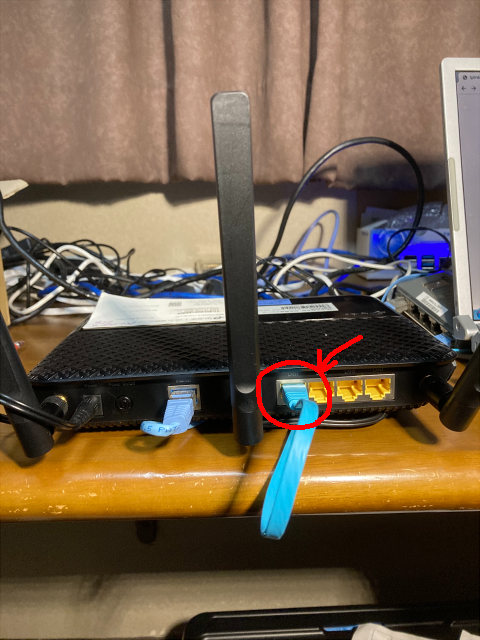
現在の設定は、インターネットのポートに、江端家のメインネット192.168.0.*をDHCPで設定して、黄色のポートの方は、192.168.11.1としておいた(それ以外は何も設定しなかった)。
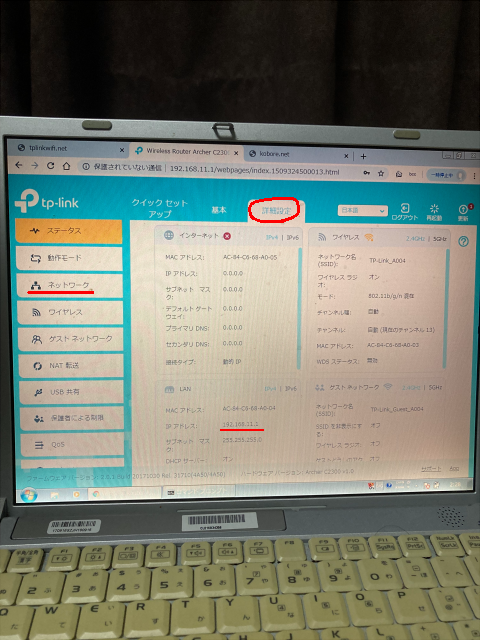
当然、設定後再起動した C2300 は、Webに表示されなくなるので、パソコンのNICを、192.168.11.10として、ブラウザから、192.168.11.1 で再度アクセスして確認する。
機器の裏面に記載されていた、この内容で無線LANの設定をしたら、192.168.11.* のIPアドレスで接続できることを確認した。

以上。
P.S. もう使う予定のないノートPCでも、こういう設定の時にはとても役に立つ(機器と直結すれば、他のネットワークの影響なく設定できるから)
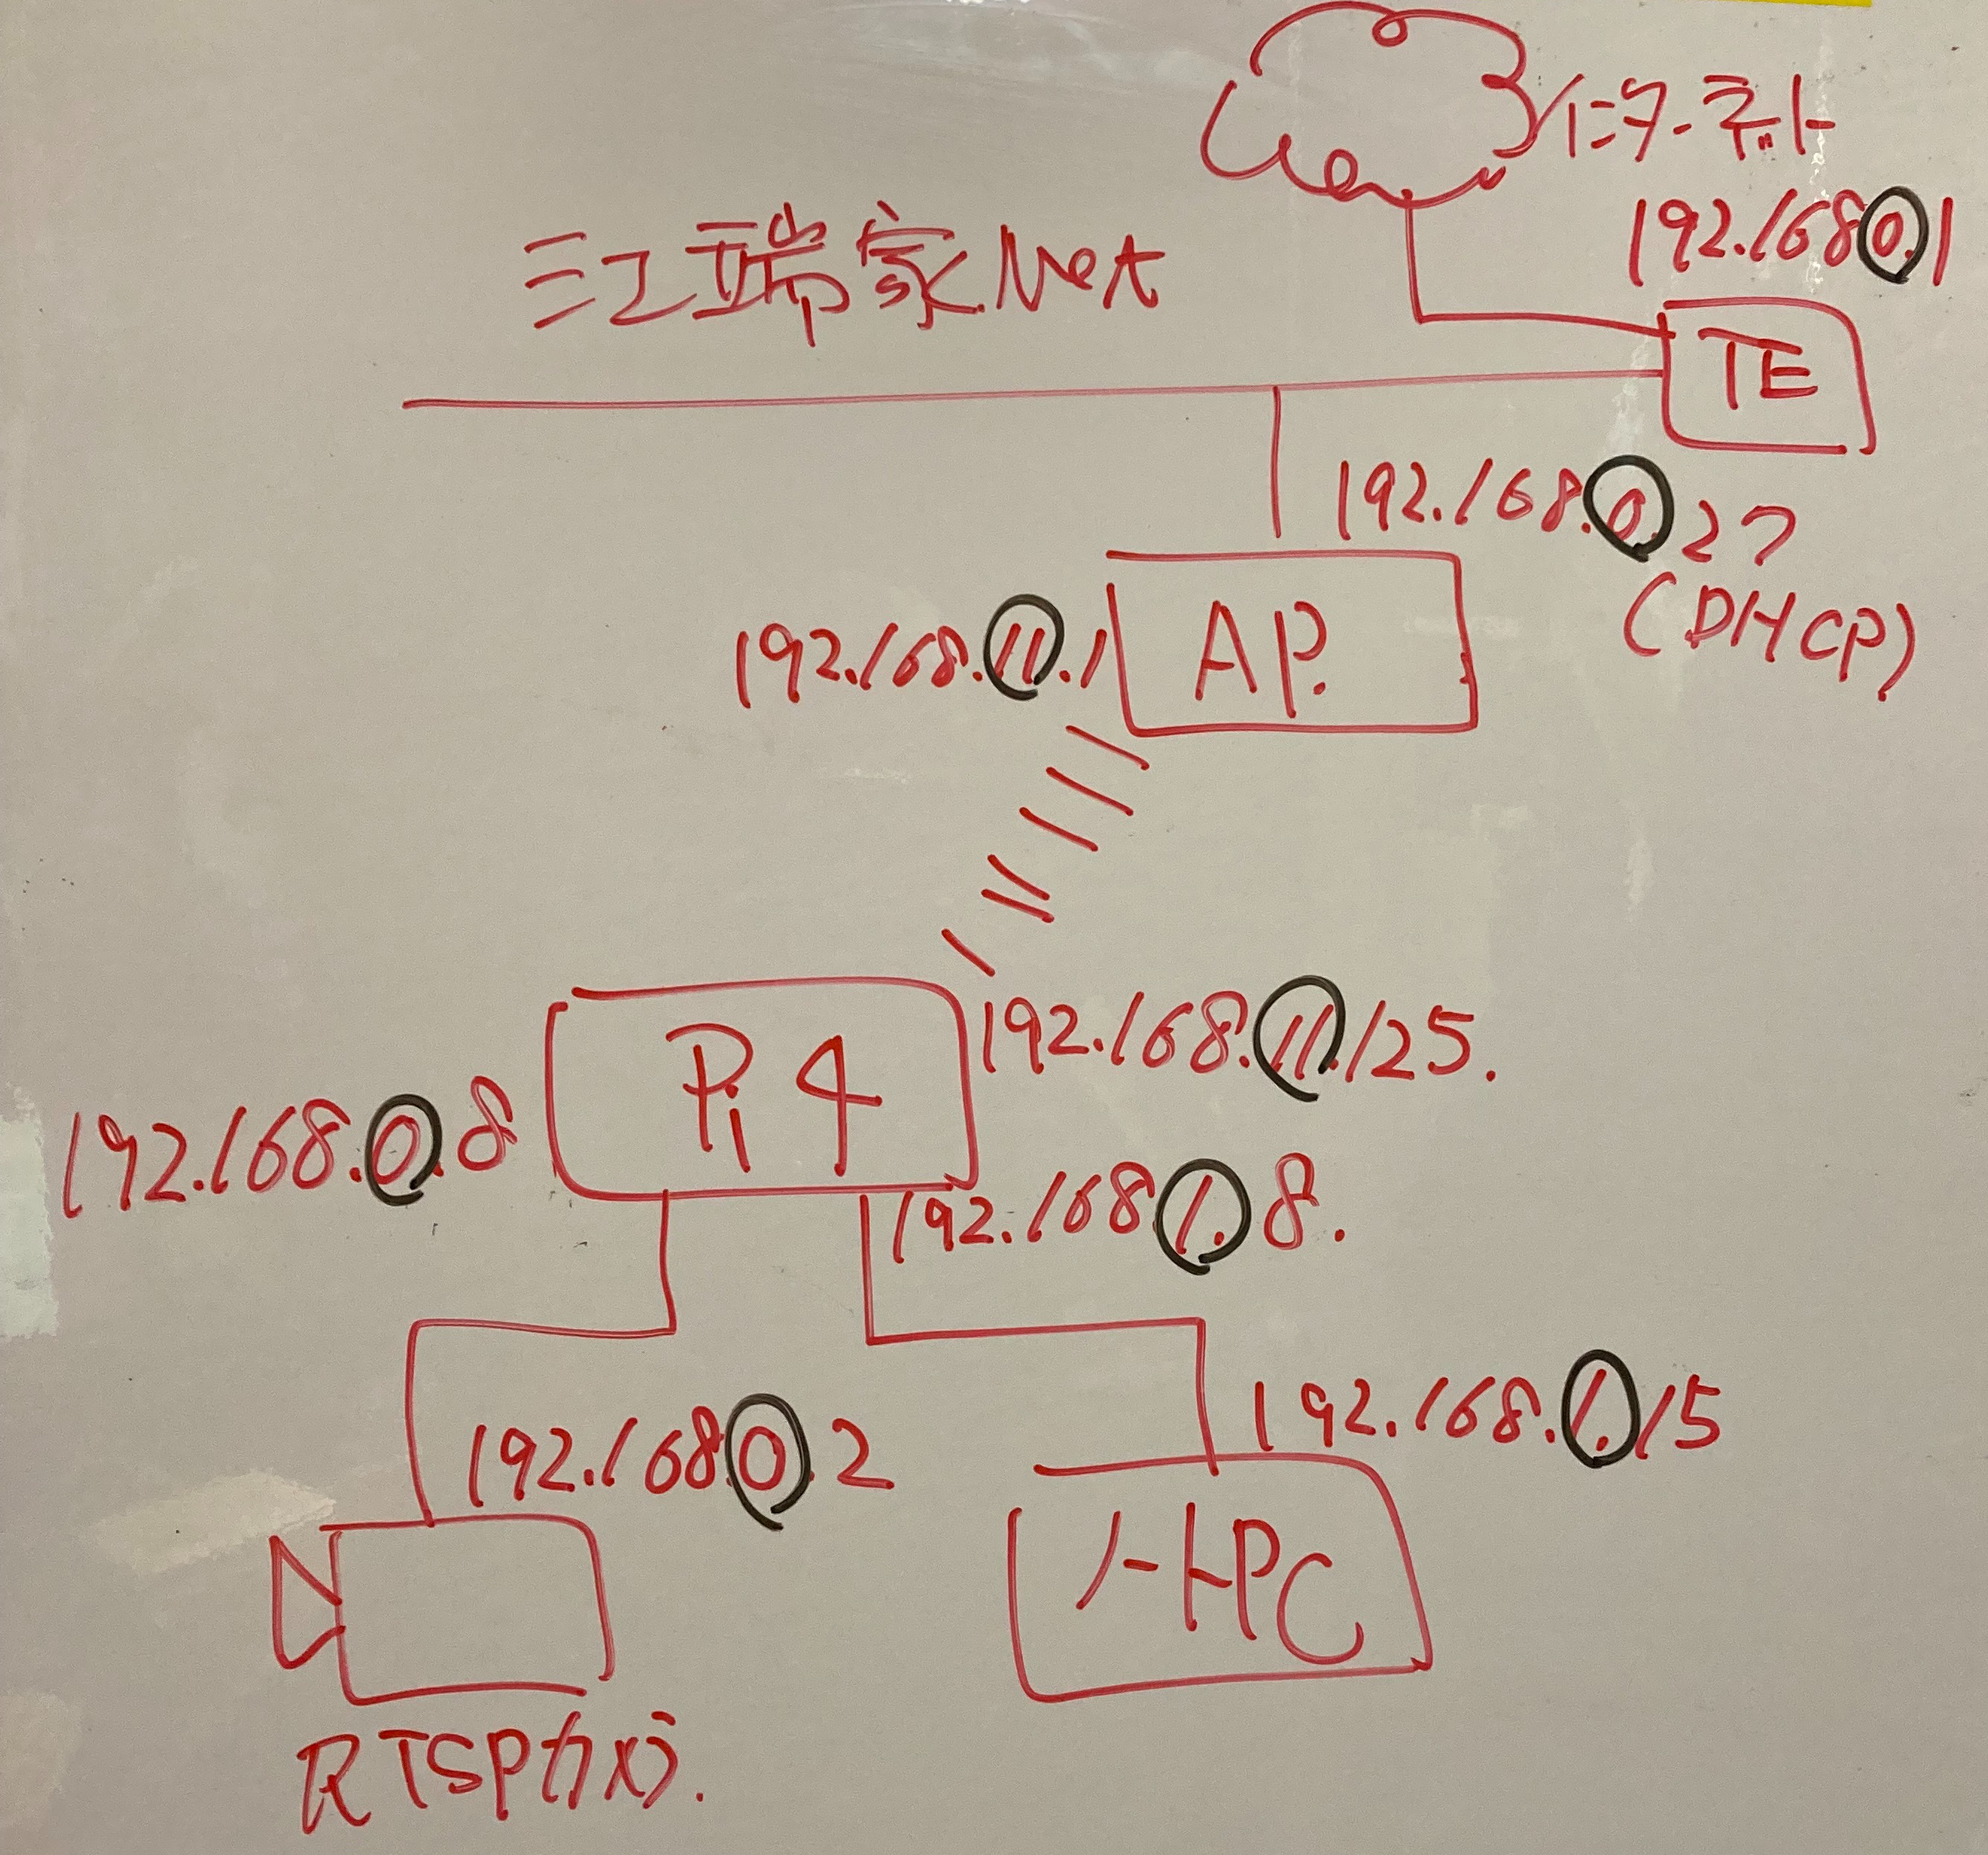
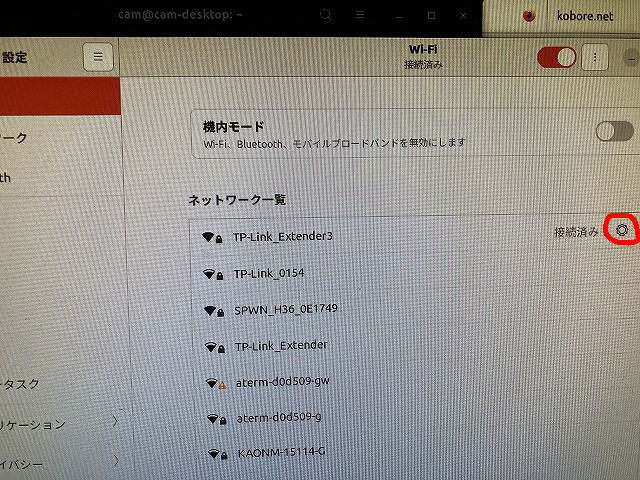
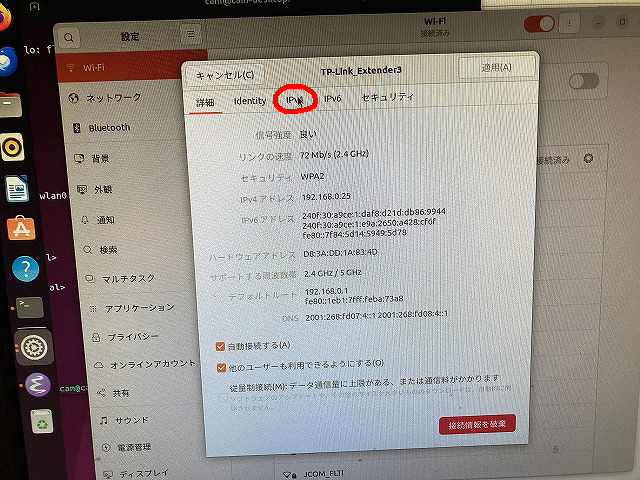
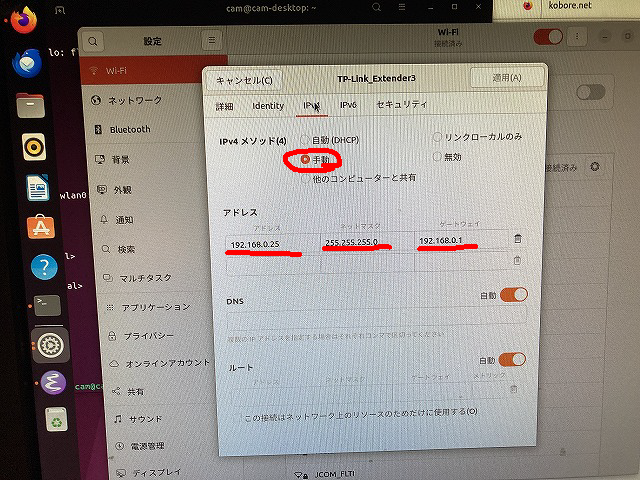
江端家ネットワークのの192.168.0.*は変更できず、かつ、RTSPカメラのデフォルトIPの192.168.0.2を変更したくなくて、色々苦労しています。
RTSPカメラを接続すると、firefoxが動かなくなるという現象がでてきてこまっていたのですが、これは、デフォルトゲートウェイだな、とあたりをつけて、最小作業で構成変更しました。
cam@cam-desktop:~$ more /etc/netplan/99_config.yaml
~
network:
version: 2
renderer: networkd
ethernets:
eth0:
dhcp4: false
addresses:
- 192.168.0.15/24
routes:
- to: default
via: 192.168.0.1
nameservers:
addresses: [192.168.0.1,8.8.8.8]
enx70886b8c8268:
dhcp4: false
addresses:
- 192.168.1.15/24
を、
network:
version: 2
renderer: networkd
ethernets:
eth0:
dhcp4: false
addresses:
- 192.168.0.15/24
enx70886b8c8268:
dhcp4: false
addresses:
- 192.168.1.15/24wlan0:
dhcp4: false
addresses:
- 192.168.11.15/24
routes:
- to: default
via: 192.168.11.1
nameservers:
addresses: [192.168.11.1,8.8.8.8]
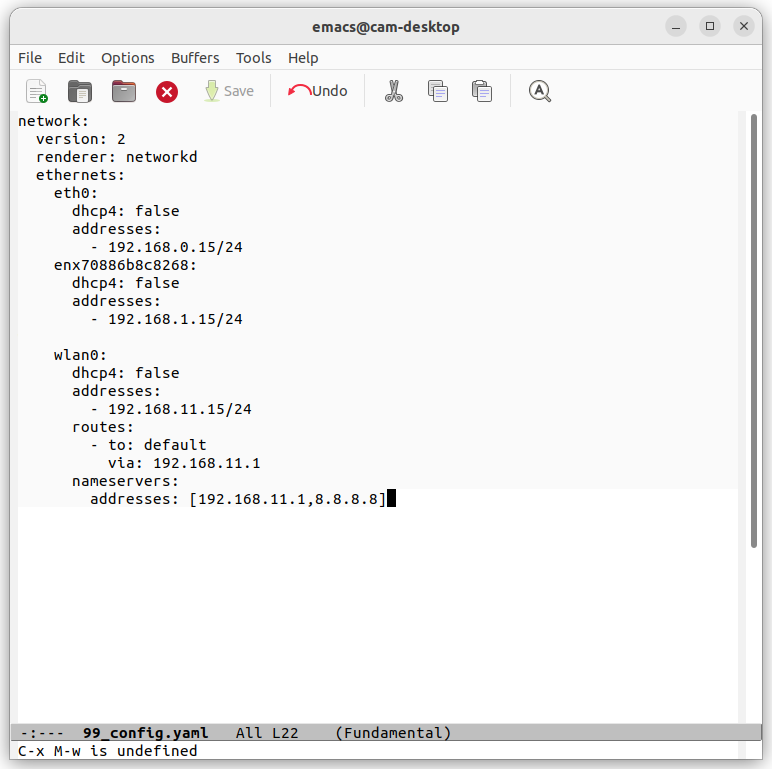
と変更しました。(8.8.8.8は多分不要です)。無線LANも192.168.1.15で固定しました。
$ sudo netplan apply
で設定を有効にします(エラーの場合、エラーの内容が表示されます)。
なお、上記はタブ(空白?)位置が崩れているので、設定する方は十分にタブ(空白?)位置を意識して変更してください。
これで、安定して起動する(?)と思います。
(嘘です。毎日安定して動きません。上記の内容毎日変わっています)
カメラの設定を変えたい時に、こういう手動の技が使えるようです。
192.168.0.2 admin/jvc でアクセスできます。
ところで、ブリッジモードにする場合、何もすることがありません(というか、"できません")
あたりまえなんですけどね、ブリッジモードとは、一言で言うと「ハブ」です。
ですので、装置にIPアドレスの付与なんで必要ないんですよね ―― なんでIPアドレスを設定できないのかで、たっぷり30分は悩んだ。ーーー 私はバカか。ハブにアドレス設定できるかアホ。
ここに結線すると、そのセグメント(e.g 192.168.11.0/255.255.248.0)が、黄色い有線ポートと無線LANに、そのまま拡張されるから。
ちなみに、DHCPとかその他の設定も、ベースとなるセグメントのネットワークの設定に従うだけだから、何もできません。
ラズパイ4のGUIから無線ネットワークを固定IPアドレスにする方法
今回の実験のケースでは、
192.168.11.232/ 255.255.248.0 / 192.168.11.1 あたりにすれば良いのであろう(多分)。